• Skip to secondary menu
  • Skip to main content
  • Skip to primary sidebar
  • Skip to footer
  • Home
  • About
    • Email Me
    • Disclosure & Copyright
  • Start Here
  • Subscribe
  • Privacy Policy
  • Books for Moms

Creative Family Fun

Your one-stop shop for kids activities and family fun

  • Facebook
  • Instagram
  • Pinterest
  • Twitter
  • Spelling Activities
  • Family Fun
  • STEM
  • Movie Night
  • Toddler Activities

Crafts

Hole-Punched Bookmark Craft for Kids

September 8, 2015 By Terri Thompson

My girls are readers.

Plus, my 3rd grader takes after me and has several books going at one time. Between the three of us girls, we use A LOT of bookmarks.

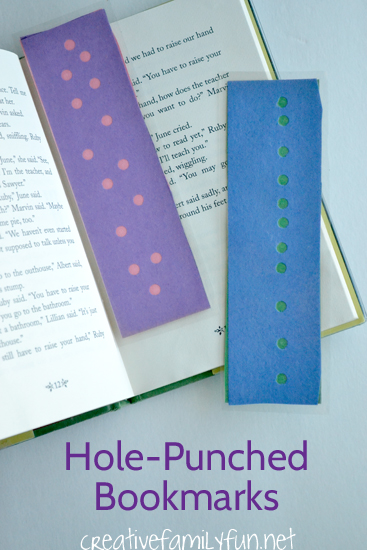
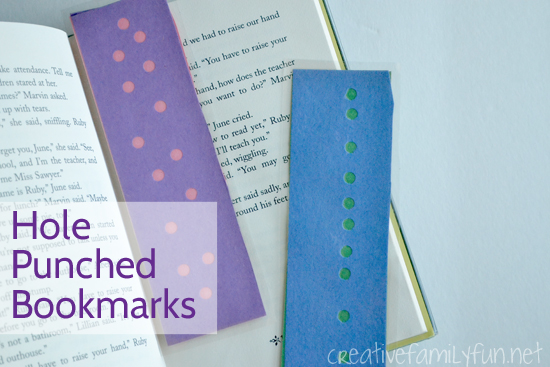
When we discovered our bookmark supply was getting low, we decided to get a little bit crafty and create a fun bookmark craft for kids. These hole-punched bookmarks are easy to make and turn out beautiful.

Exercise your fine motor skills when you make this fun hole-punched bookmark craft for kids. Personalize them with your favorite color combinations.

Disclosure: This post contains Amazon Affiliate and other affiliate links. Please see my disclosure for more details.

Supplies Needed:

2 colors of construction paper for each bookmark
Ruler
Scissors
Hole punch
Glue stick
Laminator (optional)
Exercise your fine motor skills when you make this fun hole-punched bookmark craft for kids. Personalize them with your favorite color combinations.

How to make your bookmark craft for kids:

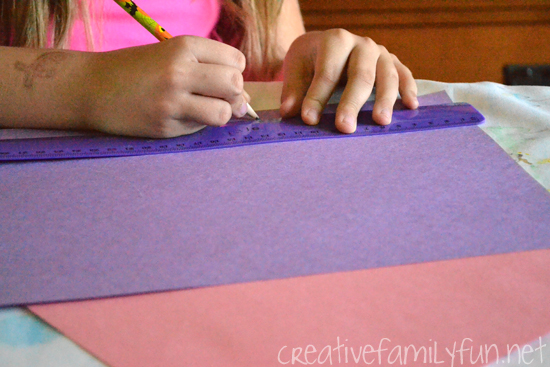
For the first step in the project, we measured and cut our bookmarks.

We went with a bookmark size of 2 inches by 7 inches so it would work in both smaller and larger books.

For each bookmark, we used two different colors of paper.

Exercise your fine motor skills when you make this fun hole-punched bookmark craft for kids. Personalize them with your favorite color combinations.

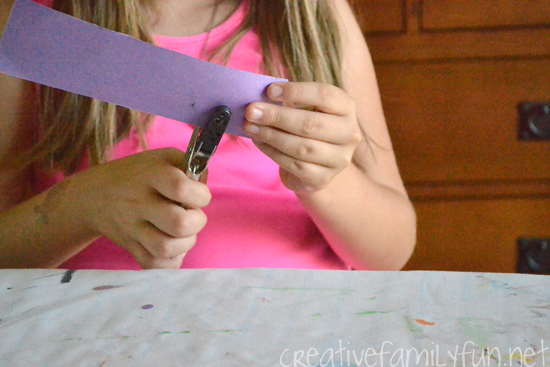
We layered our paper together and decided which would be the front and which would be the back. We used our hole punches to create a pattern of holes in our front layer of paper.

Create swirls, zig zags, straight lines, or a random smattering. Anything will look good.

After the holes were punched, we layered our hole-punched paper on top of our bottom layer. The bottom color peeks through the holes giving the bookmark a fun polka-dot look.

Next, we glued the two sheets of paper together. We used glue sticks for a quicker drying time.

Exercise your fine motor skills when you make this fun hole-punched bookmark craft for kids. Personalize them with your favorite color combinations.

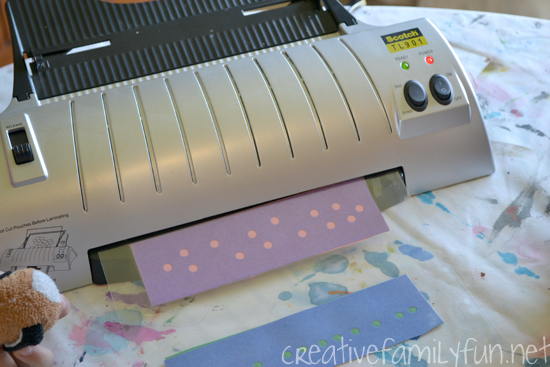
Laminate for duribility

You can leave your bookmarks as is, or laminate them to make them sturdier. We chose to laminate.

I took our bookmarks and put them inside a laminating sheet. I left enough room to cut each one out. We then ran our bookmarks through the laminator.

Cut out your bookmarks, leaving a little bit of laminating plastic around the edges.

(Note: Here is the link to the laminator I own. I love it!)

Once our bookmarks were done, we immediately put them to the test. Yep, they work! It’s time to get reading!

Exercise your fine motor skills when you make this fun hole-punched bookmark craft for kids. Personalize them with your favorite color combinations.
If you enjoyed this bookmark craft for kids, the above photo is perfect for saving on Pinterest.

You may also like one of these crafts for kids:

Koala Bear Bookmarks

Crayon Transfer Library Totes

Egg Carton Fairy Houses

Pressed Leaves and Flowers Bookmarks at Buggy and Buddy

Easy Suncatcher Craft for Kids

August 14, 2015 By Terri Thompson

I love hanging my kids’ suncatchers in my windows. They’re always so colorful and cheerful.

Today, I’d like to welcome another guest poster, Ann from Little Worlds. She’s sharing a beautiful suncatcher craft for kids that is super-easy and super-fun. Take it away Ann!

Get out the Sharpies to make this beautiful and easy suncatcher craft for kids. Your kids will love expressing their creativity with this project.

This easy suncatcher craft has been a favourite of my 4 year old daughter for a while now.

She loves to make art work to hang up in her room and around the house. And these suncatchers are both gorgeous and simple enough for preschoolers to make by themselves.

Let me quickly talk you through the process.

Disclosure: This post contains Amazon Affiliate links and other affiliate links. Please see my disclosure for more details.

Get out the Sharpies to make this beautiful and easy suncatcher craft for kids. Your kids will love expressing their creativity with this project.

How to make this easy suncatcher craft for kids

You only need a few materials to make these suncatchers: plastic lids, Sharpies and washi tape.

Children will love drawing with Sharpies on the plastic lids. It’s a different experience from drawing on paper and I found that my daughter was intrigued by how her drawings looked when she held them against the light.

She probably made a dozen drawings, from drawing objects in detail to wildly abstract scribbles. It seemed like she wanted to try out a few different techniques.

Get out the Sharpies to make this beautiful and easy suncatcher craft for kids. Your kids will love expressing their creativity with this project.

Add washi tape for a pretty finishing touch

Once the drawings are finished you can let the children frame their art work by putting washi tape around the edges.

Some good fine motor skills are needed for this and they might not be able to finish it very neatly. It doesn’t really matter.

I noticed that my daughter prefers to do things by herself and is more proud of her creations when she’s needed no help from me.

You can hang up the suncatchers any way you like. Since we had so many, we made a little banner by punching a few holes near the edge and put some string through. It looked very pretty over our tea party set up!

Get out the Sharpies to make this beautiful and easy suncatcher craft for kids. Your kids will love expressing their creativity with this project.

There’s something completely adorable about simple preschool crafts. I love how they are a bit all over the place and how they can just sum up your little one’s character in one image. I wish I could hold on to all of those gorgeous creations!

There are so many ways to have fun with this little suncatcher craft for kids.

These suncatchers could be made to hang in the classroom.

They could be used for writing or coloring in names.

If you trust your toddler with a Sharpie, you could let them have a go and creatively display their art work.

You could make gifts for grandparents.

You can take it any way you want really.

Feel free to share your creative ideas in the comments below!

Get out the Sharpies to make this beautiful and easy suncatcher craft for kids. Your kids will love expressing their creativity with this project.


About Ann

Ann is a former OT and mother of two little ones. She spends her days running around, trying to keep up with her family. On her blog Little Worlds she shares creative play ideas and tutorials for handmade toys that spark the imagination and encourage creativity. Ann was born in Belgium and is currently living in beautiful New Zealand. And yes, as a true Belgian she eats chocolate every day!
You are welcome to join the creative play community on Facebook, see what Ann and her family get up to during the week on Instagram and follow her trail of play inspiration on Pinterest.

You may also like one of these kids craft ideas:

Craft Stick Collage

Easy Fingerprint Strawberries

Hand Print Sunflower

Sweet and Simple Rainbow Necklace Craft at Little Worlds

Egg Carton Galaxy Craft at Little Worlds

Spoon Bear Craft for Kids

July 23, 2015 By Terri Thompson

My favorite kinds of kids crafts are ones that can be used as a toy later. This fun and easy spoon bear craft is the perfect example.

Today I’d like to welcome a special guest, Amanda from Easy Crafts for Kids. She’s going to share a fun puppet craft that I know you and your kids will love. Take it away Amanda!


Time for a bit of let’s pretend with Easy Crafts for Kids and their Crafty Critters! Make our spoon bear and then don’t stop there – make him some animal friends too!

Disclosure: There are Amazon Affiliate and other affiliate links in this article which means, at no additional cost to you, we could receive compensation for our recommendations. You can read our full disclosure policy on our Disclosure Page for more details.

Craft Supplies Needed:

Plastic spoon, glue, markers, pipe cleaner, craft foam, googly eyes and pom pom

Recommended Age Range:

4 years old and up

Time to Complete:

30 minutes

Step #1:

Grab a brown marker (you can choose to make your bear grey or black too). Color the back side of the spoon completely with the marker.

Step #2:

Glue on your googly eyes and a pom pom for a nose. We found that using a hot glue gun will help these stay in place better – just remember hot glue guns require adult supervision!

Make a cute and simple spoon bear craft for kids. It's fun to make and later to play with as a bear puppet or story-telling prompt.

Step #3:

Bend a brown pipe cleaner into two small circles, these will be your bear ears. Cut out two circles of pink craft foam to fit in the middle of these circles. Glue the craft foam in place.

Step #4:

Glue the pipe cleaner ears to the inside of the spoon at the bottom (which is the top of your bears’ head).

Come see all our easy crafts for kids! We have tons of crafts and we will keep you entertained for hours and hours.

Easy Crafts for Kids is a one stop shop for kids crafts for all ages and occasions! Come see what our Crafty Critters are up to!

You may also like one of these fun animal crafts:

Cardboard Tube Bear 

Polar Bear Bookmark

All About Tigers: Books, Crafts, and Activities

Paper Bag Animals at Easy Crafts for Kids

Water Bottle Piggy Bank at Easy Crafts for Kids

Crayon Transfer Library Totes

September 9, 2014 By Terri Thompson

I don’t know about you, but I can’t go to the library without a bag to hold all my books. It’s crucial, especially when you like to check out piles of books!

We some fun personalized bags inspired by a new favorite children’s book. Read along to find out how we made our crayon transfer library totes.

*This post is written in partnership with Penguin Kids in celebration of the book The Day the Crayons Quit. They provided us with copies of the books for inspiration. This post contains Amazon Affiliate and other affiliate links. Please see my disclosure for more details.

Draw on sandpaper and transfer your design to a fun bag when you make these Crayon Transfer Library Totes inspired by The Day The Crayons Quit.

Have you ever read The Day the Crayons Quit by Drew Daywalt and illustrated by Oliver Jeffers?

It’s a delightful book that consists of letters from all of Duncan’s crayons who are ready to do something different. We love it!

Penguin Kids invited us to join them in their month-long celebration of this book. The crayons have gone on strike! And, we’ve given them reason to come back and have fun with our crayon transfer library totes.

Draw on sandpaper and transfer your design to a fun bag when you make these Crayon Transfer Library Totes inspired by The Day The Crayons Quit.

Supplies Needed for Your Crayon Transfer Library Totes

Fine sandpaper
Tote bag
Crayons (use your broken pieces for this project)
Newspaper
Iron

Draw on sandpaper and transfer your design to a fun bag when you make these Crayon Transfer Library Totes inspired by The Day The Crayons Quit.

Create Your Drawings

Before beginning the process, decide what you wanted to draw.

We made drawings inspired by all the things the crayons wanted to draw in the book, such as black rainbows and pink dinosaurs and horses.

Use your crayons to draw your picture on your sandpaper. I tested a couple of different types of sandpaper and found that the fine grit worked the best for this project. The coarse grit did not transfer our designs onto the tote bag well at all, so pick up the finest grit you can find.

Draw on sandpaper and transfer your design to a fun bag when you make these Crayon Transfer Library Totes inspired by The Day The Crayons Quit.

Color your pictures as heavy as possible.

This is a great project to use up some of your broken pieces of crayon. The sandpaper will eat away at the crayons, so you won’t want to use your brand new box.

Also, note that because of the iron-on transfer process, if you want to write any words, you will need to write everything backwards!

Draw on sandpaper and transfer your design to a fun bag when you make these Crayon Transfer Library Totes inspired by The Day The Crayons Quit.

Transfer Your Design

Once you’re finished with your drawing, slide a piece of cardboard inside of your tote bag.

Then turn your sandpaper upside down and center it onto your tote bag.

Draw on sandpaper and transfer your design to a fun bag when you make these Crayon Transfer Library Totes inspired by The Day The Crayons Quit.

Place a sheet of newspaper over top. We had scattered bits of crayon on the back of our sandpaper and I did not want that on my iron. The newspaper will protect your iron.

Heat your iron to it’s highest setting and start ironing over the newspaper. Move back and forth over your newspaper to transfer your drawing. You’ll need to iron for a good five minutes.

If you lift up your newspaper, you’ll see wax coming through to the back. This is a good way to see if you’re close.  Avoid lifting the sandpaper until your design is transferred.

Beware, the sand paper is very hot after ironing and will need to cool a bit before you can safely lift it. My girls helped with this process, but it does require close adult supervision.

After your design is transferred, throw your crayon transfer tote bag in the dryer for about 20 minutes to set your design.

Draw on sandpaper and transfer your design to a fun bag when you make these Crayon Transfer Library Totes inspired by The Day The Crayons Quit.

I hope our crayon transfer library bags convince the crayons to come back to work!

Do you want to join in the fun? There are two things you can do.

First, Penguin Kids is sponsoring a Pinterest sweepstakes where you can win a $100 AmEx gift card. You can find the details here at this link. The sweepstakes runs through Sept. 30, 2014. You can also click on the blue crayon below to go to the official Pinterest board for the contest.

Not only that, but I’ve got some extra copies of this book to give away. Yay!! Thank you Penguin Kids for helping me spread the love for The Day the Crayons Quit.
Would you like your own copy? It’s so easy to enter. Just comment below with your favorite Crayon color. I’ll randomly choose 3 of you to receive a hardcover copy of the book. Please make sure to leave me an email address so I can get a hold of you if you win! Sweepstakes ends Sept. 16, 2014.
Giveaway now closed.
Winners are: Virginia, Emily, and Anonymous (krrk80)
Congratulations!

You may also enjoy one of these fun projects:

School Spirit Washer Necklaces

Hole-Punched Bookmark Craft for Kids

Cardboard Tube Yeti Craft for Kids

Simple Ribbon Bookmarks at My Joy-Filled Life

Pony Bead and Salt Dough Ornaments

September 8, 2014 By Terri Thompson

I love playing around with salt dough. It’s a great sensory experience, plus you can create and keep your masterpieces.

With this project, we tried two new things. We colored the salt dough before creating and added pony beads to decorate our designs. The resulting pony bead and salt dough ornaments were so pretty!

Use colored salt dough and pony beads to make these pretty salt dough ornaments that can be used for Christmas or year-round decorations.

Disclosure: This post contains Amazon Affiliate and other affiliate links. Please see my Disclosure Page for more details. The pony beads were provided to us by CraftProjectIdeas.com. All ideas are my own. 

The first step in the process is making your salt dough.

We use a very simple recipe that your kids can make themselves.

Use colored salt dough and pony beads to make these pretty salt dough ornaments that can be used for Christmas or year-round decorations.

Colored Salt Dough

1 c flour
1 c salt
1/2 c water
Several drops of food coloring

Mix the flour and salt together.

Add your food coloring to your water until your have your desired hue. Then, add the water to the flour and salt mixture.

Mix together until combined. Dig in with your fingers to help mix.

Once it’s thoroughly mixed, remove your dough from the bowl and start kneading until it’s pliable and no longer sticky.

You can knead in additional flour, one teaspoon full at a time, if your dough is too sticky. Just be careful and don’t add too much. Your dough can get crumbly very quickly if you add too much!

This makes about 2 cups worth of salt dough, which is enough for several children.

I cut the original recipe in half and made two batches of the half recipe, equivalent to one whole batch. I did two half recipes so each girl could have a different color of dough. Luckily, this recipe cuts in half very easily.

Use colored salt dough and pony beads to make these pretty salt dough ornaments that can be used for Christmas or year-round decorations.

Make your salt dough ornaments

Once your dough is ready to work with (and your kids are through playing with it), grab some cookie cutters and a rolling pin.

Roll the dough out to about a 1/4-inch thick and cut designs with your cookie cutters.

Use a drinking straw to make a hole in the top so that you can string a ribbon through later. I’ve tried several methods for making a hole and have found that a drinking straw works best.

Use colored salt dough and pony beads to make these pretty salt dough ornaments that can be used for Christmas or year-round decorations.

Add your pony beads

Next, get creative with your pony beads.

Squish the beads into the dough, but be careful not to push them all the way through.

Use as many or as few as you like.

We only had a package of white beads, but multi-colored beads would also be pretty.

Use colored salt dough and pony beads to make these pretty salt dough ornaments that can be used for Christmas or year-round decorations.

Harden and dry your ornaments

Once your ornaments are complete, place them on a foil-lined baking sheet.

You can leave them sitting on the baking sheet to dry (which can take a couple of days). So, to speed up the drying process, you can put them in the oven at the lowest setting for awhile. I baked ours for 1 and 1/2 hours at 250 degrees.

After baking, your ornaments may still not be completely dry. I always have to flip our ornaments over after they are done baking and let the bottom side dry. I usually leave them out overnight to finish drying.

Use colored salt dough and pony beads to make these pretty salt dough ornaments that can be used for Christmas or year-round decorations.

Once they are dry, add some ribbon and hang them up! You can string several on one length of ribbon to create a bunting, or you can hang them on a few bare branches to create a decorative tree. Or, make ornaments to hang on your Christmas tree.

These pony bead and salt dough ornaments are so pretty no matter what you do with them. Have fun and get crafting with salt dough!

You may also like on of these kids crafts:

Egg Carton Fairy Houses

Salt Dough Baseballs

Craft Stick Frames: Classic Craft for Kids

Colored Salt Dough Leaf Impressions at The Imagination Tree

Are you looking for more art projects?  

Check out Three to Five: Playful Preschool. Get over 25 activities, 10 printables, and links to even more play-based preschool activities in this fantastic e-book. Purchase it here.

https://www.creativefamilyfun.net/2014/05/three-to-five-playful-preschool.html
  • « Go to Previous Page
  • Page 1
  • Interim pages omitted …
  • Page 14
  • Page 15
  • Page 16
  • Page 17
  • Page 18
  • Interim pages omitted …
  • Page 31
  • Go to Next Page »

Primary Sidebar

Footer

Categories

Archives

Copyright © 2026 · Designed by The Blog Surgery

Creative Family Fun uses cookies to improve your experience. These cookies provide feedback to our analytics and advertisers. We use the information to track views of the site, where you go and to know if you are a regular visitor or brand new as well as provide a personalized experience where possible. We'll assume you're ok with this, but you can opt-out if you wish.Accept Reject Read More
Privacy & Cookies Policy

Privacy Overview

This website uses cookies to improve your experience while you navigate through the website. Out of these, the cookies that are categorized as necessary are stored on your browser as they are essential for the working of basic functionalities of the website. We also use third-party cookies that help us analyze and understand how you use this website. These cookies will be stored in your browser only with your consent. You also have the option to opt-out of these cookies. But opting out of some of these cookies may affect your browsing experience.
Necessary
Always Enabled
Necessary cookies are absolutely essential for the website to function properly. This category only includes cookies that ensures basic functionalities and security features of the website. These cookies do not store any personal information.
Non-necessary
Any cookies that may not be particularly necessary for the website to function and is used specifically to collect user personal data via analytics, ads, other embedded contents are termed as non-necessary cookies. It is mandatory to procure user consent prior to running these cookies on your website.
SAVE & ACCEPT