• Skip to secondary menu
  • Skip to main content
  • Skip to primary sidebar
  • Skip to footer
  • Home
  • About
    • Email Me
    • Disclosure & Copyright
  • Start Here
  • Subscribe
  • Privacy Policy
  • Books for Moms

Creative Family Fun

Your one-stop shop for kids activities and family fun

  • Facebook
  • Instagram
  • Pinterest
  • Twitter
  • Spelling Activities
  • Family Fun
  • STEM
  • Movie Night
  • Toddler Activities

Crafts

30+ Fun Recycled Crafts for Kids

March 7, 2014 By Terri Thompson

I love using recycled materials for crafting.

They are easy to find, don’t cost a thing, and the possibilities are endless.

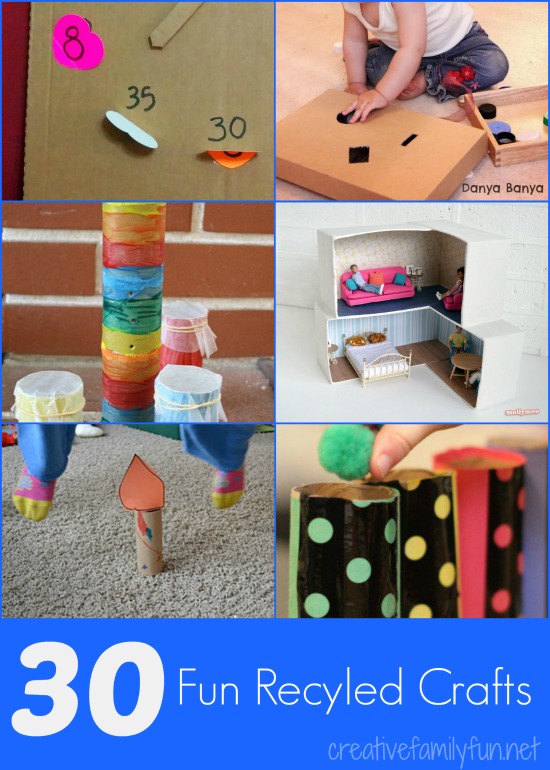
Here are over 30 great recycled crafts for kids that I know you’ll want to try.

Grab your supplies from the recycling bin to make some of the ideas from this fun collection of recycled crafts for kids.

Disclosure: There are Amazon Affiliate and other affiliate links in this article which means, at no additional cost to you, we could receive compensation for our recommendations. You can read our full disclosure policy on our Disclosure Page for more details.

Cardboard Tubes

Explore sound and make a kazoo with Buggy and Buddy

Make a DIY fine motor sorting activity with Dirt And Boogers

Create Jack Be Nimble candlesticks with Creative Family Fun

Make the Three Little Pigs and the Big Bad Wolf with Red Ted Art

Create a textured baby play station with Kids Activities Blog
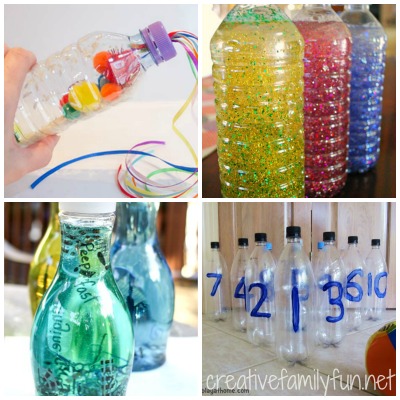
Grab your supplies from the recycling bin to make some of the ideas from this fun collection of recycled crafts for kids.

Plastic Bottles

Make floating word discovery bottles with Play Trains

Make flower prints with empty soda bottles with Inner Child Fun

Have fun with plastic bottle bowling with Learn With Play At Home

Make sun and rain inspired sensory bottles at Creative Family Fun

Make rainbow music shakers with My Little 3 and Me

Cardboard Box

Make baby activity boxes with Danya Banya

Create and play with a cardboard cafe from Inner Child Fun

Play with a homemade cardboard knight’s shield with Red Ted Art

Make a shoe box doll house with MollyMoo
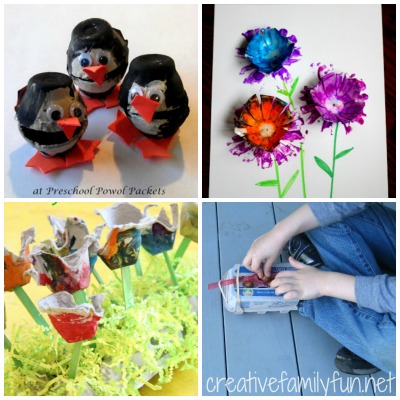
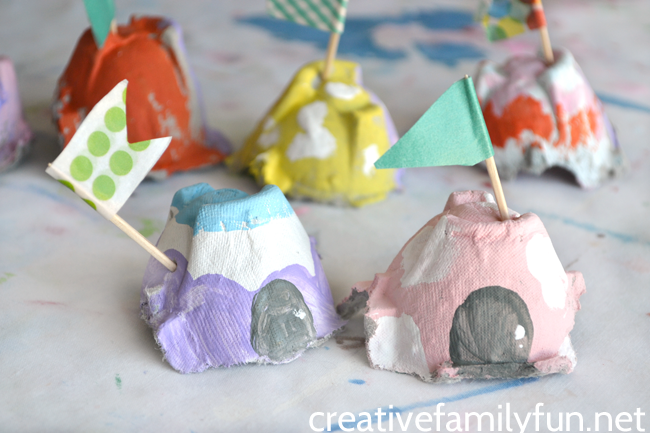
Grab your supplies from the recycling bin to make some of the ideas from this fun collection of recycled crafts for kids.

Egg Cartons

Make egg carton rainbows with Creative Family Fun

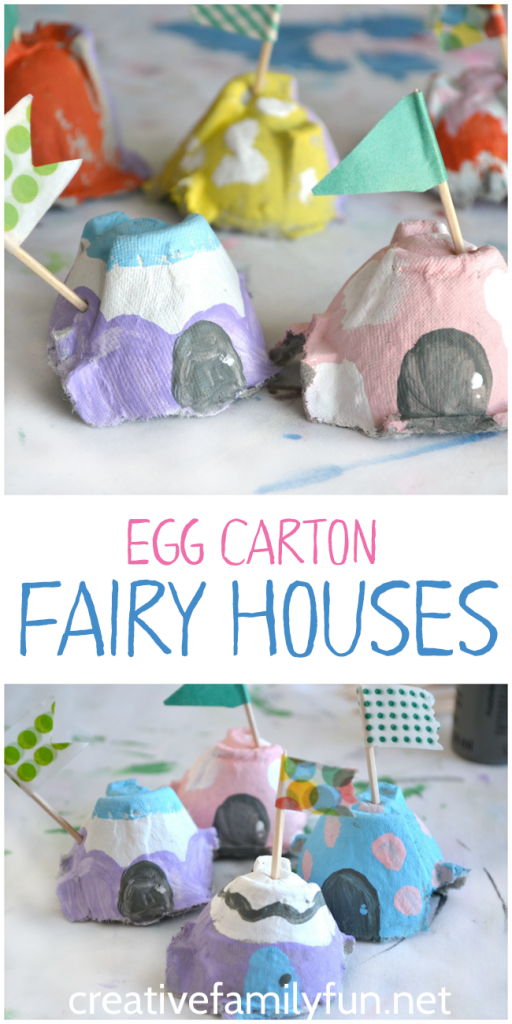
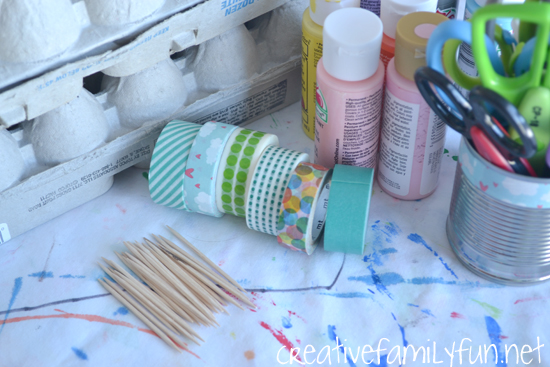
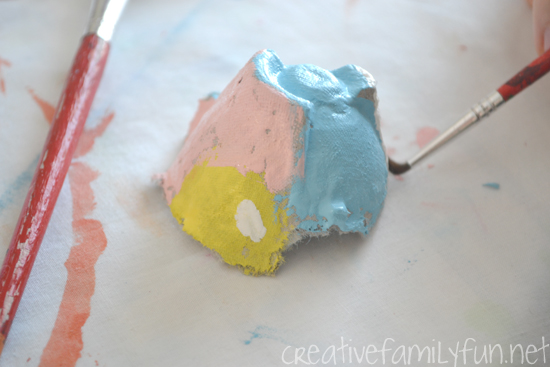
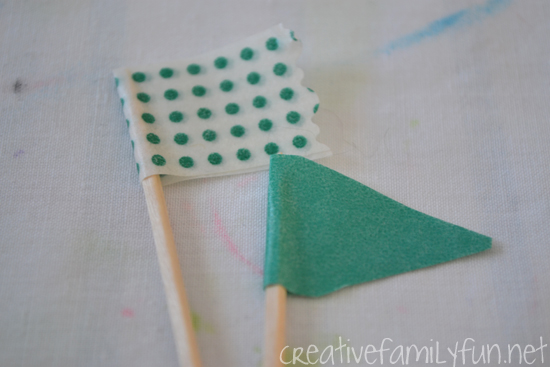
Make egg carton fairy houses with Creative Family Fun

Turn egg cartons into pretty spring tulips at the OT Toolbox.

Make peek-a-boo penguins with Preschool Powol Packets

Make egg carton spring flowers with Toddler Approved

Experiment with an egg carton catapult with JDaniel4’s Mom

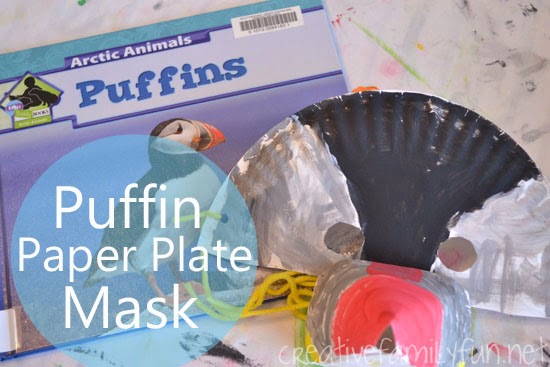
Magazines, Newspapers, and Other Recycled Paper

Do some recycled magazine weaving with Handmade Kids Art

Make itsy bitsy spiders from magazine pages with Creative Family Fun

Create with recycled paper beads from Handmade Kids Art

Make newspaper play structures with Inner Child Fun
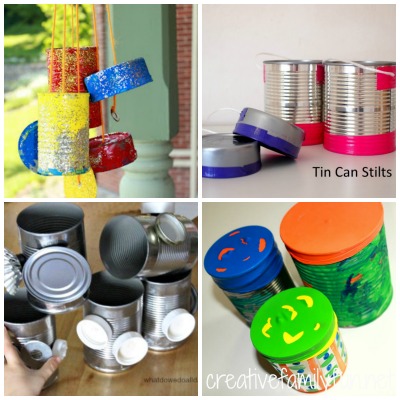
Grab your supplies from the recycling bin to make some of the ideas from this fun collection of recycled crafts for kids.

Tin Cans

Make tin can stilts with Pink Stripey Socks

Make colorful outdoor wind chimes with Hands On: As We Grow

Turn your cans into magnetic building blocks with What Do We Do All Day?

Make tin can drums with Hands On: As We Grow

Create fun Recycled Robots at Creative Family Fun

Make tin can flower pots with NurtureStore

Which of these recycled crafts for kids do you want to try with your family?

Egg Carton Fairy House Craft

March 5, 2014 By Terri Thompson

My girls are slightly obsessed with fairies.

They love Tinkerbell and have several fairy dolls.

We’ve read more of Rainbow Magic Fairies books than I can even count.

So, you can image they came running when I suggested this simple egg carton fairy house craft.

Fairy houses are tiny little things and rather magical and colorful, at least that’s how we imagined them. Of course, the very best thing about Egg Carton Fairy Houses is that they are very fun to make.

Use egg cartons to make a whole village of fairy houses. This fairy house craft is fun to create and fun for pretend play.

The best part about this egg carton craft is that we used what we had. We didn’t have to go out and buy any special craft supplies.

We shuffled through our craft supplies and found everything we could possibly need for a fun afternoon of crafting.

Disclosure: There are Amazon Affiliate and other affiliate links in this article which means, at no additional cost to you, we could receive compensation for our recommendations. You can read our full disclosure policy on our Disclosure Page for more details.

Use egg cartons to make a whole village of fairy houses. This fairy house craft is fun to create and fun for pretend play.

Supplies Needed

Egg carton
Craft paint
Toothpicks
Washi tape
Scissors

Use egg cartons to make a whole village of fairy houses. This fairy house craft is fun to create and fun for pretend play.

How to make your egg carton fairy house craft

To begin, we took an egg carton apart into individual cups.

Egg cartons tear easily and there was no need to get the scissors out for this step.

The girls and I sat and tore our egg cartons apart until we got to the perfect fairy house shape. We did use the scissors to trip off any rough edges.

The next step was the fun step… painting!

Use egg cartons to make a whole village of fairy houses. This fairy house craft is fun to create and fun for pretend play.

We painted our fairy houses with acrylic paint for better coverage.

My girls are older, so I don’t worry as much about mess, but if that is a concern, you can use washable craft paint instead.

Paint the fairy houses however you imagine them. We had stripes, polka dots, color blocks, and plenty of pastel colors.

Each and every house had a tiny door so the fairies could come and go.

While we were painting, we talked about all our little fairy friends that were going to move into our village.

Use egg cartons to make a whole village of fairy houses. This fairy house craft is fun to create and fun for pretend play.
 

To finish up our houses, we made tiny little flags out of washi tape and toothpicks.

The flags are simple. Fold a piece of tape around one end of a toothpick and then use your scissors to cut the ends to make a pretty design.

Use egg cartons to make a whole village of fairy houses. This fairy house craft is fun to create and fun for pretend play.

Do you have fairy lovers at your house?

You should spend some time together creating this egg carton fairy house craft.

Not only is it a fun craft to make together, but they’re also perfect for hours of imaginative play!

You can find more easy kid’s crafts here:

Crayon Transfer Library Totes

My Book of the Four Seasons: A Paper Bag Book

Classic Crafts: God’s Eye

Cardboard Cookies

Simple Clothespin Fairy Dolls at Toddler Approved

Cereal Box Stencils

March 4, 2014 By Terri Thompson

If you’re anything like me, you’ve got a recycle bin that is constantly overflowing. But did you know that some of the stuff in your recycle bin are perfect for crafting? We use recycled materials in crafts all the time. We even keep some of our craft supplies in cleaned out cans and plastic bins. Today, we’re going to make a fun crafting tool out of recycled cereal boxes: stencils.

Disclosure: There are Amazon Affiliate and other affiliate links in this article which means, at no additional cost to you, we could receive compensation for our recommendations. You can read our full disclosure policy on our Disclosure Page for more details.

I kept the stencils simple and made only geometric shapes. We had a square, circle, triangle, and rectangle. But, don’t stop there! Make hearts, stars, octagons, ovals, and more. This is a fun tool for kids who are just learning their shapes. Or, in the case of my girls, just a fun art tool. I set the stencils out with a pile of blank paper, markers, colored pencils, and crayons. Both girls created pictures of all kinds with the stencils.

How to make the stencils: Flatten the cereal box and divide into sections. I used the larger flat sides and cut each side in half. I drew a simple shape on each piece of cardboard. I used a little help to make my shapes. I traced one of our drinking glasses for the circle and used a ruler for the other shapes. I used a sharp pair of scissors to cut out the insides because I wanted to preserve the inner shape. We used those to trace around for a different type of stencil. The process of making the stencils couldn’t be easier.

For just a little work, you can have a fun set of free stencils. Learn your shapes, make pictures, and have fun. Miss 1st Grader loves to combine the circle with the triangle to make a whole pile of girls in pretty dresses. Miss Preschool was creating simple houses. Keep these on hand for a fun twist to art time and let your kids’ imaginations run wild.

Are you wondering what else you can use from your recycle bin? Check out this post: Favorite Craft Supplies From the Recycle Bin.

Olympic Rings Collage

February 10, 2014 By Terri Thompson

Have you been watching the Olympics?

We have and we’ve been loving every minute. Of course, we couldn’t let the moment pass without some fun activities.

This week at Creative Family Fun, we will be celebrating the Winter Olympics with some fun crafts and activities. And, we’re starting out with this fun Olympic Rings collage.

Disclosure: There are Amazon Affiliate and other affiliate links in this article which means, at no additional cost to you, we could receive compensation for our recommendations. You can read our full disclosure policy on our Disclosure Page for more details.

Supplies Needed:

Thin cardboard (cereal or cracker boxes)
2 sizes of circles to trace
Scissors
Paint (Red, black, blue, green, and yellow)
Paper, ribbon, and fabric scraps in the same colors as your paint

To begin, we traced 5 circles on our cereal boxes. We used a saucer for our outer circle and a jar lid for the inner circle.

Our circles were big, so we were only able to get two rings from each cereal box. Good thing I’ve been hoarding cereal boxes!

Once we had our circles traced, we cut out our rings.

Once we had our rings cut out, we started painting.

You can view a picture of the rings and the Olympic flag here. We had a red, blue, black, yellow, and green ring.

After painting, we started on our collages.

We had sorted through a lot of our scraps we save for collages. We had fabric, paper, foam pieces, tissue paper, and ribbon. You can also use magazine pages or card scraps. Anything that you can glue down to your cardboard ring would work. We found all sorts of fun things for our collages.

Once we were finished and our glue had dried, we arranged them in the correct order.

We’ll be hanging them up outside the girls’ room, which has been renamed Olympic Village for the duration of the games.

Our resident pretend snowboarder and pretend figure skater need a place to stay while competing!

To Learn More About the Olympics:

Visit Fact Monster for a lot of fun facts about the Olympics, including the meaning of the colors in the Olympic Rings.

The official Sochi 2014 Website will keep you up-to-date on all the Olympic results. Find out the countries involved, the sporting events, and a medal count.

For another kid project, check out Crayon Box Chronicles. You can find out how to make a set of origami Olympic bracelets. So cool!

Paper Plate Puffin Masks

January 20, 2014 By Terri Thompson

This week, we’ll be doing some fun activities all about Arctic animals. We had a lot of fun learning about some of the different animals that live in the polar regions.

First up is the puffin. Did you know that puffins are so bad at flying that they often crash while landing? Or that puffin mothers only lay one egg at a time?

We learned all we could about these colorful birds and then made some fun paper plate masks so we could spend the rest of the day pretending to be puffins.

Disclosure: There are Amazon Affiliate and other affiliate links in this article which means, at no additional cost to you, we could receive compensation for our recommendations. You can read our full disclosure policy on our Disclosure Page for more details.

Supplies Needed:

Paper plate (1 per mask)
Scissors
Paint (Black, white, orange, red, yellow)
Clear tape
Hole punch
Yarn

To begin, cut your paper plate in half.

Fold the sides in on one of your halves, similar to the picture above. This will be your beak.

Turn the half over and start painting your strips

The curved, ridged side will be the part of the beak closest to your face.

While the paint on your beak is drying, cut out the eye holes on your other half. (I usually do this part myself since I use my sharpest scissors.)Draw a few guidelines and paint the head of your puffin. Use black to paint the middle section and leave the parts around the eyes white (or gray or red as my daughters preferred!).

After your paint has dried, overlap the folded ends of your beak and pull together. (See picture above.)

Allow the painted part of the beak to curve upwards. Tape your beak together securely.

Bend the top of your beak under just a bit and secure it to your head piece with more tape.

I taped on the beak directly underneath the eye holes.

See, looks just like a puffin profile!

The girls loved wearing their masks and running around like puffins.

Plus, some of those fun facts we read stuck securely in their minds. We love learning about animals and found the puffin endlessly fascinating.

For more information about puffins:

Read a book about puffins. Check at your library in the nonfiction section for a good choice. We read Puffins (Arctic Animals) by Julie Murray.

Check out the Atlantic Puffins Creature Feature at National Geographic Kids. Learn facts, look at pictures, see a map where they live, and even watch a short video.

Visit Project Puffin. Project Puffin from the National Audubon Society is chock full of information. Find out about research project and conservation efforts. And, in the spring, during mating season, they’ve got a couple of puffin cams for you to watch!

Have fun learning about puffins!

  • « Go to Previous Page
  • Page 1
  • Interim pages omitted …
  • Page 16
  • Page 17
  • Page 18
  • Page 19
  • Page 20
  • Interim pages omitted …
  • Page 31
  • Go to Next Page »

Primary Sidebar

Footer

Categories

Archives

Copyright © 2026 ยท Designed by The Blog Surgery

Creative Family Fun uses cookies to improve your experience. These cookies provide feedback to our analytics and advertisers. We use the information to track views of the site, where you go and to know if you are a regular visitor or brand new as well as provide a personalized experience where possible. We'll assume you're ok with this, but you can opt-out if you wish.Accept Reject Read More
Privacy & Cookies Policy

Privacy Overview

This website uses cookies to improve your experience while you navigate through the website. Out of these, the cookies that are categorized as necessary are stored on your browser as they are essential for the working of basic functionalities of the website. We also use third-party cookies that help us analyze and understand how you use this website. These cookies will be stored in your browser only with your consent. You also have the option to opt-out of these cookies. But opting out of some of these cookies may affect your browsing experience.
Necessary
Always Enabled
Necessary cookies are absolutely essential for the website to function properly. This category only includes cookies that ensures basic functionalities and security features of the website. These cookies do not store any personal information.
Non-necessary
Any cookies that may not be particularly necessary for the website to function and is used specifically to collect user personal data via analytics, ads, other embedded contents are termed as non-necessary cookies. It is mandatory to procure user consent prior to running these cookies on your website.
SAVE & ACCEPT