• Skip to secondary menu
  • Skip to main content
  • Skip to primary sidebar
  • Skip to footer
  • Home
  • About
    • Email Me
    • Disclosure & Copyright
  • Start Here
  • Subscribe
  • Privacy Policy
  • Books for Moms

Creative Family Fun

Your one-stop shop for kids activities and family fun

  • Facebook
  • Instagram
  • Pinterest
  • Twitter
  • Spelling Activities
  • Family Fun
  • STEM
  • Movie Night
  • Toddler Activities

Holidays

Plastic Egg Bunnies and People

April 1, 2014 By Terri Thompson

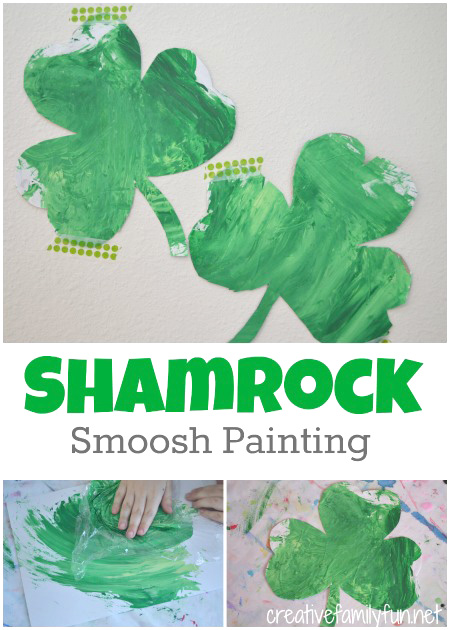
You know what’s fun? Turning things over to the girls and letting them invent, create, and have fun. When we found out that Tinkerlab was having another Creative Challenge for kids, we were all in. The challenge this month, eggs.

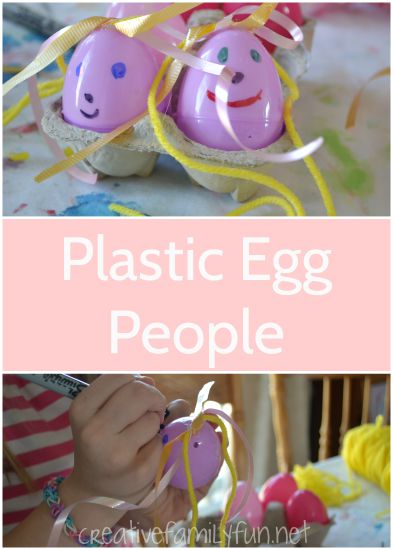
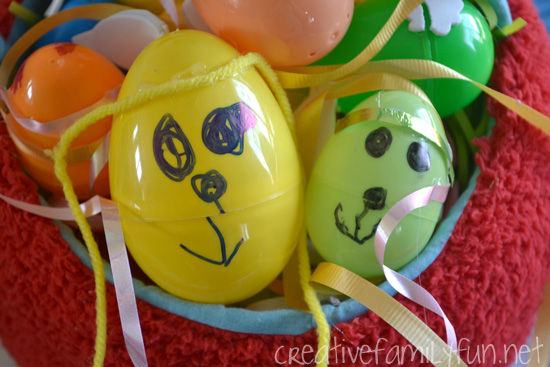
What can you do with eggs? We made plastic egg bunnies and people too!

Turn your plastic Easter eggs into fun bunnies and cute kids. This fun kids craft is open-ended and creative. Try this fun activity, Plastic Egg Bunnies, this Easter.

Disclosure: There are Amazon Affiliate and other affiliate links in this article which means, at no additional cost to you, we could receive compensation for our recommendations. You can read our full disclosure policy on our Disclosure Page for more details.

Set up your creative challenge

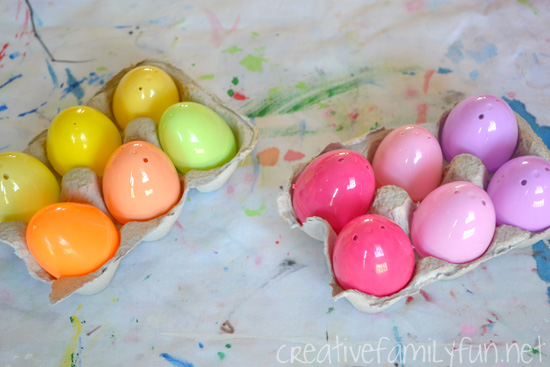
I began by pulling out our (way too) large collection of plastic eggs.

I asked my girls what they would like to make with the eggs.

They could turn them into something. They could use them to make art. Or, they could even make a game.

Turn your plastic Easter eggs into fun bunnies and cute kids. This fun kids craft is open-ended and creative. Try this fun activity, Plastic Egg Bunnies, this Easter.

The first thing they wanted to do was have an egg hunt. They love egg hunts.

But, I wanted them to think beyond the typical use. I nudged them past that idea and promised them lots of egg hunts up until Easter.

Now that that was settled, they moved on to bigger things. In the end, Miss First Grader wanted to make egg girls and Miss Preschooler wanted to make bunnies.

Turn your plastic Easter eggs into fun bunnies and cute kids. This fun kids craft is open-ended and creative. Try this fun activity, Plastic Egg Bunnies, this Easter.

How to make plastic egg bunnies and people

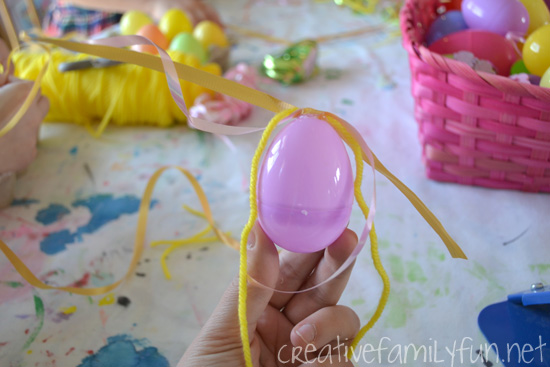
We talked about the items we needed and ended up with yarn, ribbon, and Sharpies. I got out the glue gun so we could attach the ribbon and yarn to the eggs.

The girls started creating. I was in charge of the glue gun. We only have a high heat glue gun and the girls really don’t like to use it. They ended up telling me where to put the glue and they did the rest.

Turn your plastic Easter eggs into fun bunnies and cute kids. This fun kids craft is open-ended and creative. Try this fun activity, Plastic Egg Bunnies, this Easter.

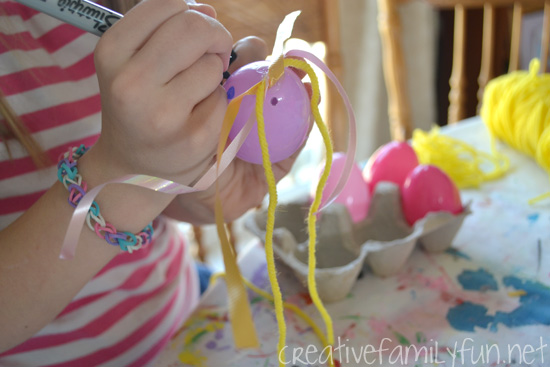
Once they were satisfied with their hair (or ears, or collars), they used the Sharpies to draw faces.

The process was very simple, but the process was their own. They laughed. They tried drawing the “cutest bunnies ever.” They got creative. And, they had fun making their plastic egg bunnies and people.

Who knows, maybe one of these days they’ll have their own crafty column here at Creative Family Fun!

Turn your plastic Easter eggs into fun bunnies and cute kids. This fun kids craft is open-ended and creative. Try this fun activity, Plastic Egg Bunnies, this Easter.

Do you want to follow along and see all the other great ideas? Stop by Tinkerlab by clicking the button below and check out all the creative kids. You can even link up your own!

Make it a family adventure!

Cost: Under $5. Plastic eggs are very inexpensive to buy if you don’t already have some extras.

Planning time: 5 – 10 minutes to gather supplies and set up an area for creating.

Ages: 5 and up. Make sure you have a grown-up helper or two if you’re using a glue gun.

Time needed: At least 30 minutes. Have extra time available if everyone gets in a creative groove.

To help move things along smoothly, set up creation stations. Have the loose parts in one area, the glue gun in another, and the markers in another. Have a grown-up sitting next to the glue gun to help the kids.

Turn your plastic Easter eggs into fun bunnies and cute kids. This fun kids craft is open-ended and creative. Try this fun activity, Plastic Egg Bunnies, this Easter.

You may also like one of these Easter activities for kids:

Egg Carton Easter Crafts

Watercolor Easter Egg Garland

Painted Easter Egg Suncatcher

Easter Egg Dye Pour Painting

Shamrock Smoosh St. Patrick’s Day Craft

March 13, 2014 By Terri Thompson

Do you do a lot of St. Patrick’s Day activities?

We don’t do a lot., but we’ll dress in green, read some awesome books, and make a St. Patrick’s Day craft or two.

Earlier, I shared our pretty shamrock rainbows and today we’re going to be doing a bit of smoosh painting. (Yes, I made up that term! It’s a fun word for a fun process)

Try some fun smoosh painting to create this pretty St. Patrick's Day craft for kids. The process is fun and the results are pretty with this sensory painting idea.

Disclosure: There are Amazon Affiliate and other affiliate links in this article which means, at no additional cost to you, we could receive compensation for our recommendations. You can read our full disclosure policy on our Disclosure Page for more details.

Supplies Needed:

White paper
2 – 3 shades of green paint
Plastic wrap
Scissors
Glue
Thin cardboard (we used a cracker box)

Try some fun smoosh painting to create this pretty St. Patrick's Day craft for kids. The process is fun and the results are pretty with this sensory painting idea.

How to make this fun St. Patrick’s Day craft

To begin, tear off a piece of plastic wrap for each child.

Next, squirt a little bit of each shade of green paint onto the plastic wrap. We were using three different paint colors, but any amount more than two will work.

Try some fun smoosh painting to create this pretty St. Patrick's Day craft for kids. The process is fun and the results are pretty with this sensory painting idea.

Next – and this is the best part – turn the plastic wrap paint side down on your paper and start smooshing.

Smoosh all over.

Smoosh the colors together.

Then smoosh, smoosh, smoosh until most of your paper is covered.

Try some fun smoosh painting to create this pretty St. Patrick's Day craft for kids. The process is fun and the results are pretty with this sensory painting idea.

This part of the process turned out to be a lot less messy than I anticipated.

To contain the mess, I had covered the table with an old sheet so the girls only ended up with a little bit of paint on their fingers.

The messiest part of the whole process was throwing away our paint-covered plastic wrap.

Try some fun smoosh painting to create this pretty St. Patrick's Day craft for kids. The process is fun and the results are pretty with this sensory painting idea.

While waiting for the paint to dry, cut a shamrock from your cereal box.

Shamrocks are not as complicated to draw as you might think. Draw three hearts with their point meeting in the middle, add a stem, and you’re done.

If you’re still not confident in your drawing abilities, do a quick Google search for a shamrock to trace.

Cut out the shamrock and brush glue all over it. We used a watered down glue (one part glue to one part water) to easily get coverage over the entire shamrock.

Try some fun smoosh painting to create this pretty St. Patrick's Day craft for kids. The process is fun and the results are pretty with this sensory painting idea.

Put your dried painting on top of the cardboard cutout, painted side facing out.

Then, press down until it’s stuck good.

We ended up putting ours under a heavy book for awhile to press it down and make sure our edges didn’t curl.

Once your glue is dry, use your cardboard as a guide to cut the paper.

And, you’re done!

Try some fun smoosh painting to create this pretty St. Patrick's Day craft for kids. The process is fun and the results are pretty with this sensory painting idea.

I love how these turned out… and I really loved the smooshy process we went through to make these fun shamrocks.

Have fun decorating with this awesome St. Patrick’s Day craft!

Try some fun smoosh painting to create this pretty St. Patrick's Day craft for kids. The process is fun and the results are pretty with this sensory painting idea.

You may also like one of these fun crafts for kids

My Book of the Four Season: A Paper Bag Book

Four Seasons Mobile with Recycled Coloring Books

Egg Carton Fairy Houses

Classic Crafts – Pom Pom Caterpillar

Shamrock Rainbows

10 Ways to Play This Weekend ~ All About Valentine’s Day

February 7, 2014 By Terri Thompson

I don’t know how things are at your house, but around here we’ve been knee deep in Valentine’s crafts and activities.

It’s quite possibly one of our favorite holidays for crafting and decorating.

Here are 10 Valentine’s activities I’ve found recently that would be perfect for some weekend fun.

Which one do you want to try?

Disclosure: There are Amazon Affiliate and other affiliate links in this article which means, at no additional cost to you, we could receive compensation for our recommendations. You can read our full disclosure policy on our Disclosure Page for more details.

Make animal out of hearts. Housing A Forest shows you how to make 7 different heart animals. (We’ve already made 3 and have plans to make all 7!)

Have fun painting with Conversation Heart Sensory Paint with Frogs, Snails, and Puppy Dog Tails.

Play with Cinnamon Heart Cloud Dough at And Next Comes L.

Do some Valentine’s Day Yoga with Kid Yoga Stories.

Make some mini sensory bin Valentines to give to your friends with Life Lesson Plans.

Make a string heart heart with How Wee Learn.

Do a Heart Tissue Paper by Number with Crayon Box Chronicles.

Conduct a Valentine potion and tasting experiment with Inspiration Laboratories.

Make salt dough heart magnets with The Connections We Share.

Make tin-foil and tissue paper hearts with Happy Hooligans.

And if you’re still looking for more activities, you can find all of our Valentine’s projects at this link.

How are you going to play this weekend?

Beaded Heart Pencil Toppers

February 6, 2014 By Terri Thompson

*Disclosure: CraftProjectIdeas.com provided most of the supplies used in this project. Project idea and opinions are my own. There are Amazon Affiliate and other affiliate links in this article which means, at no additional cost to you, we could receive compensation for our recommendations. You can read our full disclosure policy on our Disclosure Page for more details.

This year, we don’t have to worry about classroom Valentine’s. My daughter’s 1st grade class is working on them in school for a writing project. (I love this!)

But, if we did, we would have made even more of these fun beaded heart pencil toppers.

Add a simple gift tag and they’re ready to hand out to classmates – no candy required.

Supplies Needed:

Pencils
Fuzzy sticks/pipe cleaners
Variety of beads
Scissors & card stock (for gift tags)

To start the process, wrap one end of your fuzzy stick around the pencil. Wrap it around tight enough that it doesn’t slide up and down by itself.

Next start beading. We had a variety of beads: pony beads, tri-beads, fun star beads, and silver letter beads. The type of bead doesn’t matter, so use whatever you think looks best.

Keep beading until you are left with a long enough section of your pipe cleaner to wrap around your pencil again (at least 2 inches). I bent my stick in the shape of a heart before beading so I could see how my pattern was going. This step is not necessary.

We made patterns with our beads. We even spelled a few Valentine’s words, like “love” and “xoxo”, on a few. It would be fun to spell out classmates names!

Once you are finished beading, wrap the other end of your fuzzy stick around your pencil at the same place as you began. Overlap the initial wrapping so that the two ends stay together.

Shape your beaded stick into a heart. Pull the heart down so that the entire shape rests against your pencil. We left ours like this, but if you want to add a bit of stability, cut a small piece of pipe cleaner and secure the top bent section of your heart to the pencil.

Wouldn’t these make a perfect classroom Valentine? What are your kids handing out this year?

STEM at Home: Design a Valentine Card Holder

February 5, 2014 By Terri Thompson

STEM, which stands for science, technology, engineering, and mathematics, is an important concept in schools nowadays.

My 1st grader goes to a STEM school, so it’s emphasized on a daily basis. I love the concept and I love how my daughter’s day is more hands-on and less worksheet heavy.

We try to support this at home as much as we can.

When I was contemplating making Valentine’s Day card holders with my girls, I came up with several options. They were all standard crafts and would have been fun to do, but then it hit me… maybe I should let them design the card holders themselves. What would they come up with?

Disclosure: There are Amazon Affiliate and other affiliate links in this article which means, at no additional cost to you, we could receive compensation for our recommendations. You can read our full disclosure policy on our Disclosure Page for more details.

While they were off playing, I set out some supplies on the table.

Each girl had two paper plates. I then added Valentine stickers, markers, scissors, yarn, a stapler, paint brushes, red and pink paint, paper scraps, glue, and cardboard tubes shaped into hearts to the table.

I added a little note with the instructions. Step 1: Be an engineer! Design your card holder. Step 2: Construct your card holder. Step 3: Decorate. When they came to the table, I asked them to turn their two paper plates into a Valentine card holder.

They started bending and maneuvering right away. In my mind, I had envisioned stapling the two plates together into a pouch. (And that was what my project would have been if I had went with my original plan.)

But of course, my girls don’t think the way I do, nor do they spend time browsing through Pinterest to see all the wonderful Valentine’s Day ideas that are shared.

Miss First-Grader bent and stapled until her two plates resembled a mail box. Miss Preschool stapled and cut until her resembled a rather large platter. She must be expecting a lot of Valentines!

I was impressed with their ingenuity and loved their final product. I will admit, though, that it was really hard for me to just step back and let them create without my input.

Once they were finished, it was time to decorate. I think they used about every supply I had on the table.

They each added a giant string so that they could hang their holders from our highest curtain rod. They were proud of their card holders and, boy, did they ever have fun.

I loved this project even more than I would have if we would have made my original idea. The girls were able to be creative, to design, and to be an engineer. It was a fun process and one that we’ll do again and again.

The next time you want to do a craft, let your kids design it themselves. It’s so much fun to see what they make!

  • « Go to Previous Page
  • Page 1
  • Interim pages omitted …
  • Page 24
  • Page 25
  • Page 26
  • Page 27
  • Page 28
  • Interim pages omitted …
  • Page 39
  • Go to Next Page »

Primary Sidebar

Footer

Categories

Archives

Copyright © 2026 ยท Designed by The Blog Surgery

Creative Family Fun uses cookies to improve your experience. These cookies provide feedback to our analytics and advertisers. We use the information to track views of the site, where you go and to know if you are a regular visitor or brand new as well as provide a personalized experience where possible. We'll assume you're ok with this, but you can opt-out if you wish.Accept Reject Read More
Privacy & Cookies Policy

Privacy Overview

This website uses cookies to improve your experience while you navigate through the website. Out of these, the cookies that are categorized as necessary are stored on your browser as they are essential for the working of basic functionalities of the website. We also use third-party cookies that help us analyze and understand how you use this website. These cookies will be stored in your browser only with your consent. You also have the option to opt-out of these cookies. But opting out of some of these cookies may affect your browsing experience.
Necessary
Always Enabled
Necessary cookies are absolutely essential for the website to function properly. This category only includes cookies that ensures basic functionalities and security features of the website. These cookies do not store any personal information.
Non-necessary
Any cookies that may not be particularly necessary for the website to function and is used specifically to collect user personal data via analytics, ads, other embedded contents are termed as non-necessary cookies. It is mandatory to procure user consent prior to running these cookies on your website.
SAVE & ACCEPT