• Skip to secondary menu
  • Skip to main content
  • Skip to primary sidebar
  • Skip to footer
  • Home
  • About
    • Email Me
    • Disclosure & Copyright
  • Start Here
  • Subscribe
  • Privacy Policy
  • Books for Moms

Creative Family Fun

Your one-stop shop for kids activities and family fun

  • Facebook
  • Instagram
  • Pinterest
  • Twitter
  • Spelling Activities
  • Family Fun
  • STEM
  • Movie Night
  • Toddler Activities

Holidays

Pony Bead and Salt Dough Ornaments

September 8, 2014 By Terri Thompson

I love playing around with salt dough. It’s a great sensory experience, plus you can create and keep your masterpieces.

With this project, we tried two new things. We colored the salt dough before creating and added pony beads to decorate our designs. The resulting pony bead and salt dough ornaments were so pretty!

Use colored salt dough and pony beads to make these pretty salt dough ornaments that can be used for Christmas or year-round decorations.

Disclosure: This post contains Amazon Affiliate and other affiliate links. Please see my Disclosure Page for more details. The pony beads were provided to us by CraftProjectIdeas.com. All ideas are my own. 

The first step in the process is making your salt dough.

We use a very simple recipe that your kids can make themselves.

Use colored salt dough and pony beads to make these pretty salt dough ornaments that can be used for Christmas or year-round decorations.

Colored Salt Dough

1 c flour
1 c salt
1/2 c water
Several drops of food coloring

Mix the flour and salt together.

Add your food coloring to your water until your have your desired hue. Then, add the water to the flour and salt mixture.

Mix together until combined. Dig in with your fingers to help mix.

Once it’s thoroughly mixed, remove your dough from the bowl and start kneading until it’s pliable and no longer sticky.

You can knead in additional flour, one teaspoon full at a time, if your dough is too sticky. Just be careful and don’t add too much. Your dough can get crumbly very quickly if you add too much!

This makes about 2 cups worth of salt dough, which is enough for several children.

I cut the original recipe in half and made two batches of the half recipe, equivalent to one whole batch. I did two half recipes so each girl could have a different color of dough. Luckily, this recipe cuts in half very easily.

Use colored salt dough and pony beads to make these pretty salt dough ornaments that can be used for Christmas or year-round decorations.

Make your salt dough ornaments

Once your dough is ready to work with (and your kids are through playing with it), grab some cookie cutters and a rolling pin.

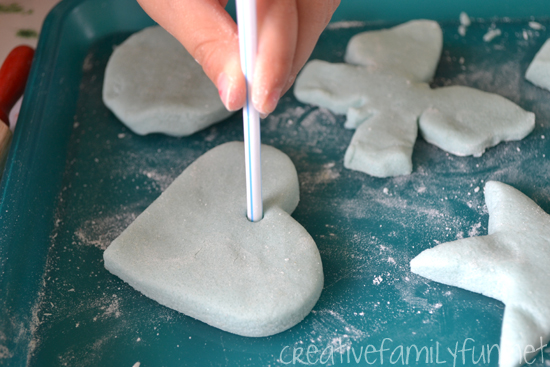
Roll the dough out to about a 1/4-inch thick and cut designs with your cookie cutters.

Use a drinking straw to make a hole in the top so that you can string a ribbon through later. I’ve tried several methods for making a hole and have found that a drinking straw works best.
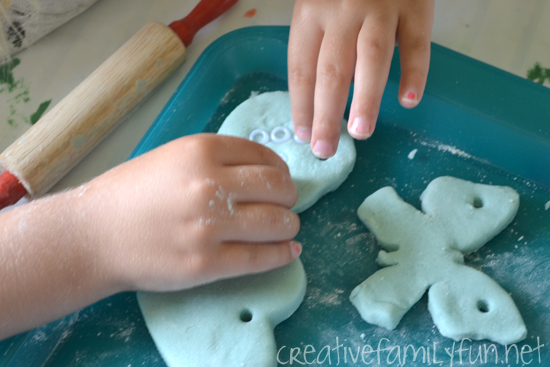
Use colored salt dough and pony beads to make these pretty salt dough ornaments that can be used for Christmas or year-round decorations.

Add your pony beads

Next, get creative with your pony beads.

Squish the beads into the dough, but be careful not to push them all the way through.

Use as many or as few as you like.

We only had a package of white beads, but multi-colored beads would also be pretty.

Use colored salt dough and pony beads to make these pretty salt dough ornaments that can be used for Christmas or year-round decorations.

Harden and dry your ornaments

Once your ornaments are complete, place them on a foil-lined baking sheet.

You can leave them sitting on the baking sheet to dry (which can take a couple of days). So, to speed up the drying process, you can put them in the oven at the lowest setting for awhile. I baked ours for 1 and 1/2 hours at 250 degrees.

After baking, your ornaments may still not be completely dry. I always have to flip our ornaments over after they are done baking and let the bottom side dry. I usually leave them out overnight to finish drying.

Use colored salt dough and pony beads to make these pretty salt dough ornaments that can be used for Christmas or year-round decorations.

Once they are dry, add some ribbon and hang them up! You can string several on one length of ribbon to create a bunting, or you can hang them on a few bare branches to create a decorative tree. Or, make ornaments to hang on your Christmas tree.

These pony bead and salt dough ornaments are so pretty no matter what you do with them. Have fun and get crafting with salt dough!

You may also like on of these kids crafts:

Egg Carton Fairy Houses

Salt Dough Baseballs

Craft Stick Frames: Classic Craft for Kids

Colored Salt Dough Leaf Impressions at The Imagination Tree

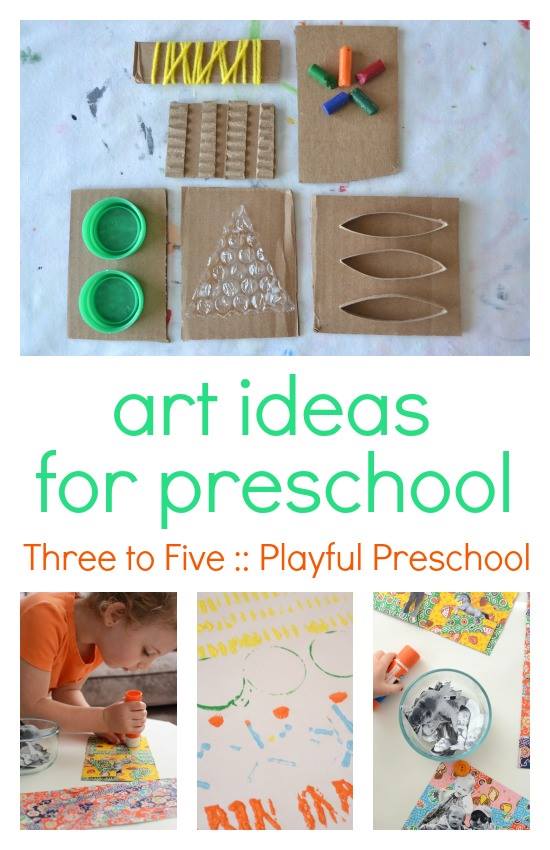
Are you looking for more art projects?  

Check out Three to Five: Playful Preschool. Get over 25 activities, 10 printables, and links to even more play-based preschool activities in this fantastic e-book. Purchase it here.

https://www.creativefamilyfun.net/2014/05/three-to-five-playful-preschool.html

10 Ways to Celebrate Earth Day Every Day

April 24, 2014 By Terri Thompson

Earth Day may be only one day a year, but, it can (and should) be practiced every day. You can’t be too young to learn about the earth and find ways to help. Your littlest ones can go on a nature walk or create a craft from the recycle bin. Older kids can take control and guide the family in ways to recycle, reduce, and reuse. They can implement a plan to reduce their water consumption or make a pledge to turn off the lights.

Disclosure: There are Amazon Affiliate and other affiliate links in this article which means, at no additional cost to you, we could receive compensation for our recommendations. You can read our full disclosure policy on our Disclosure Page for more details.

Here are 10 ideas for families that want to celebrate Earth Day every day.

Set up an at-home recycling station. Teach Me Mommy show you how.

Learn about the world around you and go on a nature walk with How Wee Learn.

Pick up litter around your neighborhood with My Nearest and Dearest.

Learn about composting and start a compost pile or bin in your yard with ALLterNATIVE Learning.

Find ways to conserve water in your home with Kitchen Counter Chronicles.

Play a recycling think and sort game with No Time for Flashcards.

Make a log pile home for creatures in the corner of your yard with Rainy Day Mum.

Search your recycling bin for craft supplies. JDaniel4’s mom has a great list of recycled crafts!

Challenge each other to turn out the lights, like we did here at Creative Family Fun.

Save a tree with these 7 Ways Kids Can Help Save Trees from Go Explore Nature.

What are some of the ways your family celebrates Earth Day every day?

Make this a family adventure!
Spending time learning about the earth and the ways we can be more eco-friendly is always a rewarding way to spend time together as a family. Any one of these links would be a great family adventure. Pick an idea and spend your next family night working on ways to save the earth

Earth Day Pledge ~ Turn Off the Lights!

April 22, 2014 By Terri Thompson

I love Earth Day. It’s a great time to evaluate what you are already doing to conserve and find ways to make more of an impact. We already recycle and compost. We’ve planted several new trees. We use cloth napkins and use environmentally-safe cleaners. But, there was one big thing that we could do better. It was one thing that the girls could do themselves and feel like they were making a big difference. It was so simple. We need to turn out the lights!

Disclosure: There are Amazon Affiliate and other affiliate links in this article which means, at no additional cost to you, we could receive compensation for our recommendations. You can read our full disclosure policy on our Disclosure Page for more details.

According to the Midwest Energy Efficiency Alliance (MEAA), artificial lighting is responsible for 20% of a home’s energy usage. Wow! We can easily reduce that percentage by turning off the lights when we leave a room and using natural light during the daytime.

The girls were very excited about this idea and wanted to help, but we knew we needed a few reminders. We grabbed a few blank index cards, markers, and tape. The girls made several “turn off the lights” signs, which were the perfect size to hang over (or under) our light switches.

We traveled through the house and hung up the signs in the rooms where we always forget to turn off the lights, especially in the bathrooms and the girls’ bedroom.

So far, the reminders have been working wonderfully. I’ve been hearing my girls’ verbal reminders to each other, “hey, you forgot to turn out the lights!” And, those switches have been flipped to “off” more times than not.

Earth Day may come only once a year, but you can put into practice earth-friendly habits any day of the year. You’re never too young and you’re never too old. Show your kids just how simple it is to make a difference and see how they take charge. Hey, all it takes is turning off the lights!

Make it a family adventure!
Cost: free (Don’t go out and buy index cards if you don’t have any. Just cut paper to size.)
>Planning time: 10 minutes. It would be incredibly valuable to have a few statistics and facts on hand to share with the family. The U.S. Energy Information Administration’s Energy Kids website is a fabulous resource.
Ages: 5 and up. Everyone of every age can benefit in picking up the habit of turning out the lights, but your kids 5 and up with find the information the most valuable.
Time needed: 30 minutes. Give yourself plenty of time to talk and brainstorm. Maybe this simple idea will lead to more conversation about other things you can do as a family to be more eco-friendly!

Easter Egg Dye Pour Painting

April 15, 2014 By Terri Thompson

I’ve always loved the tradition of dying Easter eggs.

We typically do the traditional method of mixing up cups of egg dye made from food coloring and vinegar and dipping our eggs.

We’re still going to do that this year. We usually dye eggs the Saturday before Easter.

But, I also wanted to do a little egg dying experiment this year. For this project, we spooned our dye over top of our eggs to make these Easter Egg Dye Pour Painting Eggs.

Decorate your Easter eggs this year with a fun twist on classic egg dying. This Easter Egg Dye Pour Painting is so much fun and results in pretty striped Easter Eggs.

Disclosure: There are Amazon Affiliate and other affiliate links in this article which means, at no additional cost to you, we could receive compensation for our recommendations. You can read our full disclosure policy on our Disclosure Page for more details.

Set up your project

I ran across a dozen plastic dye-able eggs at a big box store to use for this project.

We used these so we could keep them out all week and use them again next year.

But, you can certainly use this technique with regular hard-boiled eggs or blown-out eggs. (TinkerLab has a few great tips for blowing out an egg if you want to go that route.)

Decorate your Easter eggs this year with a fun twist on classic egg dying. This Easter Egg Dye Pour Painting is so much fun and results in pretty striped Easter Eggs.

To make these eggs, you can either use a traditional egg dye or liquid watercolors.

We chose the liquid watercolors because there wasn’t any prep work involved.

Decorate your Easter eggs this year with a fun twist on classic egg dying. This Easter Egg Dye Pour Painting is so much fun and results in pretty striped Easter Eggs.

Turn an extra egg carton upside down and prop your eggs in between the cups.

This is a great trick. The egg carton will hold your egg upright for you and you can use both hands for decorating. Plus the egg carton soaks up all the excess dye and keeps it from running all over the table.

If you don’t have paper egg cartons, put a baking sheet under the eggs to help catch your egg dye.

Decorate your Easter eggs this year with a fun twist on classic egg dying. This Easter Egg Dye Pour Painting is so much fun and results in pretty striped Easter Eggs.

How to make your Easter Egg Dye Pour Painting Eggs

Once we were all set up with cups of our liquid watercolors, egg cartons, and spoons for each color, the girls got to work.

My oldest was very deliberate with her color choices and even managed to make a fun rainbow effect.

My preschooler started turning her eggs every which way to get the best coverage.

There really is no right way to do this project. Just pour and create.

Decorate your Easter eggs this year with a fun twist on classic egg dying. This Easter Egg Dye Pour Painting is so much fun and results in pretty striped Easter Eggs.

I love these eggs and I’m so happy we’ll have then for Easter decorating every year.

Have you decorated your eggs yet? Do you use a traditional dye, natural dyes, or a fun technique? Or are your going to try this Easter Egg Dye Pour Painting technique?

Decorate your Easter eggs this year with a fun twist on classic egg dying. This Easter Egg Dye Pour Painting is so much fun and results in pretty striped Easter Eggs.

You may also like one of these Easter activities for kids:

Watercolor Easter Eggs

Egg Carton Easter Baskets

Painted Easter Egg Suncatchers

Plastic Egg People

Fancy Shaker Eggs at Mama Smiles

12 Ways to Play With Plastic Easter Eggs

April 8, 2014 By Terri Thompson

Despite the fact that we already own a ton, we always get new plastic Easter eggs every year? Do you do this too?

We’ve accumulated quite a few over the years and it’s time to start using some of them. Luckily, there are a ton of fun ways to play with plastic Easter eggs. I’ve gathered up 12 of my favorite ideas to share with you. Which one do you want to try?

What do you do with all those leftover plastic Easter eggs? Here are 12 fun ways to play with plastic Easter eggs from crafts to art projects and also learning games.

Disclosure: There are Amazon Affiliate and other affiliate links in this article which means, at no additional cost to you, we could receive compensation for our recommendations. You can read our full disclosure policy on our Disclosure Page for more details.

Ways to play with plastic Easter eggs

Get out the glue gun and make plastic egg sculptures with Fun-A-Day. (pictured)

Make plastic egg people. We’ll show you how. (pictured)

Paint with them along with Buggy & Buddy! (pictured)

Use them to create a fine motor color sort game for toddlers with Minne Mama.

Fill them with puzzle pieces and let your kids go on a puzzle Easter egg hunt with Make the Best of Everything. (pictured)

Make fancy shaker eggs with Mama Smiles. (pictured)

Add paint inside for a fun (and messy) “crack open the egg and paint” project at Teach Preschool.

Make a DIY toy by turning them into magnetic eggs with Frugal Fun 4 Boys.

Use the eggs for a creative way to tell the Easter story with Teach Beside Me.

Make a Easter egg sound matching game with A Mom With a Lesson Plan.

Make funny dancing eggs with Frog in a Pocket!

Use them to make a pattern matching game for toddlers from Childhood 101. (pictured)

What do you do with all those leftover plastic Easter eggs? Here are 12 fun ways to play with plastic Easter eggs from crafts to art projects and also learning games.

You may also like one of these fun Easter activities:

Egg Carton Easter Basket

Painted Easter Egg Suncatcher

Easter Word Scramble Printable

Pretty Easter Garland Crafts for Kids

  • « Go to Previous Page
  • Page 1
  • Interim pages omitted …
  • Page 23
  • Page 24
  • Page 25
  • Page 26
  • Page 27
  • Interim pages omitted …
  • Page 39
  • Go to Next Page »

Primary Sidebar

Footer

Categories

Archives

Copyright © 2026 · Designed by The Blog Surgery

Creative Family Fun uses cookies to improve your experience. These cookies provide feedback to our analytics and advertisers. We use the information to track views of the site, where you go and to know if you are a regular visitor or brand new as well as provide a personalized experience where possible. We'll assume you're ok with this, but you can opt-out if you wish.Accept Reject Read More
Privacy & Cookies Policy

Privacy Overview

This website uses cookies to improve your experience while you navigate through the website. Out of these, the cookies that are categorized as necessary are stored on your browser as they are essential for the working of basic functionalities of the website. We also use third-party cookies that help us analyze and understand how you use this website. These cookies will be stored in your browser only with your consent. You also have the option to opt-out of these cookies. But opting out of some of these cookies may affect your browsing experience.
Necessary
Always Enabled
Necessary cookies are absolutely essential for the website to function properly. This category only includes cookies that ensures basic functionalities and security features of the website. These cookies do not store any personal information.
Non-necessary
Any cookies that may not be particularly necessary for the website to function and is used specifically to collect user personal data via analytics, ads, other embedded contents are termed as non-necessary cookies. It is mandatory to procure user consent prior to running these cookies on your website.
SAVE & ACCEPT