• Skip to secondary menu
  • Skip to main content
  • Skip to primary sidebar
  • Skip to footer
  • Home
  • About
    • Email Me
    • Disclosure & Copyright
  • Start Here
  • Subscribe
  • Privacy Policy
  • Books for Moms

Creative Family Fun

Your one-stop shop for kids activities and family fun

  • Facebook
  • Instagram
  • Pinterest
  • Twitter
  • Spelling Activities
  • Family Fun
  • STEM
  • Movie Night
  • Toddler Activities

Art Activities

Clay African Baskets: Exploring Angola Through Art

March 26, 2015 By Terri Thompson

Our fifth stop in our journey around the world through art was Angola. Angola is located in south-western Africa. (You can see it on a map here.) The Portuguese began exploring and settling in Angola in the 1400’s. Angola was a Portuguese colony until it gained independence in 1975 following almost 15 years of warfare. Angola still faces extreme poverty and social problems today.
Despite a lack of books about Angola, we were able to find many resources on the web. We found a culture that was rich in art. We found beautiful wood carvings, like this intricately carved chair. We also found amazing baskets. (See some examples here.) All of these examples show how an everyday object can be made beautiful. We took our inspiration from those baskets to create our Angola art project.
Disclaimer: This post contains Amazon Affiliate links. Please see my disclosure for more details.
How can you make your own version of these baskets? That question had me thinking for awhile. We couldn’t actually make our own baskets, so I had to come up with an alternative. Finally, I settled on the idea of clay pots painted in the style of the baskets. My friend Cerys at Rainy Day Mum has a baker’s clay recipe that I’ve been wanting to try, so I made up a batch. Please click here to get the recipe. I followed her recipe exactly and had enough clay for both of our pots.


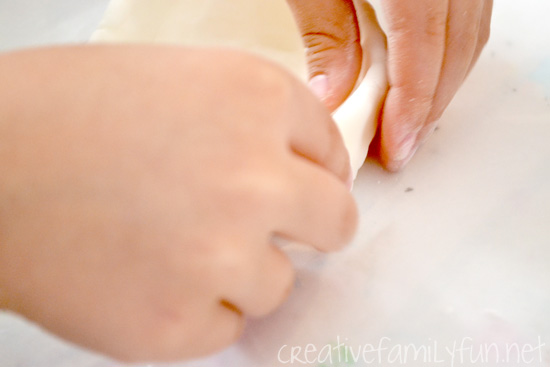
The girls found the clay very easy to work with. They made simple pinch pots to create their basket shapes. They tried several versions before they settled on their preferred shape. Plus, they just really enjoyed the feel of the soft dough and wanted to play with it for awhile. After they were satisfied, I put the pots on a foil-lined baking sheet and dried them in the oven. Do check on it frequently. Our pots dried quicker than I had anticipated. (We typically use salt dough which can take a very long time to dry. I loved that this dried so much quicker.)


Even after the oven drying, we let our pots sit out over night to cool before painting. You don’t need to wait as long as we did. We were just busy and didn’t have a chance to paint until the next day. We used regular craft paint for our decorations. (This was the brand we used. Any similar paint would also work.) The clay was very easy to paint and we only needed one coat for full coverage. The girls used three different shades of brown for their designs.


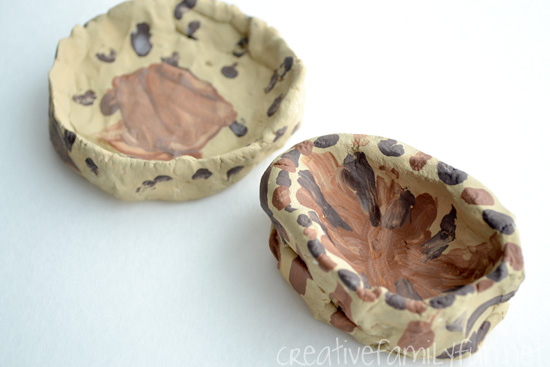
No, they’re not carbon copies of the Angola baskets we saw. But, I think the girls really captured the feel of the baskets. They enjoyed the process and made it all their own. Plus, we had a lot of conversation about how talented the basket-makers are.
I hope you’re enjoying our virtual trip around the world through art. If you would like to see details of this project, please see my introductory post. You can find all the previous projects we did here or by clicking on the graphic below.
 

Puff Paint Ski Mountains: Exploring Andorra Through Art

March 12, 2015 By Terri Thompson

Disclosure: This post contains Amazon Affiliate links. Please see my disclosure for more details.
Quick geography pop quiz: who can tell me, without looking at a map, where Andorra is located? I’ve got a passion for geography, so I knew a bit about where it was located. But, once I started researching, I could find very little information about Andorra beyond a map. No books, no other projects, only information from travel sites. And that, my friends, is one reason why we are doing this project. We want to learn about all corners of the world and not just the most popular countries. I’ll admit that I struggled with the planning for Andorra for awhile. I didn’t have a book to read to the kids and I had a very hard time coming up iwth an idea for an art project?

Andorra is a tiny European country located in the Pyrenees Mountains between France and Spain. See Andorra on a map here. It’s size is only 181 squares miles and completely mountainous. Most citizens live in the few valley areas. Tourism is the biggest industry in Andorra, especially mountain sports. (Source: Oxford Atlas of the World) Since winter sports are so important to Andorra’s economy, we decided to focus on that for our art project. We made our own puff paint to create a simple ski mountain.

Supplies Needed:
Microwave puff paint (see recipe below)
Blue paper
2 craft sticks
2 toothpicks
Paint
Glue
Special note on this project: This project is more focused on the process and the experience and doesn’t necessarily produce a piece of art that you can keep. I’ll be creating a digital scrapbook of our journey with Project: Around the World, because I know I won’t have room to keep every project. So, it’s not important to me to be able to preserve each project. I will give you tips to help you preserve this project if you desire. But, despite this, the project is fun and it helped us learn about the country of Andorra.


Before we started using our puff paint, we painted our skis and poles. The girls used regular craft paint in some of their favorite colors. You only need to paint one side of each since you will be gluing them down. We found that painting these first gave them plenty of time to dry before it was time to glue to our snowy mountains.
Next, it was time to make the puff paint. It’s a simple recipe to follow and the girls loved being able to make their own paint. Our recipe made enough for both projects with just a little bit left over.
Microwave Puff Paint:
1/3 c flour
1 tsp baking powder
1 tsp salt
1/3 cup of water
Mix all of the dry ingredients in a bowl. Add water slowly, stirring after every couple of tablespoons, until your paint is the consistency of paste (thick, but spreadable). We used just shy of the 1/3 cup of water.
You need to use the paint soon after you make it, so don’t try to make it too far ahead of time!


We used our paint to make the side of a snowy mountain. We found that a small sponge brush works better than a regular paintbrush with this paint. If you don’t have a sponge brush, cut up a regular sponge into smaller pieces or you can even use your fingers.
Once we were satisfied with our mountains, it was time to pop it into the microwave to dry. I microwaved each in 10 second increments until the paint started getting hard. Our pieces were not fully dry when I felt the paper getting hot (after about 30 seconds). This did give us enough to work with because the paint was hard on the surface. It will continue to dry in the air. Once we microwaved our pictures, we glued our skis and ski poles to the mountain.


I’ll admit that I’ve never found this puff paint to keep well. Nonetheless, we love using it! The paper will curl up on the sides once it’s fully dry and it will crack and flake after awhile. There are a couple of options if you would like to keep these projects. First, you can make the pictures on thick cardboard, like the side of a packing box. Paint the sky blue after microwaving. This will prevent the curling of the edges, but not the cracking and flaking. You can also recreate this project with regular white paint. You won’t have the puffy effect, but you will be able to keep the project if that is what is important to you.


Even though we’ve just barely started our artistic journey around the world, we’ve already found such great value in it. We’re learning about countries that aren’t often introduced to kids until they’re much older and we’re doing it in a way that will help us remember a bit about them. This approach is also helping us find the beauty and the positive aspects of each location. I want to teach my girls to see the value in each and every corner of the world. I can’t wait to do more projects!
If you’d like to follow along with Project: Around the World, you can find the introduction post here. Or click here or on the image below to see all the projects we’ve done so far.


Prehistoric Rock Paintings: Exploring Algeria Through Art

February 25, 2015 By Terri Thompson

Our third stop in Project: Around the World was to the country of Algeria. Algeria is located on the northern coast of Africa. (See it on the map here.) The majority of the population lives along the coast line because about 80% of its land is covered by desert, specifically the Sahara Desert. Inspiration came easy for this project once we discovered the prehistoric rock paintings in Tassili n’Ajjer. The Tassili n’Ajjer rock paintings are some of the oldest artwork in the world and is considered one of the most important groupings of prehistoric art in the world. (You can read an extensive description, plus view many pictures of Tassili n’Ajjer, at this link from the World Heritage Convention.)
Disclosure: This post contains Amazon Affiliate links. Please see my disclosure for more details.
Supplies Needed:
Roll of brown kraft paper
Painter’s tape
Washable paint
Old sheet or drop cloth
To prep this project, I cut a length of the brown paper off the roll. I crumpled it up and smoothed it out before taping to the wall to mimic the texture of the rocks. I always use painter’s tape when I stick anything to the wall. It’s a bit hard to get off the back of the paper (and will sometimes peel a bit of the paper), but it will protect your wall. Spread out your drop cloth on the ground underneath your paper.
Note: I normally don’t specify the type of paint you should use, but for this project I would HIGHLY recommend the washable paint. You know, for that washable factor!


After viewing some online pictures of Algeria and reading the book, The Sahara Desert: The Largest Desert in the World by Megan Lappi, I showed the girls their invitation to create. We talked a bit about the Tassili n’Ajjer rock paintings before beginning. What colors do you see in the rock paintings? We knew the paint came from natural materials so we pulled out the brown and orange paints as best color matches. What materials did they use for painting? We decided that using their fingers was one possibility, so that’s what we used to do our paintings. We also talked about how these paintings sometimes told stories, so the girls decided to try and tell their own stories of the desert.


The girls had a lot of fun creating their rock paintings with their fingers. My 5-year-old especially got into it. She painted a fennec fox, a chameleon, and painted around her hand to represent humans. My 7-year-old painted a camel and mountains. It was so much fun and they proudly told their dad the stories once he came home from work.
We loved making our own versions of the prehistoric rock paintings of Tassili n’Ajjer and my 5-year-old want to do this again sometime. But, now it’s time to move on to another country. Andorra is coming up soon!
Thank you for joining us on our virtual trip around the world.
Click on the logo to find all of our Project: Around the World posts:


Colorful Buildings: Exploring Albania Through Art

February 9, 2015 By Terri Thompson

Our second stop in Project: Around the World was Albania. Albania is a small country located in Eastern Europe, just east of the heel of the boot that is Italy. (See it on a map here.) It was a little bit difficult to narrow down our inspiration. Albania is a beautiful country and I found many examples of beautiful buildings and traditional folk costumes. In the end, we stumbled across the town of Tirana. Tirana was completely downtrodden until mayor Edi Rama decided to brighten the spirits of the citizens with paint. Tirana is now completely transformed and is full of the most fun and beautiful brightly colored buildings. (You can see before and after examples at this link from TEDx.) For our art project inspired by Albania, we took a few simple supplies and made our own version of the colorful buildings of Tirana.
Disclosure: This post contains Amazon Affiliate links. Please see my disclosure for more details.


Supplies Needed:
White paper
Pencil
Oil pastels (crayons or markers will also work)
Before designing our buildings, we folded each piece of paper in half. Make a sharp crease to help the buildings stand up.
Next, we used our pencils to add our doors and our windows. We outlined these with black oil pastel to help them stand out. Most of the buildings we was in the pictures were larger apartment buildings, so we tried duplicating this on our buildings.
After we were satisfied with our basic buildings, we started adding the bright colors. You can be inspired by the pictures of Tirana or dream up your own design. Both girls decided to add a little big of nature to their buildings with clouds, trees, and flowers. Once we finished, we refolded the paper and stood our buildings up. We had our own mini version of the colorful buildings in Tirana.
Our virtual trip to Albania was short, but fun. I won’t have a separate book post this time since I was unable to find any books about Albania. I did find one folk story in the the book, Magic Hoofbeats: Fantastic Horse Tales retold by Josepha Sherman. If you know of any books about Albania, please let me know in the comment section. Otherwise, online you can browse through Lonely Planet’s guide to Albania for pictures and information about places you can visit.
Thanks for traveling along on our virtual trip around the world!


Click the logo below to find all of our Project: Around the World posts.


Watercolor Tiles: Exploring Afghanistan Through Art

January 26, 2015 By Terri Thompson


Our first stop on our alphabetical tour of the world was Afghanistan. In a way, it was a complicated place to start, since Afghanistan has such a complicated history. And, how do you talk about things in an age-appropriate way without ignoring current events? In the end, I took my cues from the books we had and kept things simple. (I’ll have a separate post this week with my book recommendations.) Then, we dug down and concentrated on our focus. Our focus for this project is cultural and our focus is on the average citizen – those people that are just like you and me. We discovered the rich and beautiful cultural heritage in Afghanistan. We were in awe at all the beauty. For our project, we took our inspiration from the Blue Mosque in Mazar-e Sharif and created watercolor tiles inspired by its beautiful mosaic tiles.
*Disclosure: This post contains affiliate links. Please see my disclosure for more details.
We started with a routine that we will do for every country. We got out the world atlas and located Afghanistan on a world map and looked at a map of Afghanistan to see its geographical make-up. We located mountains, rivers, deserts, and major cities. (We are using the Oxford Atlas of the World.) We read a few books and looked at other pictures I had found on line. When we were ready to start our project, we looked at several close-up pictures of the Blue Mosque. (The articles here and here were very helpful.)
Supplies Needed:
Watercolor paper
Ruler
Pencil
Blue watercolor (We used liquid watercolor for this project.)
To prep this project, cut a piece of watercolor paper into a square. Our squares were 8 inches by 8 inches. Then, using the ruler, divide the square into 4 quarters.
We used our pencils to draw designs on the tile. You can draw a design that crosses all four tiles or do individual designs in each tile. If you have a reluctant artist, they may want to try their hand at copying some of the designs in the pictures of the Blue Mosque. I encouraged my girls to come up with their own designs. Simple designs or complicated designs are both perfect for this project.
Once we were satisfied with our designs, we painted them with our watercolors. We used liquid watercolor because we love the vibrant look, but any watercolor you have on hand will work. After our paint was dry, we cut along the pencil lines to make 4 individual tiles.
You can display your tiles by attaching them to blue paper, or you can leave them cut apart and have simple tile puzzles. No matter how you display them, they are beautiful!
Thanks for coming along on our trip around the world through art.
If you want more information about Project Around the World, you can read my intro post here. You can follow all the posts here. Or, you can follow along on Instagram using the hashtag #projectaroundtheworld. I’d love to see your own projects with that hashtag!


  • « Go to Previous Page
  • Go to page 1
  • Interim pages omitted …
  • Go to page 3
  • Go to page 4
  • Go to page 5
  • Go to page 6
  • Go to page 7
  • Interim pages omitted …
  • Go to page 11
  • Go to Next Page »

Primary Sidebar

Footer

Categories

Archives

Copyright © 2021 · Designed by The Blog Surgery

Creative Family Fun uses cookies to improve your experience. These cookies provide feedback to our analytics and advertisers. We use the information to track views of the site, where you go and to know if you are a regular visitor or brand new as well as provide a personalized experience where possible. We'll assume you're ok with this, but you can opt-out if you wish.Accept Reject Read More
Privacy & Cookies Policy

Privacy Overview

This website uses cookies to improve your experience while you navigate through the website. Out of these, the cookies that are categorized as necessary are stored on your browser as they are essential for the working of basic functionalities of the website. We also use third-party cookies that help us analyze and understand how you use this website. These cookies will be stored in your browser only with your consent. You also have the option to opt-out of these cookies. But opting out of some of these cookies may affect your browsing experience.
Necessary
Always Enabled

Necessary cookies are absolutely essential for the website to function properly. This category only includes cookies that ensures basic functionalities and security features of the website. These cookies do not store any personal information.

Non-necessary

Any cookies that may not be particularly necessary for the website to function and is used specifically to collect user personal data via analytics, ads, other embedded contents are termed as non-necessary cookies. It is mandatory to procure user consent prior to running these cookies on your website.

SAVE & ACCEPT