• Skip to secondary menu
  • Skip to main content
  • Skip to primary sidebar
  • Skip to footer
  • Home
  • About
    • Email Me
    • Disclosure & Copyright
  • Start Here
  • Subscribe
  • Privacy Policy
  • Books for Moms

Creative Family Fun

Your one-stop shop for kids activities and family fun

  • Facebook
  • Instagram
  • Pinterest
  • Twitter
  • Spelling Activities
  • Family Fun
  • STEM
  • Movie Night
  • Toddler Activities

Art Activities

Aboriginal Dot Painting: Exploring Australia Through Art

July 28, 2015 By Terri Thompson

Our next stop in Project Around the World was to a country most everyone knows something about – Australia. It was one of those places where we took a pause and immersed ourselves in all the wondrous things to explore. One of my girls’ favorite things about Australia are the animals. Australian animals are different from anywhere else in the world. The kangaroos, koalas, wombats, and more are endlessly fascinating. But, before we completely immersed ourselves in the animals, we learned a little about the Aboriginal culture in Australia.
Disclosure: The post contains Amazon Affiliate links. Please see my disclosure for more details. 
Before beginning our project, we read Rainbow Bird: An Aboriginal Folk Tale from Northern Australia by Eric Maddern. The book retells the traditional Aboriginal fire myth from northern Australia. The story is wonderfully told and the illustrations were delightful. It’s a book we read over and over while we had it from the library. After reading, we decided to try our hand at dot painting, a traditional Aboriginal form of art.
Supplies Needed:
Heavy cardboard for your canvas (I cut apart a shipping box)
Craft paint
Empty plastic lid (or other flat surface for your palette)
Cotton swabs
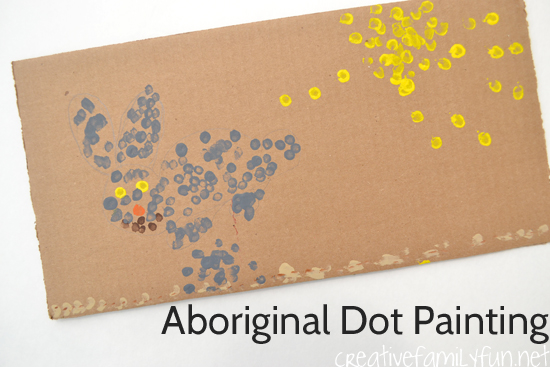
We used a cut apart cardboard box for our painting surface. You can actually do this project on paper, I was just looking for something a little more solid and I wanted the brown background. Use whatever you have on hand for your project.
Before we got started painting, I had the girls draw simple outlines of their subjects. Despite their complete infatuation of all things Australia, the girls didn’t want to draw any of the Australian animals. One drew a rabbit and the other a bathing suit (she’s really into fashion design). After we had simple pencil outlines, the girls used their cotton swabs to fill in their designs with dots.
In order to stay true to traditional dot art, we chose colors that were earth tones, or other colors found in nature. The brightest color we chose was yellow. Even though the girls chose non-traditional subjects, the art technique and colors reminded us of all the examples of traditional Aboriginal dot art that we saw. It was such a fun painting technique and one I hope we revisit some day.
Thank you for travelling along on our virtual trip around the world. To see all the projects we’ve done so far, please click here or on the image below.
 

Illuminated Manuscript Initials: Exploring Armenia Through Art

June 16, 2015 By Terri Thompson

There’s an area of land sandwiched in between the continents of Asia and Europe, called Eurasia. Armenia is a small, mountainous country located in that area. It is in Asia, very near Europe. (See it on a map here.) Armenia was a part of the former Soviet Union after being taken over by Russia following World War I. The modern Republic of Armenia gained its independence in 1991.


For our artistic inspiration, we went far back in history, way before World War I. Every time I went searching for Armenian art, I discovered illuminated manuscripts. While not exclusive to Armenia, I found many wonderful Armenian examples. Here is an illustrated version of the Armenian alphabet done in the style of illuminated manuscripts. The Armenian alphabet is also unique with a rich history. It was created in 405 A.D. You can read about the history here. The written word and beautifully illustrated versions are an important part of Armenia’s history. We used this inspiration to create illustrated versions of our initials.
Disclosure: This post contains Amazon Affiliate links. Please see my disclosure for more details.
We started by cutting out our initials from wrapping paper. We were looking for something fancy and shiny. We settled on the silver wrapping paper we found in our closet. After cutting out the initials, we glued them down to plain white paper. If you don’t have fancy wrapping paper, you could also use scrapbook paper, construction paper, or magazine pages. I wouldn’t recommend aluminum foil as it won’t glue down to the white paper.
We used our collection of Sharpies to decorate our initials. I wasn’t sure if the washable markers would work on the shiny wrapping paper, so we went with the permanent markers. They worked perfectly! The girls decorated their initials and they decorated the paper surrounding the initials, just like some of the pictures we viewed. After we were done, we got more paper and made more initials. It was fun to see how fancy we could make them!


It has been such a valuable experience to explore the world through art. The girls missed it while we took a short break for the busy, busy month of May. We’re eager to start exploring again!

Thanks for coming along on our virtual trip to Armenia with Project: Around the World. Click here for all the projects we’ve done so far or on the button below.
 

Handprint Art: Exploring Argentina Through Art

April 29, 2015 By Terri Thompson

What happens when we can’t decide between two different art projects in Project: Around the World? Well… we end up doing two. We started with our Colorful Building Paper Collages and I thought that would be it. But, I just couldn’t get the idea of handprint art out of my system. More specifically, I kept thinking about the hand outlines at Cueva de las Manos in Argentina. (You can see them here.) This amazing cave art is between 9500 and 13,000 years old. Wow! I just knew we could make our own version at home.
Disclosure: This post contains Amazon Affiliate links. Please see my disclosure for more details.


The first step in our process was to make our stencils. We used paper plates since they are thicker and sturdier than regular paper. The girls each traced a hand on a plate and cut out the handprint. They decided to trace part of their arm too so that it looked more like the cave paintings.
I had some legal size paper (8.5″ x 14″), so we traced our handprints on that. Letter size paper would work too. The girls used their stencils and traced around it with a chalk pastel. We used different shades of grays and browns to mimic the cave art.
After tracing the stencil, we left it in place and used our fingers to gently swipe outward from the stencil. You will get a fun feathery effect which looks a lot like the handprints at Cueva de las Manos. We repeated the process until we had filled our paper with handprints.
The result was awesome! And, as you can see we didn’t stick with our brown color scheme. Why use brown when you can use blue? Let your kids take the reign any time they want during art projects. They can come up with amazing ideas. Plus, it becomes their project and not just a parent-directed project. (And, quite frankly, a parent-controlled project isn’t all that fun.)
Thanks for coming along on Project: Around the World. Click here for all the projects or on the button below.
 

Colorful Buildings Paper Collages: Exploring Argentina Through Art

April 20, 2015 By Terri Thompson

We headed to South America for stop 7 in Project: Around the World to visit Argentina. Argentina is a vast country, the second largest in South America, and there were so many fascinating things to choose for inspiration. (See Argentina on a map here.) Would it be the pampas, which are the fertile grasslands, or the Andes Mountains? Would it be the tango, the dance that originated in Argentina, or the gauchos, the native cowboy of the pampas? We ended up using a small slice of Argentine life, the colorful buildings in the neighborhood of La Boca in Buenos Aires for inspiration.
Disclosure: This post contains Amazon Affiliate links. Please see my disclosure for more details.


Supplies Needed:
White paper
Construction paper in several bright colors
Scissors
Glue
Black marker
I love this project because the process is super simple. It’s an open-ended project with such fun results.
The first thing you need to do it to decide on your buildings. We make simple square and rectangular shapes. Try to fill in much of your paper with the larger shapes. Glue all your shapes down. Overlap your shapes if you want the look of a busy city block.
Next, use smaller pieces for roofs, windows, doors, and other details. Your shapes don’t have to be perfect! Arrange them on your paper until you’re pleased with the results, then glue them all down.
After you have all your collage complete, use your black marker to add in details. Add bars to the windows, door knobs, shutters, or anything else that strikes your fancy.
Thank you for coming along on our virtual trip to Argentina. If you’d like to see all of the projects we’ve done for Project: Around the World, please click here or on the button below.


Watercolor and Salt: Exploring Antigua and Barbuda Through Art

April 6, 2015 By Terri Thompson

Stop six in Project: Around the World took us to the sandy beaches of Antigua and Barbuda. The islands, located in the West Indies, became an independent nation in 1981. You can see Antigua and Barbuda on a map here. Many of the citizens today are descendants of African slaves brought by the British to work on sugar plantations. The sugar trade was once the main source of income for Antigua and Barbuda, but has since been replaced by tourism. Its pleasant climate, beautiful beaches, and world-class sailing draws tourists all year round.
Disclaimer: This post contains Amazon Affiliate links. Please see my disclosure for more details.


We took our inspiration for our art projects from the beautiful beaches of Antigua and Barbuda, specifically the pink sand beaches. (You can see plenty of beach images here at the Visit Antigua and Barbuda website.) I thought it would be the perfect project to experiment with watercolor and salt.
Supplies Needed:
Watercolor paper
Liquid watercolor
Salt
The project was very, very simple. The girls used pencil to draw a very light dividing line between the sand and the ocean on their watercolor paper. Then they started painting. They would paint a bit at a time and stop and sprinkle salt over the wet watercolor. They went bit by bit until they had covered their entire page. Once the paintings were completely dry, I shook both of them over a trash can to get rid of all the excess salt. Since I knew our paper would get rather wet during the process, I had the girls use watercolor paper which is thicker and better able to handle all the wet paint.
The painting itself was very simple, just two colors. We used the salt to create texture and add interest to the sand. The girls decided they liked the salt so much (of course) that they also added it their water. After all, the ocean is full of salt water! I love how the paintings ended up looking like an abstract beach scene using texture and blocks of color instead of detail.
It was so much fun talking a virtual tour of the beautiful beaches of Antigua and Barbuda. I’m so glad you came along!
If you would like to see the rest of our stops during Project: Around the World, please click here or on the image below.
Note: Facts about Antigua and Barbuda all came from this book, Antigua and Barbuda (Cultures of the World) by Sara Louise Kras, which we used for reference throughout this project.
 

  • « Go to Previous Page
  • Page 1
  • Page 2
  • Page 3
  • Page 4
  • Page 5
  • Page 6
  • Interim pages omitted …
  • Page 11
  • Go to Next Page »

Primary Sidebar

Footer

Categories

Archives

Copyright © 2025 · Designed by The Blog Surgery

Creative Family Fun uses cookies to improve your experience. These cookies provide feedback to our analytics and advertisers. We use the information to track views of the site, where you go and to know if you are a regular visitor or brand new as well as provide a personalized experience where possible. We'll assume you're ok with this, but you can opt-out if you wish.Accept Reject Read More
Privacy & Cookies Policy

Privacy Overview

This website uses cookies to improve your experience while you navigate through the website. Out of these, the cookies that are categorized as necessary are stored on your browser as they are essential for the working of basic functionalities of the website. We also use third-party cookies that help us analyze and understand how you use this website. These cookies will be stored in your browser only with your consent. You also have the option to opt-out of these cookies. But opting out of some of these cookies may affect your browsing experience.
Necessary
Always Enabled
Necessary cookies are absolutely essential for the website to function properly. This category only includes cookies that ensures basic functionalities and security features of the website. These cookies do not store any personal information.
Non-necessary
Any cookies that may not be particularly necessary for the website to function and is used specifically to collect user personal data via analytics, ads, other embedded contents are termed as non-necessary cookies. It is mandatory to procure user consent prior to running these cookies on your website.
SAVE & ACCEPT