• Skip to secondary menu
  • Skip to main content
  • Skip to primary sidebar
  • Skip to footer
  • Home
  • About
    • Email Me
    • Disclosure & Copyright
  • Start Here
  • Subscribe
  • Privacy Policy
  • Books for Moms

Creative Family Fun

Your one-stop shop for kids activities and family fun

  • Facebook
  • Instagram
  • Pinterest
  • Twitter
  • Spelling Activities
  • Family Fun
  • STEM
  • Movie Night
  • Toddler Activities

Art Activities

Craft Stick Collage

May 21, 2014 By Terri Thompson

I’ve always got craft sticks in the supply closet.

We’ve used them for so many things, from picture frames to bracelets, and even for learning games like Math Fact Sticks.

There are so many things you can do.

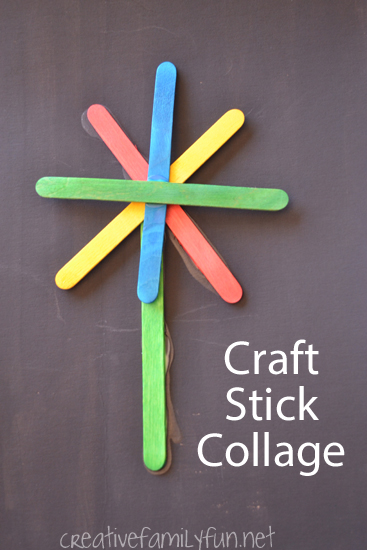
This time, we kept it simple with a creative process art activity. We used a pile of colored craft sticks to make this Craft Stick Collage.

Grab a pile of colorful craft sticks and start creating this craft stick collage. You'll love the results of this craft stick art project for kids.

Disclosure: There are Amazon Affiliate and other affiliate links in this article which means, at no additional cost to you, we could receive compensation for our recommendations. You can read our full disclosure policy on our Disclosure Page for more details.

Supplies Needed:

Cereal box
Black paint
Colored craft sticks
White glue

If you don’t have any colored craft sticks, you can add an extra step to this project and paint plain crafts sticks in a few vibrant colors.

Grab a pile of colorful craft sticks and start creating this craft stick collage. You'll love the results of this craft stick art project for kids.

Prep your project

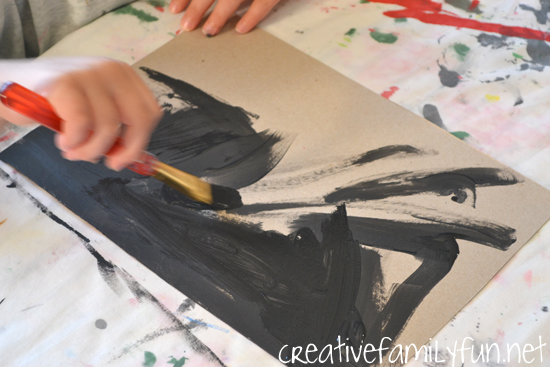
Since we were going to be gluing our craft sticks, I knew we needed something sturdy as a canvas. Plain paper would just not work.

So, we went to the recycling bin for a cereal box.

We cut off the two largest panels to use for our canvasses and painted them black. The colors of our craft sticks would pop so much more against the black than they would have against the cardboard brown.

Grab a pile of colorful craft sticks and start creating this craft stick collage. You'll love the results of this craft stick art project for kids.

Time to create your craft stick collage

Once the paint was dry, it was time to create.

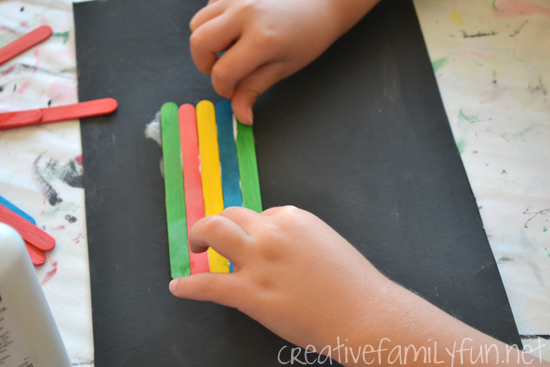
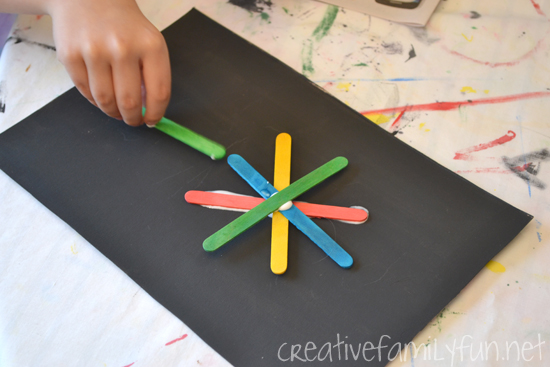
We put the pile of crafts sticks in the middle of the table, pulled out a couple of bottles of glue, and got to work.

There were no rules and no suggestions. I walked away for awhile to get the girls to start creating without my input.

Grab a pile of colorful craft sticks and start creating this craft stick collage. You'll love the results of this craft stick art project for kids.

One of my daughters stacked and one laid them all side-by-side.

One started creating a colorful flower.

One had an idea in mind before she even started and the other went with the flow to see what would happen.

I love the way their craft stick art projects turned out. I love the way their minds work.

Grab a pile of colorful craft sticks and start creating this craft stick collage. You'll love the results of this craft stick art project for kids.

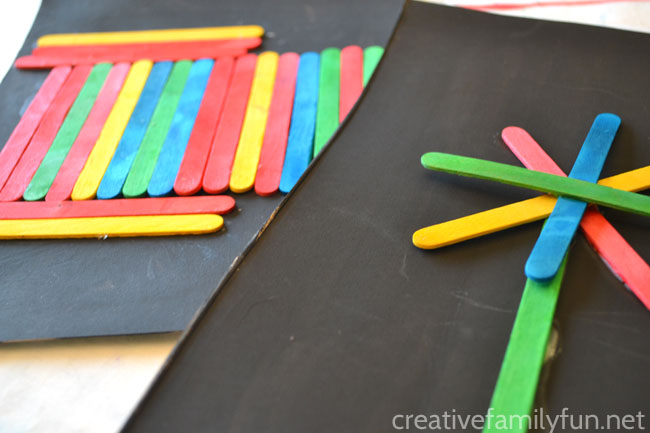
The contrast of the colored craft sticks with the black canvas on our craft stick collage was so striking. I’m so glad we used that instead of plain paper.

I think I need a pile of black cardboard around for creating. It would be a great canvas for chalk pastels and other collages. What would you use it for?

Grab a pile of colorful craft sticks and start creating. You'll love the results of this craft stick art project for kids.

You may also like one of these fun craft projects:

Egg Carton Fairy Houses

Classic Crafts ~ Pom Pom Caterpillar

Craft Stick Initial Plaque

Tie-Dye Suns

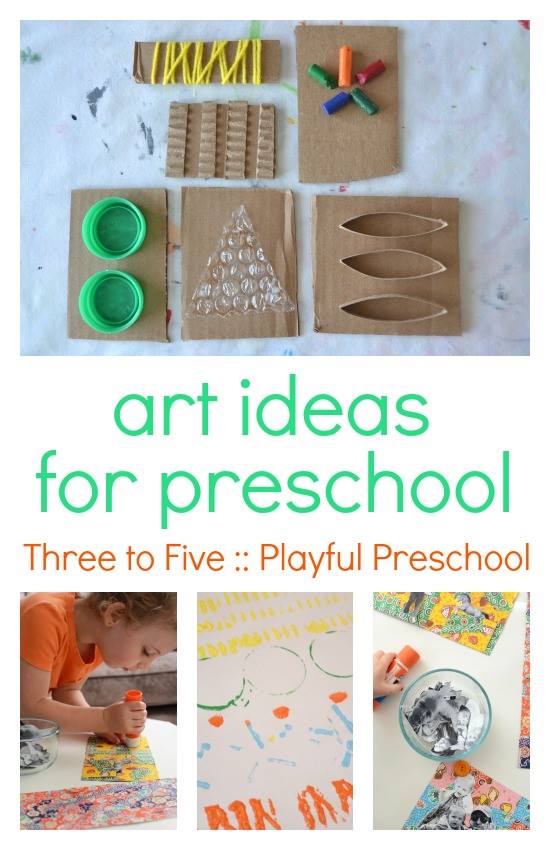
Are you looking for more preschool art projects?  Check out Three to Five: Playful Preschool. Get over 25 activities, 10 printables, and links to even more play-based preschool activities in this new e-book. Download it here.

https://www.creativefamilyfun.net/2014/05/three-to-five-playful-preschool.html 

Kaleidograph Review and Giveaway – Now Closed

April 25, 2014 By Terri Thompson

*Disclosure: We were sent free products from Kaleidograph for review. All opinions are my own.

We recently got to review a fun, new product, Kaleidograph. The girls love it and I love it. So *ahem* let me pull myself away from this awesome pattern design toy and tell you a little about it.


Kaleidograph is a simple toy inspired by the design toys from the original Froebel Kindergarten system. Each set contains several sturdy, double-sided, die-cut cards that fit in a sleeve about the size of a thick cd case. Each also comes with a double-sided poster showing some of the many possible combinations.

Turn them, twist them, and stack them. The possibilities are endless. Seriously. I don’t think you would ever run out of combinations. My girls loved coming up with their own designs. I tried to challenge myself to duplicate some of the designs on the poster.


They’re so much fun to play with at home. It’s perfect for quiet time before bed or a rainy afternoon. It would also be the perfect toy to slip in your purse for those times when you’re waiting in a restaurant or a doctor’s office. I love Kaleidograph because it’s completely open-ended. You can try to create the designs on the poster, or you can come up with your own. You can see from the picture below that my daughter was going for side-by-side designs. She tried to see how many she could make with one set. Stack as many cards as possible together or see what you can do with only two cards. Believe me when I tell you, you will love playing with this as much as your kids. Click here to find out where to buy your own set.
Now that you’ve seen just how awesome Kaleidograph is, would you like your own set? Kaleidograph and Red Hen Books and Toys are offering two winners their choice of a Kaleidograph set. That’s right, two of you will get to stay up playing all night long just like I do! (Kidding, I don’t stay up all night long playing, but I do love making designs with these) You can use the form below to enter (USA only). Only one entry is mandatory and it’s easy. Just tell me which set you would choose if you win. Your choices are Contrast, Flora, OpArt, and Crystal. (You can see all the sets here.) All other entries are completely optional!

a Rafflecopter giveaway


Becoming Marc Chagall ~ A Stained Glass Project

February 20, 2014 By Terri Thompson

Maybe it’s because the only work by Marc Chagall that I’ve ever seen in person are the America Windows at the Art Institute of Chicago, but when I decided to do a mini lesson about Chagall, I knew we were going to do a stained glass window project.

Chagall was born in 1887 in the small village of Vitebsk, close to the Polish border. (Vitebsk is in Belarus, which at the time of Chagall’s birth was part of the Russian empire. Belarus is now an independent country.)

Chagall wasn’t even exposed to art until he was a teenager, yet he found a passion. He had to leave his home and his family and eventually even Russia to learn all he could and pursue his passion.

Because he was Jewish, he faced persecution every step of the way. His story is fascinating and his artwork exquisite.

After looking at several examples of Chagall’s paintings (we had checked this book out from the library, we talked about his stained glass projects.

Chagall was in his 70’s when he started working with stained glass and in his 90’s when he created America Windows at The Art Institute of Chicago. Pretty amazing, isn’t it? We then set out to make our own stained glass inspired project.

Disclosure: There are Amazon Affiliate and other affiliate links in this article which means, at no additional cost to you, we could receive compensation for our recommendations. You can read our full disclosure policy on our Disclosure Page for more details.

Supplies Needed:

White paper
Oil pastels
Ruler
Blue watercolors (we used liquid watercolors)

We began by dividing our paper into four sections. We used the ruler to divide our paper evenly, then went over the lines with our black oil pastel several time to make them thick and dark. (You can do this project with crayon if you don’t have any oil pastels, just make sure you make dark, heavy lines.)

Next, we drew our pictures. I encouraged the girls to overlap their panes, to create pictures that were big. We also added some additional lines to mimic the look of stained glass.

After we had our drawings completed, we used our oil pastels to add a bit of color.

Both girls had a big yellow sun in their picture. They also added red, pink, and white.

We didn’t color in everything and left some spots as black outlines.

Once our pictures were complete, we painted over the entire thing with blue watercolor to look like our inspiration piece, America Windows.

I love how the finished product came out. The blue water color combined with the black oil pastel really gave our pictures the look of stained glass and you can definitely see the influence of Marc Chagall.

Have you ever done a project based off of a famous piece of art?

For More Information:

View this video about the history, creation, conservation, and installation of America Windows produced by the Art Institute of Chicago.

View some of Chagall’s painting at the Marc Chagall gallery at Guggenheim.org

Your elementary-aged kids may enjoy doing this Marc Chagall inspired watercolor project from Art Projects for Kids

Exploring Russia: Creating the Onion Domes

February 19, 2014 By Terri Thompson

Russia is so rich in culture, from the art, to the music, to the architecture. We could spend months learning about all these wonderful treasures. Wouldn’t that be fun?

One of the things I wanted to expose the girls to was the onion dome.  I chose the onion domes for this project because they are so prevalent throughout Russia.

You can find them adorning churches and cathedrals, the most famous being St. Basil’s Cathedral.

With the help of a couple of easy-to-make stencils, we turned this into a fun art project.

Disclosure: There are Amazon Affiliate and other affiliate links in this article which means, at no additional cost to you, we could receive compensation for our recommendations. You can read our full disclosure policy on our Disclosure Page for more details.

Supplies Needed:

Black construction paper
Cardboard (for stencils)
Scissors
Oil pastels
Washable craft paint (we used Crayola brand)

1. Before beginning, create a few stencils from your cardboard. We used a recycled cereal box. Create a couple of different sizes of the domes. Keep the design simple with a pointed top, rounded sides, and a flat bottom.

2. Use the stencils to create several different dome shapes on your paper. Trace the stencil with a white oil pastel.

3. Finish the domes by making towers underneath (two straight lines) with a dot and tall cross on top. Use the white oil pastel for all the drawing.

4. Add details to your domes and towers with different colors of oil pastels. Refer to pictures of St. Basil’s Cathedral or create your own ideas. Add swirls to the domes and designs on the towers. Make them ornate!

5. Once you have your towers and domes decorated, use your craft paint to paint your towers. I liked using washable paint because it did not completely cover the oil pastel designs. We painted completely over our designs creating a bit of a resist effect and more subtle coloring. You can also choose to use your designs as guidelines and paint up to them, not over them.

6. Once you are finished painting, retrace your outlines with the white oil pastel. It makes the colors and designs pop.

The onion domes are beautiful and I can only imagine how awe-inspiring they are in real life.

Enjoy making this simple art project with your kids and learn a little about Russian architecture in the process.

Art for Kids: Snowy Landscapes

January 7, 2014 By Terri Thompson

Even if you don’t have a winter wonderland outside your home, you can still create a pretty snowy landscape to enjoy indoors.

This simple art project can be easily adapted for both preschoolers and elementary-aged kids.

Disclosure: There are Amazon Affiliate and other affiliate links in this article which means, at no additional cost to you, we could receive compensation for our recommendations. You can read our full disclosure policy on our Disclosure Page for more details.

Supplies Needed:

White paper
Blue paper
Scissors
Glue
White paint
Bubble wrap

Use your white paper to make some rolling hills, mountains, snowy trees, or all three for your landscape.

A simple curvy strip cut from the white paper makes a lovely rolling hillside. Small triangles work great for snowy pine trees.

Arrange and glue your white paper to your blue construction paper.

Now it’s time to add the snow.

Cut a small bit of bubble wrap and paint white paint all over the bumpy side. Turn it over and start stamping you picture.

Keep repeating until you are satisfied with the amount of snow.

In the end, my daughter and I had a lot of fun making these landscapes together.

Often, I’ll sit side-by-side with my girls and craft with them. It keeps me from hovering and trying to control the process.

The result, my 4-year-old did all the work herself and was very proud of her finished landscape.

Get inspired by the snow and go craft with your kids!

  • « Go to Previous Page
  • Page 1
  • Interim pages omitted …
  • Page 4
  • Page 5
  • Page 6
  • Page 7
  • Page 8
  • Interim pages omitted …
  • Page 11
  • Go to Next Page »

Primary Sidebar

Footer

Categories

Archives

Copyright © 2026 ยท Designed by The Blog Surgery

Creative Family Fun uses cookies to improve your experience. These cookies provide feedback to our analytics and advertisers. We use the information to track views of the site, where you go and to know if you are a regular visitor or brand new as well as provide a personalized experience where possible. We'll assume you're ok with this, but you can opt-out if you wish.Accept Reject Read More
Privacy & Cookies Policy

Privacy Overview

This website uses cookies to improve your experience while you navigate through the website. Out of these, the cookies that are categorized as necessary are stored on your browser as they are essential for the working of basic functionalities of the website. We also use third-party cookies that help us analyze and understand how you use this website. These cookies will be stored in your browser only with your consent. You also have the option to opt-out of these cookies. But opting out of some of these cookies may affect your browsing experience.
Necessary
Always Enabled
Necessary cookies are absolutely essential for the website to function properly. This category only includes cookies that ensures basic functionalities and security features of the website. These cookies do not store any personal information.
Non-necessary
Any cookies that may not be particularly necessary for the website to function and is used specifically to collect user personal data via analytics, ads, other embedded contents are termed as non-necessary cookies. It is mandatory to procure user consent prior to running these cookies on your website.
SAVE & ACCEPT