• Skip to secondary menu
  • Skip to main content
  • Skip to primary sidebar
  • Skip to footer
  • Home
  • About
    • Email Me
    • Disclosure & Copyright
  • Start Here
  • Subscribe
  • Privacy Policy
  • Books for Moms

Creative Family Fun

Your one-stop shop for kids activities and family fun

  • Facebook
  • Instagram
  • Pinterest
  • Twitter
  • Spelling Activities
  • Family Fun
  • STEM
  • Movie Night
  • Toddler Activities

STEAM Activities

Hockey Science Experiment

December 26, 2018 By Terri Thompson

Have you ever watched hockey and thought about the puck?

How fast is it going? And how does it go so fast?

Those questions inspired a fun winter science project: Hockey Science.

What slides the best on ice? Experiment with friction and find out the answer with this fun hockey science fair project for kids.

Can you combine hockey with science? Of course you can!

We don’t have any hockey players in our family, but we definitely have hockey fans. Hockey is a hugely popular sport here in Minnesota for both girls and boys. We thought we’d have a little fun with hockey and turned it into a simple science experiment.

Or, if your sports loving kids are looking for a fun science fair idea, this project is perfect!

Disclosure: There are Amazon Affiliate and other affiliate links in this article which means, at no additional cost to you, we could receive compensation for our recommendations. You can read our full disclosure policy on our Disclosure Page for more details.

Our question: What will slide on ice?

Before we started our project, I needed to do a little prep.

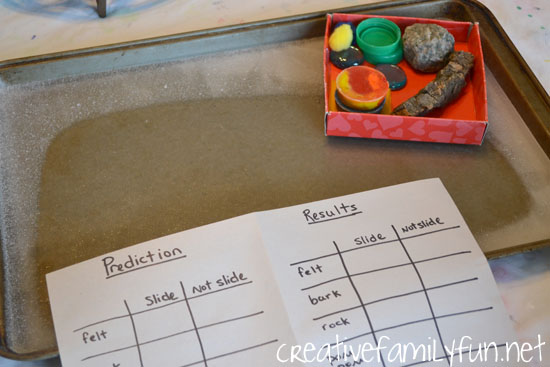
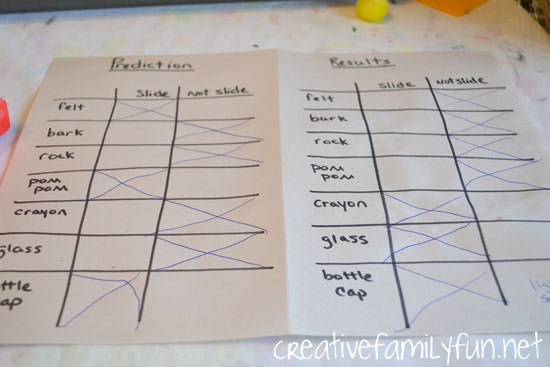
I created a two-sided chart. The first side for our predictions and the second side for our results.

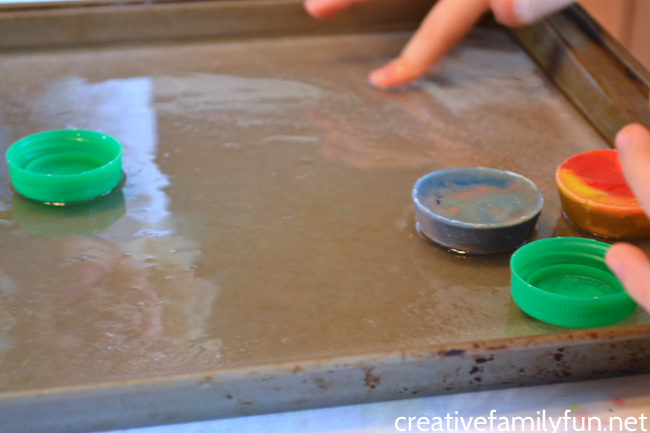
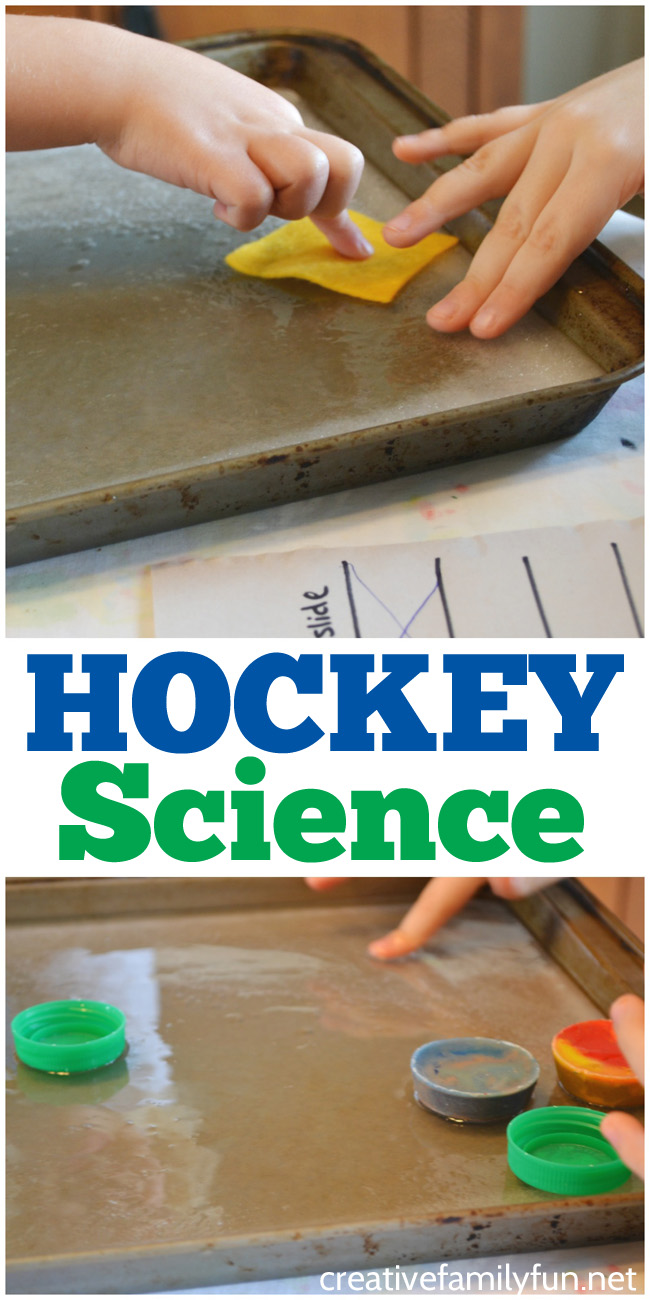
I also prepped a box of different items we already had on hand: glass marbles, muffin-tin crayons, milk jug caps, a rough piece of bark, a rough rock, puff balls, and small squares of felt.

Finally, I set a large sheet pan outside and filled it with water. Our sub-zero temperatures guaranteed that the water would freeze faster outside than in our own freezer. Brrrrrr! Stick your pan in the freezer if your day isn’t as cold as mine.

Make a prediction – form your hypothesis.

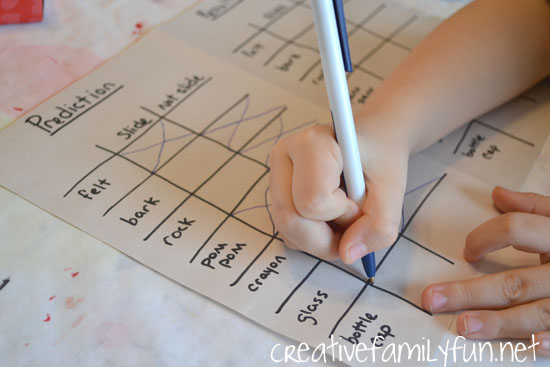
I showed my oldest (age 5 1/2) the items and asked her if she thought they would slide easily on the ice. I had her make her predictions by making an “x” in the appropriate box, “slide” or “not slide”.

Create your hypothesis by forming a statement: I predict ___________ will slide and ice and ____________ will not slide.

The hockey science experiment.

The experiment’s always the fun part, isn’t it?

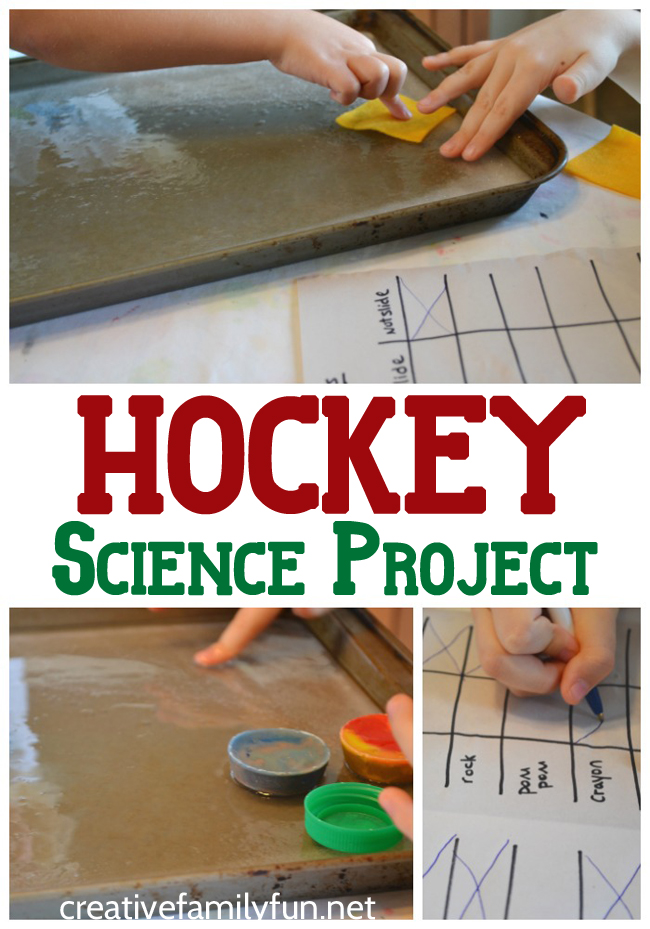
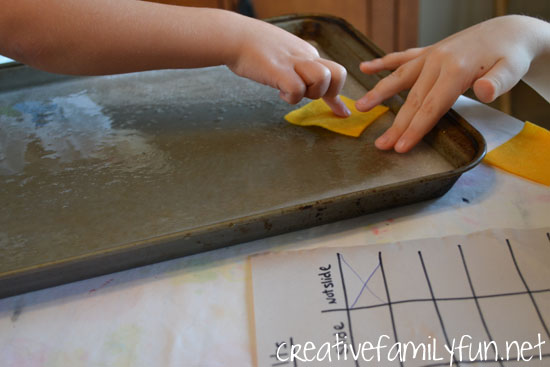
It was time to see how well everything slid. We brought in our frozen sheet pan and started sliding our objects across it. My oldest marked our results the same way as she did our predictions.

We discovered that felt and pom poms didn’t slide like we thought they would. And those glass marbles, wow! They slid the best!

Our conclusion.

The item that were smooth and light slid better than the items that were rough or soft.

Why?

We were exploring friction with our hockey science project. The rough (or fuzzy) items had more friction which slowed the objects down. The smoother the item, the less friction which meant they slid more quickly across the ice.

By now, we had a good idea as to why a hockey puck looks like it does.

But, how fast do those things really go?

Hockey pucks generally travel over 100 miles per hour and the fastest hockey shot clocked in at 110.3 miles per hour. (Source: Guinness Book of World Records) Wow!

What slides the best on ice? Experiment with friction and find out the answer with this fun hockey science project for kids.

You may also like one of these fun science projects:

Hot Chocolate Science

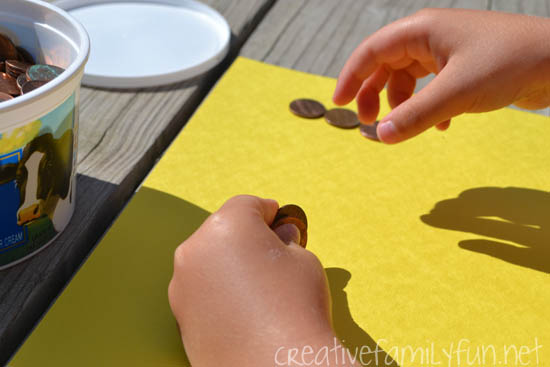
Chemical Reactions with Pennies

Will It Float? Making Boats

Ice and Snow Experiments at Inspiration Laboratories

How to Make a Magnifying Glass from Ice at Schooling a Monkey

What slides the best on ice? Experiment with friction and find out the answer with this fun hockey science project for kids.

My Must-Have Resources for Science Fun

I don’t know about you, but I don’t always have time to prep a fun science project. That’s why I love Green Kid Crafts Discovery boxes. The boxes are packed full of projects that are fun and inviting. You can choose to get a subscription or a one-off box based off of a specific theme. Any one you choose would be a lot of fun!

Here are some of our favorites (you can purchase and find out more at each link):

Get a monthly subscription.

Kitchen Science Box

Physics Box

Find all their fun STEM and science boxes here.

STEAM Family Activities

Wouldn’t it be so much fun to get STEAM family activities delivered to your inbox? I think so! That’s why I’ve created this fun series, STEAM Family Fun, to be delivered to your inbox. After going through all the letters in STEAM each week with a fun activity devoted to each, you’ll start receiving a fun STEAM activity once a month. (And I’ll also pop up in your inbox occasionally if I’ve got other fun things to share.)

Fill out the form below to start receiving STEAM Family Fun in your inbox.


STEAM Family Fun Email List Sign Up

Hands-On Perimeter Activity: Perimeter Lab

December 6, 2018 By Terri Thompson

Measurement is more than just grabbing a ruler and measuring the length of an object. There’s width, weight, circumference, area, perimeter, and more, so much more.

I love measurement activities because they’re so often hands-on activities, and this idea is no exception.

This perimeter activity is a fun invitation you can quickly set-up so your child can practice measuring and calculating.

Explore measurement with this simple hands-on perimeter activity for kids, a Perimeter Lab math invitation. They'll measure, calculate, and have fun.

So, grab a few items and let’s create a Perimeter Lab.

Disclosure: There are Amazon Affiliate and other affiliate links in this article which means, at no additional cost to you, we could receive compensation for our recommendations. You can read our full disclosure policy on our Disclosure Page for more details.

Explore measurement with this simple hands-on perimeter activity for kids, a Perimeter Lab math invitation. The'll measure, calculate, and have fun.

Set-up your perimeter activity

Set-up is so easy!

First, you’ll need some measurement tools: a ruler, pencil, and your perimeter lab recording sheet.

Click this link to download your perimeter lab recording sheet.

You’ll also need a variety of things to measure. Choose items of various sizes that are rectangular or square. Look for books, boxes, board or card games. You could also cut pieces of paper into different sized squares or rectangles.

Explore measurement with this simple hands-on perimeter activity for kids, a Perimeter Lab math invitation. The'll measure, calculate, and have fun.

Does your child already know how to find the perimeter or are they just learning?

If they already know, set them loose with this math invitation for a fun way to review perimeter.

They can use the recording sheet to walk through the process and find the perimeter of the different objects that you’ve set out.

But, if they don’t know, you can use the recording sheet to walk them through the process.

How do you find the perimeter of an object?

First, grab the ruler. You’ll want to measure side A, side B, side C, and side D of your rectangular object. (See the picture above for reference.)

After you’ve recorded all the measurements, add all the sides together to find the perimeter of the object.

Explore measurement with this simple hands-on perimeter activity for kids, a Perimeter Lab math invitation. The'll measure, calculate, and have fun.

Variations of this perimeter activity

Since we’re just grabbing random objects to measure, you may want to alter this perimeter activity just a bit to fit with your child’s ability.

Depending on your child’s ability, you may want to have them round their measurements to the nearest inch or half-inch. If they’re comfortable with fractions or decimals, they can use more specific measurements.

If all you want to do is get comfortable with calculating perimeter, then getting exact measurements isn’t necessary.

Explore measurement with this simple hands-on perimeter activity for kids, a Perimeter Lab math invitation. The'll measure, calculate, and have fun.

Check your work.

There’s no answer key to this project. You can pre-measure all the items (if you really want to) to create an answer key. Or, just look over the process and the answers to see if your child is correctly figuring perimeter. You can also have your child double-check their work.

Correct answers are important in math, but so is learning the process. Know the process first and then focus on finding the correct measurement later.

A Perimeter Lab is a fun way to learn the process behind calculating perimeter. You’re doing real-life measurements and not just looking at a drawing on a piece of paper. It’s fun, it’s hands-on, and it’s a great way to extend learning at home.

Explore measurement with this simple hands-on perimeter activity for kids, a Perimeter Lab math invitation. They'll measure, calculate, and have fun.

You may also like one of these math activities:

Math Paper Plate Games

Measuring with Hearts

Number Line Secret Codes

Architecture STEM: Area and Perimeter City at Teach Beside Me

Fun hands-on math resources

When we practice math at home, we love to play games. These games are so much fun and a great hands-on activity. Plus, it’s a great way to combine a family activity with learning. Check out some of these awesome math games below:

Are you looking for more kids activities?

Join our fun Facebook community, Creative Family Fun for Busy Families, for daily activities that are great for kids and families. We’ll chat, share, and have fun. It’s a safe and private place to share ideas for family and kids activities.

I’d love for you to join me! Just click the link below, request to join, and answer the questions (they’re easy, I promise). Come join the fun! Join the Creative Family Fun for Busy Families community here.

Hot Chocolate Science Experiment

October 17, 2018 By Terri Thompson

I love my girls’ natural curiosity when it comes to science. So, when my daughter asked me “Can we do a hot chocolate science experiment?” I knew it was time to get creative.

Working together, we came up with an amazing STEM activity.

When we make instant hot chocolate, we dissolve the contents of the packet into hot water. We decided to find out if temperature affected the speed that it dissolves.

This hot chocolate science experiment is a fun way to learn about how temperature affects the rate at which hot chocolate dissolves. It's a great STEM activity that uses items you probably already have in your kitchen.

Let’s get started!

Disclosure: There are Amazon Affiliate and other affiliate links in this article which means, at no additional cost to you, we could receive compensation for our recommendations. You can read our full disclosure policy on our Disclosure Page for more details.

Supplies Needed for Your Hot Chocolate Science Project

First we needed to gather our supplies. Luckily most of the items were already in our kitchen.

Here’s what you’ll need:

Three heat-proof mugs
Three packets of instant hot chocolate
Measuring cup
Water
Spoons
Stopwatch or timer
Notebook for recording your results.

Fun cocoa science project

How to Do Your Hot Chocolate Science Experiment

We started our experiment by making a prediction. Which temperature of water would dissolve the hot chocolate the quickest?

The girls made their prediction (they chose hot) and then it was time to experiment.

We started by emptying our hot chocolate packets into our mugs, one packet per mug. Then we moved on to testing the different temperatures of water.

We tested each temperature, one at a time. We were very vague with our temperatures, using ice cold water, room temperature water, and hot water. You can always add a kitchen thermometer to measure the temperature of the water to add an extra measurement element to your experiment.

My girls took turns measuring the water, stirring, and operating the stopwatch. We used the digital stopwatch on my phone to time how long the hot chocolate took to dissolve.

STEM Hot Chocolate Activity

For each cup, we measured 6 oz. of water. We used cold water from our refrigerator over ice, lukewarm water from the tap, and I did my grown-up duty and heated water in the microwave for the last mug.

Once the water was added to a mug, one girl started the stopwatch and the other started stirring. We stopped the stopwatch as soon as we saw the hot chocolate had dissolved.

Does Hot Chocolate Dissolve Faster in Hot Water or Cold Water?

We started with the ice cold water. My oldest daughter was in charge of the stirring. She stirred and stirred and stirred some more. It wouldn’t dissolve. Eventually, we made the decision to stop after three minutes. You can see the results above. Disgusting!

We moved on to the room temperature water, which clocked in at 1 minute 38 seconds. And, then the hot water, which only took 28 seconds.

The results:  hot water takes the least amount of time. We predicted that because the instructions said to use hot water when we made hot chocolate. (And, it’s called hot chocolate after all…) But, now we know why we need to use hot water.

Why Does Hot Chocolate Powder Dissolve Faster in Hot Water?

Hot water has more energy than cold water. With more energy, the molecules in the water move faster breaking down the hot chocolate mix quicker.

Once we finished writing our results, we unceremoniously dumped the cold water hot chocolate sludge down the kitchen sink. Ick.

What happened to the other two mugs? They were topped with a dollop of whipped cream and enjoyed!

Yield: 1 experiment

Hot Chocolate Science Experiment

This hot chocolate science experiment is a fun way to learn about how temperature affects the rate at which hot chocolate dissolves.

Learn about how temperature affects the rate at which hot chocolate mix dissolves with this fun science experiment.

Prep Time 5 minutes
Active Time 25 minutes
Total Time 30 minutes
Difficulty Easy
Estimated Cost under $5

Materials

  • 3 heat-proof mugs
  • 3 packets of instant hot chocolate
  • Water
  • Stopwatch or timer
  • Notebook for recording your results

Tools

  • Measuring cup
  • Spoons

Instructions

  1. Make a prediction. Which temperature of water will dissolve the hot water the fastest: cold, room temperature, or hot? Write it in your notebook.
  2. Empty your hot chocolate packets into your mugs. You need three total mugs with one packet per mug.
  3. Get your stopwatch or timer reader to start measuring your time.
  4. Choose the first mug and add 1 cup (8 oz.) of cold water to your mix.
  5. Start the timer and start stirring. Record how long it takes for your hot chocolate mix to dissolve.
  6. Grab your next mug and add 1 cup of room temperature water to your hot chocolate mix.
  7. Start the timer and start stirring. How long did this one take?
  8. Next, grab your last mug. Have a grown up add 1 cup of hot water to your mug.
  9. Start the timer and start stirring. Record the time it takes to dissolve.
  10. Compare your results to your prediction. Were you right?

Notes

Use a kitchen thermometer to measure the temperature of your water if you would like. This is a great way to practice reading a thermometer and adds more data to your experiment.

Recommended Products

As an Amazon Associate and member of other affiliate programs, I earn from qualifying purchases.

  • Vremi 12 oz Coffee Mugs Set of 6 - White Ceramic Porcelain Mugs for Women and Men - Hot Tea Mug Set with Cool Decorative Red Orange Yellow Green Blue Purple Color Trim - Microwave and Dishwasher Safe
    Vremi 12 oz Coffee Mugs Set of 6 - White Ceramic Porcelain Mugs for Women and Men - Hot Tea Mug Set with Cool Decorative Red Orange Yellow Green Blue Purple Color Trim - Microwave and Dishwasher Safe
  • Nestle Hot Chocolate Mix, Hot Cocoa, Rich Chocolate Flavor, Made with Real Cocoa, 0.71 oz Packets (Pack of 50)
    Nestle Hot Chocolate Mix, Hot Cocoa, Rich Chocolate Flavor, Made with Real Cocoa, 0.71 oz Packets (Pack of 50)
  • Pyrex Prepware 1-Cup Glass Measuring Cup
    Pyrex Prepware 1-Cup Glass Measuring Cup
© Terri Thompson
Project Type: Kitchen Science Experiment / Category: Science
This hot chocolate science experiment is a fun way to learn about how temperature affects the rate at which hot chocolate dissolves.

Our hot chocolate science experiment and turned out great!

More STEAM Activities to Try

Hockey Science

Christmas Science: Grow the Grinch’s Heart

Edible STEM Projects for Kids

Marshmallow Engineering STEAM Building Challenge

28 Awesome STEM Challenges for the Elementary Classroom at Teach Junkie

STEM Activities for Kids in the Kitchen at iGame Mom

Do more science at home:

We love Green Kid Crafts boxes because they provide easy, ready-to-do STEM activities we can try at home. You’ll receive easy-to-follow instructions plus the supplies that you need for up to 6 activities. You can get a monthly subscription or buy a single themed box. If you enjoyed our hot chocolate science experiment, you may enjoy the Kitchen Science or the monthly Discovery Box subscription.

Click here for the Kitchen Science box.

Click here for the monthly Discovery Box subscription.

Are you looking for more activities?

Join our fun Facebook community, Creative Family Fun for Busy Families, for daily activities that are great for kids and families. We’ll chat, share, and have fun. It’s a safe and private place to share idea for family and kids activities. I’d love for you to join me! Just click the link below, request to join, and answer the questions (they’re easy, I promise). Come join the fun! Join the Creative Family Fun for Busy Families community here.

Spinning Tops Color Mixing STEM Activity

August 17, 2018 By Terri Thompson

This fun color mixing STEM activity is a little bit science, a little bit art, and a whole lot of fun!

We tried to see if we could mix colors through motion and came up with some awesome results with these Color Mixing Tops.

STEM projects can be so much fun!

Our color mixing tops were simple to make and used supplies that you probably already have at home.

So, let’s get out the craft supplies and get ready to have fun with this STEAM activity.

Disclosure: There are Amazon Affiliate and other affiliate links in this article which means, at no additional cost to you, we could receive compensation for our recommendations. You can read our full disclosure policy on our Disclosure Page for more details.

Supplies needed for this color mixing activity

Thin cardboard (recycled cereal or cracker box)
Circle template
Scissors
Paint – red, blue, yellow
Toothpicks

How to Make a Color Mixing Top

We used our circle template (the top of our Barrel of Monkeys) to trace a few circles on our cereal box. A drinking glass or a can would also work for your template.

You only need one circle per top. We made four different tops to test our different color combinations.

After we cut out our circles, we divided them into four equal sections.

Using our primary paint colors, we alternated the colors in each section. We used only two colors per top.

As an alternative, my 5-year-old divided her circles in half, with each half a different color.

Once our paint was dry, I made a tiny hole in the center of each top. (Use a pair of sharp scissors or a paper clip to make the hole.)

If you divided your top into quarters, the center is very easy to find.

We then poked a toothpick into the middle of each circle.

Color Mixing STEM Activity

They turned out so pretty! But, did they work? There’s nothing left to do but try to see if they word.

We started spinning and were amazed to see the colors blend together. So cool!

I tried my hardest to get some good pictures, but it wasn’t easy! Have you ever tried to photograph a spinning top in low light? Boy, is that tough! I got plenty of crummy pictures, but I was able to capture one that showed the color mixture effect.

In the photo below. We were spinning our red and yellow top from the picture above. Can you see the orange?

We also discovered that the tops divided into quarters blended the colors much better than the ones divided into halves.

Use these fun spinning tops as a lesson in color with this color mixing STEM activity. It's so fascinating to watch the colors mix while they spin!

I always love combining science and art. We always have so much fun!

And, this color mixing STEM activity was the perfect activity to combine science and art. We learned a lot while we got creative.

Use these fun spinning tops as a lesson in color with this color mixing STEM activity. It's so fascinating to watch the colors mix while they spin!

You may also like one of these STEM activities:

Melting Crayons Science Experiment

Marshmallow Engineering

Color Mixing Lab

Art + Science: Sun Prints

Color Pattern Projectors at Teach Beside Me

My must-have STEM resource

We love STEM so much that we’ve decided to have fun STEM activities delivered to our house each month with Green Kid Crafts. The activities are so much fun and all ready for you to create and learn.

You should check out their great products. You can get a subscription like we have, or just buy a single box.

Get a subscription here.

Or browse all their fun STEM boxes!

Get fun family STEM activity delivered to your inbox – for free!

Wouldn’t it be so much fun to get STEAM family activities delivered to your inbox? I think so! That’s why I’ve created this fun series, STEAM Family Fun, to be delivered to your inbox. After going through all the letters in STEAM each week with a fun activity devoted to each, you’ll start receiving a fun STEAM activity once a month. (And I’ll also pop up in your inbox occasionally if I’ve got other fun things to share.)

Fill out the form below to start receiving STEAM Family Fun in your inbox.


Easy Sun Prints STEM Activity

June 6, 2018 By Terri Thompson

We’ve been reading and learning about the sun lately. It seemed like a fitting subject to learn about during the summer.

While thinking about some things we could do I remembered making sun prints when I was a kid.

It was an easy and fascinating project; one that was perfect for a summer day.

So, we combined a little science with a little art and made sun prints.

Let’s gather our supplies to do this fun STEM project.

Combine art and science with this fun Sun Prints STEAM activity that uses the power of the sun to make art. It's a fun project for a sunny day!

Disclosure: There are Amazon Affiliate and other affiliate links in this article which means, at no additional cost to you, we could receive compensation for our recommendations. You can read our full disclosure policy on our Disclosure Page for more details.

Supplies Needed:

Dark, bright colored construction paper (red, orange, blue, or black would work perfectly)
Pennies
Tape
Lots of sunshine

How to make sun prints

Find a nice sunny spot to work on your project. Once you’ve arranged your coins, you will not want to move your paper until your project is complete, so choose wisely.

We chose a spot in our backyard that had sunshine for many hours during the day.

If the day is windy, you will want to tape your paper down so that it won’t blow away. We made the mistake of not taping ours down and had to go rescue our pennies halfway through the project. Let me tell you, pennies are hard to find in a grassy lawn!

Arrange your pennies in a pretty design on the paper. Then, don’t move them for several hours. Create a pretty design, try to write a word, or make a simple picture.

Observe the process

Make some observations along the way. Is your paper getting darker or lighter? What do you think is happening underneath the pennies? Touch a penny. How does it feel?

Combine art and science with this fun Sun Prints STEAM activity that uses the power of the sun to make art. It's a fun project for a sunny summer day!

We left our paper outside for 8 hours. You don’t have to leave it out as long as we did, but the longer the sun shines on your paper, the more contrast you’ll have on your design.

The first thing we noticed on our design was that our paper was a lot lighter than when we first brought it out.

Combine art and science with this fun Sun Prints STEAM activity that uses the power of the sun to make art. It's a fun project for a sunny summer day!

Next we started removing our pennies and saw the design form right before our eyes.

The paper underneath stayed dark because the pennies blocked the paper-fading UV rays of the sun, a process described as “really cool” by my girls.

Above is a close-up of one of the pictures. If you can’t tell, it’s a girl with long pigtails standing on the ground.

Have you ever made sun prints? It’s a fun experiment to show just how powerful the sun’s rays are.

You may also like one of these fun STEAM activities:

Color Mixing Lab

Spinning Tops Color Mixing STEM Activity

Melting Crayons Science Experiment

Summer Science Experiments and Activities for Kids at Frugal Fun for Boys and Girls

My must-have STEM resource

I don’t know about you, but I don’t always have time to prep a fun science project. That’s why I love Green Kid Crafts Discovery boxes. The boxes are packed full of projects that are fun and inviting. You can choose to get a subscription or a one-off box based off of a specific theme. Any one you choose would be a lot of fun!

Get a subscription here.

Get STEM fun delivered to your inbox

Wouldn’t it be so much fun to get STEAM family activities delivered to your inbox? I think so! That’s why I’ve created this fun series, STEAM Family Fun, to be delivered to your inbox. After going through all the letters in STEAM each week with a fun activity devoted to each, you’ll start receiving a fun STEAM activity once a month. (And I’ll also pop up in your inbox occasionally if I’ve got other fun things to share.)

Fill out the form below to start receiving STEAM Family Fun in your inbox.


  • « Go to Previous Page
  • Page 1
  • Page 2
  • Page 3
  • Page 4
  • Page 5
  • Page 6
  • Page 7
  • Go to Next Page »

Primary Sidebar

Footer

Categories

Archives

Copyright © 2026 · Designed by The Blog Surgery

Creative Family Fun uses cookies to improve your experience. These cookies provide feedback to our analytics and advertisers. We use the information to track views of the site, where you go and to know if you are a regular visitor or brand new as well as provide a personalized experience where possible. We'll assume you're ok with this, but you can opt-out if you wish.Accept Reject Read More
Privacy & Cookies Policy

Privacy Overview

This website uses cookies to improve your experience while you navigate through the website. Out of these, the cookies that are categorized as necessary are stored on your browser as they are essential for the working of basic functionalities of the website. We also use third-party cookies that help us analyze and understand how you use this website. These cookies will be stored in your browser only with your consent. You also have the option to opt-out of these cookies. But opting out of some of these cookies may affect your browsing experience.
Necessary
Always Enabled
Necessary cookies are absolutely essential for the website to function properly. This category only includes cookies that ensures basic functionalities and security features of the website. These cookies do not store any personal information.
Non-necessary
Any cookies that may not be particularly necessary for the website to function and is used specifically to collect user personal data via analytics, ads, other embedded contents are termed as non-necessary cookies. It is mandatory to procure user consent prior to running these cookies on your website.
SAVE & ACCEPT