• Skip to secondary menu
  • Skip to main content
  • Skip to primary sidebar
  • Skip to footer
  • Home
  • About
    • Email Me
    • Disclosure & Copyright
  • Start Here
  • Subscribe
  • Privacy Policy
  • Books for Moms

Creative Family Fun

Your one-stop shop for kids activities and family fun

  • Facebook
  • Instagram
  • Pinterest
  • Twitter
  • Spelling Activities
  • Family Fun
  • STEM
  • Movie Night
  • Toddler Activities

Crafts

Simple Sewing ~ Constellation Wall Hanging

January 14, 2014 By Terri Thompson

I’ve never been good at spotting constellations in the sky.

I’ve always wanted to be because there’s something endlessly appealing about laying back and seeing all those pictures in the sky. Maybe I’ll try again this summer once it’s warm enough to sit outside at night for long periods!

I created this project to learn about and celebrate the beauty of the constellations. It’s perfect for elementary-aged kids, tweens, teens, or even adults.

Even if you’ve never picked up a needle, you should be able to create these fun constellation wall hangings.

Disclosure: There are Amazon Affiliate and other affiliate links in this article which means, at no additional cost to you, we could receive compensation for our recommendations. You can read our full disclosure policy on our Disclosure Page for more details.

Supplies Needed:

Dark blue (or black) felt
White embroidery thread
Needle
Sharp scissors

Tacky Glue

Ribbon (for hanging)

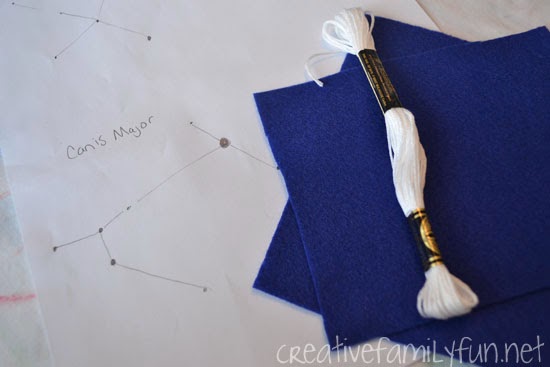
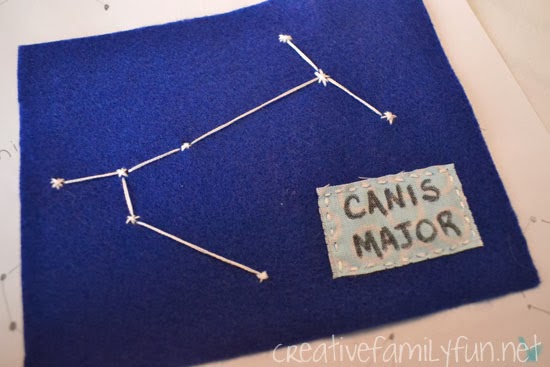
Before beginning this project, you need to decide which constellations you want to create. I used this constellation guide at StarDate.org. You can also find printable constellation maps at Mr. Printable. I chose a few to create (Canis Major and Cygnus) and drew them on paper.

Cut your felt into small rectangles. I had sheets of craft felt and cut it into quarters. This left me with 4-3/4 inches by 6 inches per rectangle

You will need two rectangles per wall hanging.

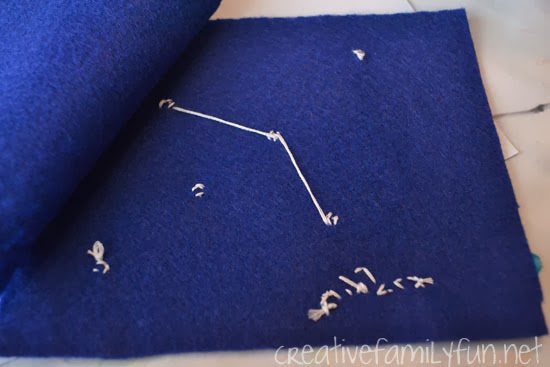
Next, transfer your constellation drawing to your felt. This step doesn’t need to be difficult. I used one of our washable markers and lightly made dots on my felt for each star. If you keep your markings small, your stitches will cover it.

Start stitching your stars. Embroidery thread is thick with six strands of thread combined. Cut off a length of thread and then pull the strands apart, so that you are stitching with three strands instead of six. For each star, I stitched an x over top of a +. Some stars were bigger than others according to how the constellation was pictured. Then, I stitched long lines in between each star, using my drawing as a guide.

Once you’ve sewn your constellation, you’ll want to label it.

I tried two different methods. For my first constellation (Cygnus), I chose to stitch the name with my embroidery thread. Honestly, this method was a bit difficult and you wouldn’t want to try it if you are a beginning sewer.

The second method was to attach a label. For Canis Major, I used a scrap piece of fabric and wrote the name with permanent marker (a Sharpie). I cut it down to fit on my picture and simply stitched it into the corner. I prefer this method because it was easier and I thought it looked much better than the stitched name.

After you are finished and satisfied with your constellation, it’s time to cover up that ugly back. No matter how good of a seamstress you are, the back never looks good.

I used another rectangle of felt, cut the same size as my wall hanging, to cover the back.

Instead of sewing my back on, I used Tacky Glue. (This stuff is amazing and will hold the felt together. I’m not sure if any other brands of glue would work as well.) If you prefer, you can sew the front to the back using thread that matches the color of the felt.

If using the glue, run a line all around the edge. Cut a piece of ribbon for hanging and stick it down on the glue (see picture below) before attaching the back. If you let your glue dry completely before hanging, your ribbon will stay put.

Once your glue has dried, hang your creations on the wall. Make a few or a lot. I think it would be stunning to make a small gallery of your favorite constellations.

For more information about the constellations:

Play the Constellation Hunt game at Astronomy for Kids. This game challenges you to spot the different constellations in the night sky.

Read the book, A Child’s Introduction to the Night Sky: The Story of the Stars, Planets, and Constellations–and How You Can Find Them in the Sky by Michael Driscoll. This book covers everything and is perfect for a kid who is fascinated by the night sky.

Print and make a star finder at Nasa.gov. You can also find kid-friendly information about finding these constellations in the sky.

In the Tall, Tall Grass Craft and Book

October 3, 2013 By Terri Thompson

In the Tall, Tall Grass by Denise Fleming is always a delightful book to read.

You get to explore all the creatures that can live in the tall grass through larger-than-life illustrations that are simply beautiful.

This time, we decided to expand the book by doing our own tall, tall grass craft.

Disclosure: There are Amazon Affiliate and other affiliate links in this article which means, at no additional cost to you, we could receive compensation for our recommendations. You can read our full disclosure policy on our Disclosure Page for more details.

Supplies Needed:

White construction paper
Green construction paper
Markers, crayons, or colored pencils
Scissors
Glue stick

To prep the project, I folded a 2-inch strip on the long side of the green construction paper and drew vertical lines up to the fold for cutting.

After reading the book, I challenged Miss Preschool to draw some of the creatures that could be hiding in the grass on her white paper.

She decided to try and copy some of the pictures in the book. She did a great job copying the snake, bird, and caterpillar.

After she finished drawing, I gave her the green paper and her scissors. (I’m still trying to include scissor skills in all of our craft projects.)

I asked her to cut my pencil-drawn lines up to the fold.

Next we glued the uncut strip of the green paper along the bottom of our white paper. We glued it down so that the strips would easily fold down. (See the picture below for guidance.)

When we were done, we were able to peek at our own animals through the tall, tall grass. It was easy, fun, and a great way to extend the joy of a book we already love.

Have you ever read In the Tall, Tall Grass?

Easy Fingerprint Strawberry Craft

September 20, 2013 By Terri Thompson

Miss Preschool and I recently read The Little Mouse, The Red Ripe Strawberry, and The Big Hungry Bear by Don and Audrey Wood and wanted to make a craft to go with the book.

We decided to make these simple fingerprint strawberries.

My motivation behind this craft was to create a project that would give Miss Preschool some scissor practice.

Disclosure: There are Amazon Affiliate and other affiliate links in this article which means, at no additional cost to you, we could receive compensation for our recommendations. You can read our full disclosure policy on our Disclosure Page for more details.

Supplies Needed:

Red construction paper
Green construction paper
Scissors
Glue
Black paint
Small piece of felt

Before beginning I drew a simple strawberry shape on the red paper and the leaves and stem on the green paper. My strawberry shape almost took the whole sheet of red construction paper.

Miss Preschool started by cutting out the strawberry shape and the leaves with her scissors.

We then flipped them both over so you couldn’t see the lines I had drawn. (I drew in black marker to make it clear where she needed to cut.)

Using a glue stick, she glued the leaves and stem onto the top of the strawberry.

I took a small piece of felt and put it on an empty lid. I added some black paint and blotted it a bit to get rid of any big clumps. We used this like you would a ink pad. Miss Preschool stuck her finger on the paint, then used it to add her fingerprints all over the strawberry.

We filled up the strawberry since we were using her fingerprints to mimic the seeds.

In the end, we had a simple project.

But we accomplished our goals of cutting practice and supplementing our book.

Remember, craft projects don’t have to be complicated to be fun (and look good)!

What’s the last simple craft project you and your kids have done?

Stenciling with Cinnamon-Scented Paint

September 17, 2013 By Terri Thompson

We added a fun twist to our painting recently with the addition of cinnamon.

Our easy cinnamon-scented paint smelled good and had a fun texture.

We used our paint to make apple designs with a simple paper plate stencil.

Disclosure: There are Amazon Affiliate and other affiliate links in this article which means, at no additional cost to you, we could receive compensation for our recommendations. You can read our full disclosure policy on our Disclosure Page for more details.

Supplies Needed:

For the Cinnamon-Scented Paint
Red paint (non-toxic kid’s paint is the best)
Cinnamon
Toothpick or small paint brush for stirring

For the Stencils
Paper plateSharp scissors
Sponge
Clothes pin

To make the paint I mixed together cinnamon and red paint. I used about the same amount for each, but you can use less cinnamon if you are making up a big batch.

I used a plastic lid for mixing and we stirred it up until the cinnamon was completely mixed into the paint. Your red paint will become darker and grittier.

I prepared a paper plate stencil of an apple ahead of time.

Simply draw a shape in the middle of your paper plate and use your sharp scissors to cut it out. (This step is best done by an adult.)

Miss Preschool then clipped a small piece of sponge with a clothes pin and started painting.

If you pat the paint on with the sponge instead of smearing, your stencil print will be much sharper.

Miss Preschool had lots of fun painting and stopping to smell her paint. When you mix up your cinnamon-scented paint, use a non-toxic kid’s paint so you won’t have to worry about how often your child smells the paint.

Believe me, they’ll smell it a lot because it smells so great!

Our apples turned out great. They had a fun texture and the scent lingered long after the paint was dry. We’ll definitely try mixing things into our paint again!

What would you combine with paint to add scent and texture?

Hand Print Sunflower Craft

September 12, 2013 By Terri Thompson

I’ve seen many versions of hand print sunflowers around the Web and really wanted to do one with the girls.

So, recently, Miss Preschool and I got to work and created these beautiful sunflowers.

Disclosure: There are Amazon Affiliate and other affiliate links in this article which means, at no additional cost to you, we could receive compensation for our recommendations. You can read our full disclosure policy on our Disclosure Page for more details.

Supplies Needed:

Thin cardboard or heavy paper (a cereal box would work well)
Yellow and green paint
Brown construction paper
White glue
Sunflower seeds in the shell

Before we began, I lightly drew a large circle on the top half of our cardboard. I used the cardboard so that we will have a sturdy surface to hold up our sunflower seeds. The circle was used as a template to help place the hand prints.

I painted Miss Preschool’s little hand with yellow (washable) paint and helped her place her hand prints around the circle, overlapping each one.

She loved the sensation of getting her hands painted, so, according to Miss Preschool, this was the best part of the whole project.

She then cut a large circle out of the brown construction paper for the center.

We glued it down in the center of our hand prints.

Next, we added glue all over the top of our brown circle and Miss Preschool started adding sunflower seeds.

She covered the entire circle with our seeds.


While waiting for the glue to dry, Miss Preschool used the green paint to make her stem and leaves.

Once we were done we had a beautiful sunflower that is now prominently on display in our house.

Have you done a sunflower craft lately?

  • « Go to Previous Page
  • Page 1
  • Interim pages omitted …
  • Page 17
  • Page 18
  • Page 19
  • Page 20
  • Page 21
  • Interim pages omitted …
  • Page 31
  • Go to Next Page »

Primary Sidebar

Footer

Categories

Archives

Copyright © 2026 ยท Designed by The Blog Surgery

Creative Family Fun uses cookies to improve your experience. These cookies provide feedback to our analytics and advertisers. We use the information to track views of the site, where you go and to know if you are a regular visitor or brand new as well as provide a personalized experience where possible. We'll assume you're ok with this, but you can opt-out if you wish.Accept Reject Read More
Privacy & Cookies Policy

Privacy Overview

This website uses cookies to improve your experience while you navigate through the website. Out of these, the cookies that are categorized as necessary are stored on your browser as they are essential for the working of basic functionalities of the website. We also use third-party cookies that help us analyze and understand how you use this website. These cookies will be stored in your browser only with your consent. You also have the option to opt-out of these cookies. But opting out of some of these cookies may affect your browsing experience.
Necessary
Always Enabled
Necessary cookies are absolutely essential for the website to function properly. This category only includes cookies that ensures basic functionalities and security features of the website. These cookies do not store any personal information.
Non-necessary
Any cookies that may not be particularly necessary for the website to function and is used specifically to collect user personal data via analytics, ads, other embedded contents are termed as non-necessary cookies. It is mandatory to procure user consent prior to running these cookies on your website.
SAVE & ACCEPT