• Skip to secondary menu
  • Skip to main content
  • Skip to primary sidebar
  • Skip to footer
  • Home
  • About
    • Email Me
    • Disclosure & Copyright
  • Start Here
  • Subscribe
  • Privacy Policy
  • Books for Moms

Creative Family Fun

Your one-stop shop for kids activities and family fun

  • Facebook
  • Instagram
  • Pinterest
  • Twitter
  • Spelling Activities
  • Family Fun
  • STEM
  • Movie Night
  • Toddler Activities

Crafts

Classic Crafts ~ Painted Rock Turtles

July 16, 2013 By Terri Thompson

Did you ever paint rocks when you were a kid?

It’s always so much fun to see what you can create on a smooth rock surface.

We’ve painted rocks in the past, that time using abstract designs.

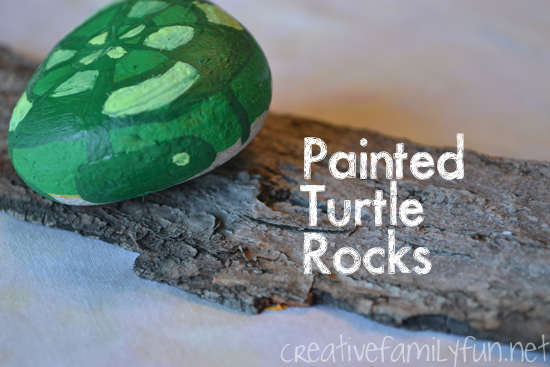
But, this time we wanted to turn them into animals.

Keep reading and I’ll show you how to turn a rock into a cute turtle.

Disclosure: There are Amazon Affiliate and other affiliate links in this article which means, at no additional cost to you, we could receive compensation for our recommendations. You can read our full disclosure policy on our Disclosure Page for more details.

Supplies Needed:

Craft paint in varying colors of green
Paint brushes
Rocks (Look for rocks that are rounded with a smooth surface)

*Note: I used acrylic craft paint for a darker, even coat. Try to avoid washable paint as it will not cover the rock’s surface as well.

Step 1: Paint the top and sides of your rock in the medium green color.

Step 2: Use your darkest green color to paint circles in increasing size from the middle to the end of your medium green paint.

Step 3: Still using your dark green, paint straight lines from the center to the outer edges. It will look like a spider web.

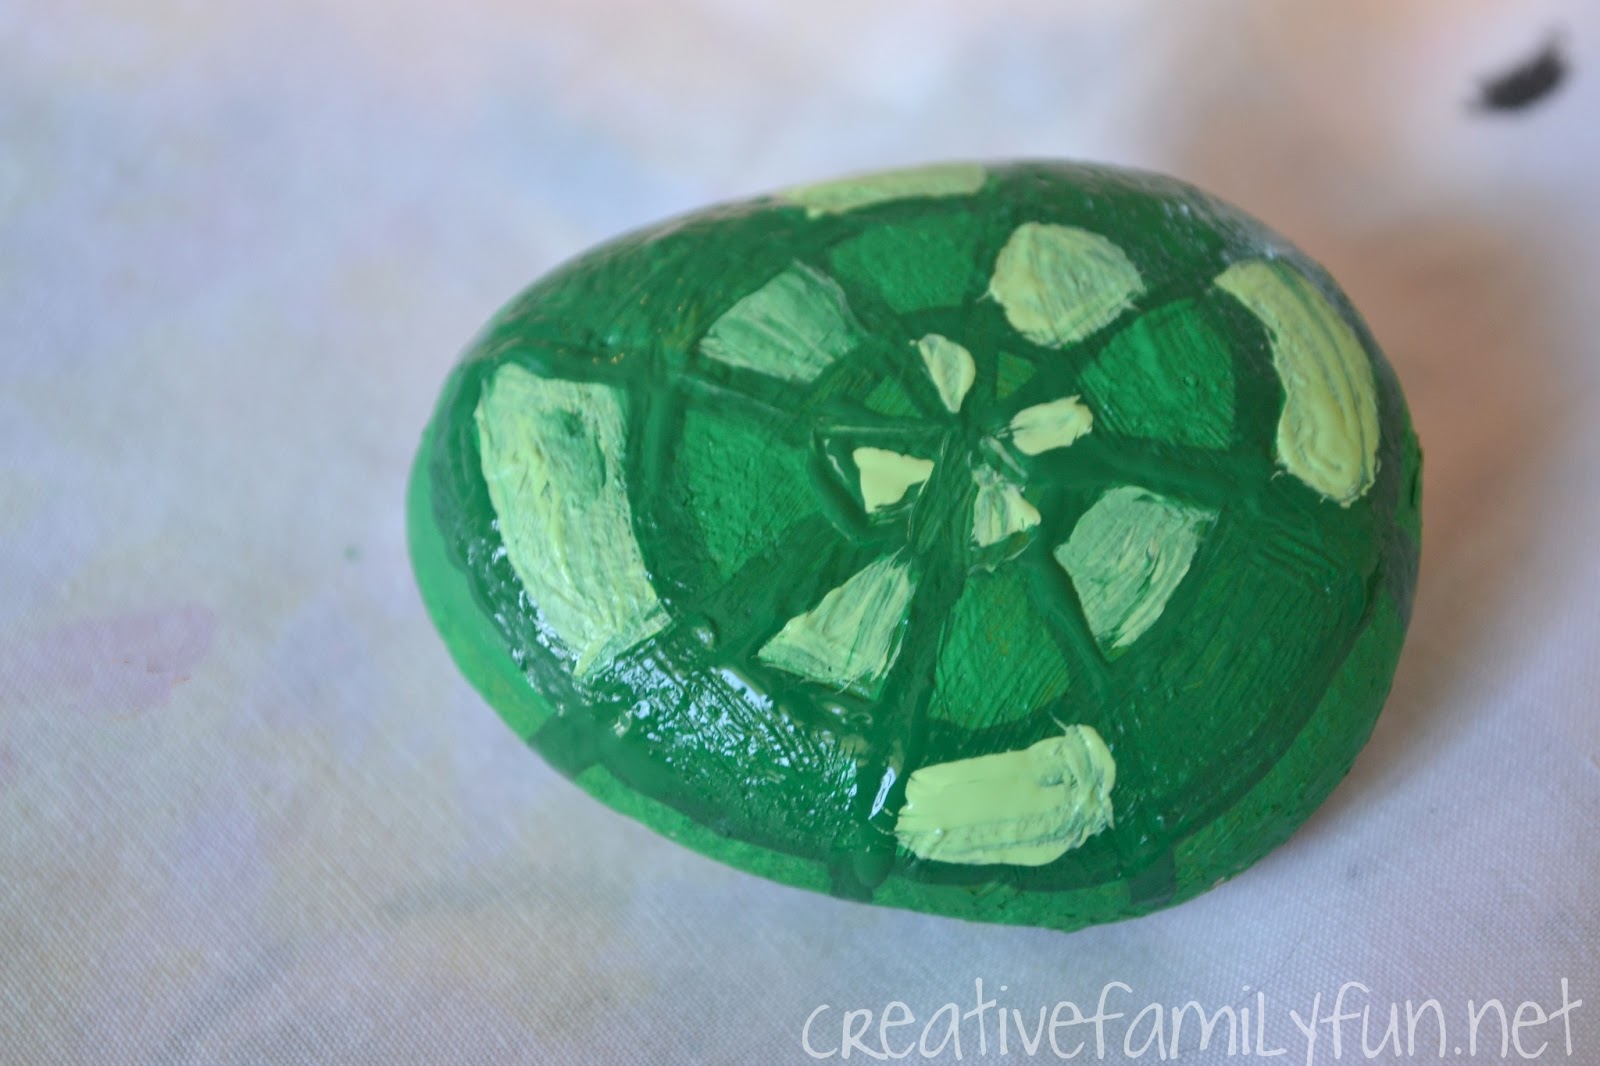
Step 4: Use all three of your colors to create spaces of differing colors; use a pattern or just randomly paint in the different sections.

At this point, you can also use your darkest green color to paint a head, tail, and feet on your turtle.

There you have it, a cute little round turtle.

But, don’t limit yourself to turtles. Create a whole menagerie of animals! Try a ladybug, snail, mouse, or frogs.

You are only limited by your imagination.

Craft Stick Initial Plaque

June 28, 2013 By Terri Thompson

We’ve accumulated such a big supply of craft sticks that I’ve been challenging myself to come up with crafts that we can do with them.

One such craft was our initial plaques.

My girls loved making them and are now using theirs to decorate their bedroom.

The plaque would also make a fun and easy gift for your kids to make.

Let’s get started crafting!

Disclosure: There are Amazon Affiliate and other affiliate links in this article which means, at no additional cost to you, we could receive compensation for our recommendations. You can read our full disclosure policy on our Disclosure Page for more details.

Supplies Needed:

Craft sticks
White glue
Masking tape or painter’s tape
Craft paint
String (optional, for hanging)

Lay several craft sticks out side by side until they are the length of a craft stick.

Push them close together; you don’t want any gaps.

Once you’ve arranged your craft sticks, glue two crafts sticks crosswise on your sticks. See the picture above for an example.

Use your masking tape to mark off your letter. You’ll want to use either masking tape or painter’s tape since you will be pulling it off after painting.

After you have formed your letter, it’s time to paint.

My girls wanted to paint one solid color on their plaques, but don’t let our examples stop you. Get creative! Stripes, dots, or even a chevron pattern would all look great.

Let the paint dry for a few minutes before you take the tape off. Peel it off carefully and you should have perfect initials on your plaque.

Don’t let the paint dry too long, or you may have difficulties getting it off!

If you would like to hang your plaques, attach some string to the back. Or you can do like my girls did and prop them up on a shelf. This is a fail-proof project for kids of all ages!

I still have a pile of craft sticks waiting to be used. Do you have any ideas for them?

Classic Crafts ~ Craft Stick Frames

June 25, 2013 By Terri Thompson

Disclosure: CraftProjectIdeas.com provided me with some of the supplies we used in this project. The ideas were entirely my own. There are Amazon Affiliate and other affiliate links in this article which means, at no additional cost to you, we could receive compensation for our recommendations. You can read our full disclosure policy on our Disclosure Page for more details.

There are a few classic crafts that every kids should make at least once during their childhood.

One of those classics is the craft stick picture frame.

Did you make one of these when you were a kid? I know I made a few. In fact, my mom still has some of the frames I made.

Supplies Needed:

8 craft sticks per frame
White glue
Embellishments (We used glitter glue & foam stickers)
Photo

There are millions of ways to make these frames, but we opted for a double-wide version. We wanted plenty of room to get creative with our embellishments.

Lay out two crafts sticks for the side, then layer two on top and two on bottom. Do not glue until you are satisfied with your arrangement.

Once you are ready, use white glue on your corners to hold the craft sticks together.

We used this fun neon glitter glue assortment from craftprojectideas.com to decorate our frames.

We loved the glitter glue and have to say it was much better than other glitter glue we’ve used in the past. It was easy to squeeze and dried thicker and brighter.

It was the perfect embellishment for our frames. We also added a few of these awesome glow-in-the-dark foam star stickers.

When everything was dry, we added our photo.

We’re using our frames to show off our pretty dog, Charlie. Isn’t he a handsome boy!

To add a photo, just cut the picture to size and glue the overlapping edges to your frame. It’s that easy.

Prop your frames up on a bookshelf or add a magnet to the back for a fabulous fridge decoration.

Have you ever made craft stick frames?

Martha Stewart Crafts for Kids ~ Review and Giveaway (now over)

June 24, 2013 By Terri Thompson

*Disclosure: I was sent a free copy of this book for review. All opinions are my own. This post also contains Amazon Affiliate links. Please see my Disclosure Page for more details.

Congratulations to entry #3 Nicolette Roux who follows me on Pinterest! Thank you to all who entered.

I was recently contacted by the lovely folks at Martha Stewart Living Omnimedia to see if I wanted to review Martha Stewart’s Favorite Crafts for Kids: 175 Projects for Kids of All Ages to Create, Build, Design, Explore, and Share. How could I say no?

The book is full of fun and amazing projects. Some are simple, others are quite elaborate, and all look like tons of fun. I let the girls leaf through the projects and they found so many they wanted to make. You can make a toy service station out of mostly recycled materials, design your own painted umbrellas, or make tiny trinket boxes for all your little collections. Your kids can make their own games to play, like rock dominoes, or make a nice gift for someone, like pretty button frames. This is the perfect book to have on hand for a rainy day or to help combat summer boredom. You can also view some of the projects here at the Martha Stewart’s Crafts for Kids video collection.

After leafing through the book several time, we decided to make these foil-and-paper crowns for our first project. We added our own little twist and turned them into fun 4th of July crowns.

The girls folded, cut, and stuck stickers. The instructions were simple and easy to follow. The girls did not have any difficulty making these crowns.

After a bit of modeling, we declared the project a success and the book a keeper. Now I’ve got to start gathering materials for that toy service station!

I’f you’d like a copy of the book, you can get it on Amazon here or in your local book store.

Or, you could try to win a copy for yourself. That’s right! I get to offer one reader a copy of Martha Stewart’s Favorite Crafts for Kids along with a gift package of Martha Stewart craft supplies to help you get started crafting. Included are Martha Stewart Crafts satin paint set, Martha Stewart Crafts essentials paper pad, Martha Stewart Crafts basic brush set, Martha Stewart Crafts crafter’s clay nature starter kit & Martha Stewart Crafts craft glue. You can enter via Rafflecopter below. You must be at least 18 years old and a US resident. Giveaway ends June 30, 2013 at midnight (CST).

Pipe Cleaner Sun Plant Stakes

June 10, 2013 By Terri Thompson

I was pleasantly surprised when a fun package arrived from CraftProjectIdeas.com that was full of neon goodness.

We use their supplies often in our crafting and I couldn’t wait to get started creating. We decided to use the pack of neon fuzzy sticks to make some cheery sun plant stakes.

Disclosure: There are Amazon Affiliate and other affiliate links in this article which means, at no additional cost to you, we could receive compensation for our recommendations. You can read our full disclosure policy on our Disclosure Page for more details.

Supplies Needed:

Yellow & orange pipe cleaners
Glue
Large craft stick

If you would like to use the neon fuzzy sticks in your project, they can be found at your local Wal-Mart.

For the first step, take a yellow and orange pipe cleaner and twist them together.

After both colors are twisted, form it into a circle twisting the ends together to hold your circle in place.

Next take 4 more pipe cleaners, two orange and two yellow and begin forming your rays. Begin each pipe cleaner by twisting the end around your circle. Bend your rays around the circle, overlapping your circle as you go (see above picture). Twist the other end around your circle when you reach the end of a pipe cleaner. Alternate the colors as you go.

Once your sun is complete, use regular white glue to attach it to a large craft stick.

Glue down one of the rays, like I did in the above picture, to add a bit of stability.

Once it dries, it’s ready to decorate your plants.

It would be perfect to add to a cheery summer gift or just to brighten up your house.

You will want to keep it indoors on one of your houseplants because it will not stand up to rain. Yes, I know I photographed it outside, but unfortunately my green thumb does not extend to houseplants.

The only potted plants I have are outdoors!

Thank you again CraftProjectIdeas.com for the fun craft supplies!

  • « Go to Previous Page
  • Page 1
  • Interim pages omitted …
  • Page 18
  • Page 19
  • Page 20
  • Page 21
  • Page 22
  • Interim pages omitted …
  • Page 31
  • Go to Next Page »

Primary Sidebar

Footer

Categories

Archives

Copyright © 2026 · Designed by The Blog Surgery

Creative Family Fun uses cookies to improve your experience. These cookies provide feedback to our analytics and advertisers. We use the information to track views of the site, where you go and to know if you are a regular visitor or brand new as well as provide a personalized experience where possible. We'll assume you're ok with this, but you can opt-out if you wish.Accept Reject Read More
Privacy & Cookies Policy

Privacy Overview

This website uses cookies to improve your experience while you navigate through the website. Out of these, the cookies that are categorized as necessary are stored on your browser as they are essential for the working of basic functionalities of the website. We also use third-party cookies that help us analyze and understand how you use this website. These cookies will be stored in your browser only with your consent. You also have the option to opt-out of these cookies. But opting out of some of these cookies may affect your browsing experience.
Necessary
Always Enabled
Necessary cookies are absolutely essential for the website to function properly. This category only includes cookies that ensures basic functionalities and security features of the website. These cookies do not store any personal information.
Non-necessary
Any cookies that may not be particularly necessary for the website to function and is used specifically to collect user personal data via analytics, ads, other embedded contents are termed as non-necessary cookies. It is mandatory to procure user consent prior to running these cookies on your website.
SAVE & ACCEPT