• Skip to secondary menu
  • Skip to main content
  • Skip to primary sidebar
  • Skip to footer
  • Home
  • About
    • Email Me
    • Disclosure & Copyright
  • Start Here
  • Subscribe
  • Privacy Policy
  • Books for Moms

Creative Family Fun

Your one-stop shop for kids activities and family fun

  • Facebook
  • Instagram
  • Pinterest
  • Twitter
  • Spelling Activities
  • Family Fun
  • STEM
  • Movie Night
  • Toddler Activities

Terri Thompson

Move Like a Figure Skater

February 11, 2014 By Terri Thompson

I have always been fascinated by figure skating. My girls are the same.

The costumes are beautiful, the jumps spectacular, and the spins amazing.

I always wanted to be a figure skater, even though I can barely stand up in a pair of ice skates.

And let’s face it, most of us won’t be donning a pair of ice skates and doing a triple axel anytime soon.

But nothing’s stopping us from pretending to be a figure skater!

Disclosure: There are Amazon Affiliate and other affiliate links in this article which means, at no additional cost to you, we could receive compensation for our recommendations. You can read our full disclosure policy on our Disclosure Page for more details.

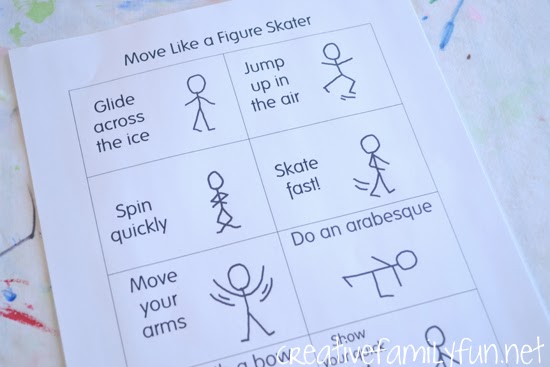
Pretend to glide across the ice. Move your arms artistically. Who can do the prettiest spin?

I came up with 8 simple moves to help your child get moving and pretend to be a figure skater.

It’s a perfect game for when you’re stuck inside this winter. Blow off some steam, have a little fun, and move like a figure skater.

Download the game here

Are you ready to play? Click the link above to download and print (for free)!

Print on card stock for extra durability, but that’s certainly not necessary.

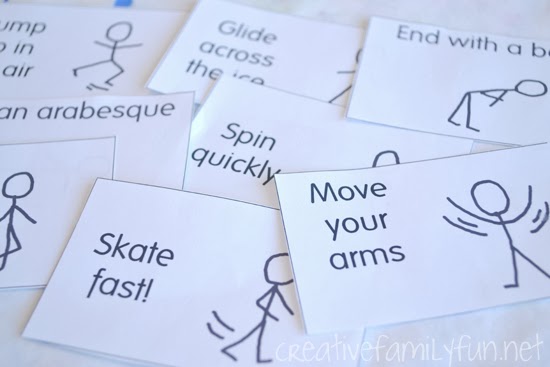
How to play? There are no rules. Cut the cards out and have your kids pick one at a time. They can take turns doing the moves or do them together.

Go through your dress-up clothes and let them create figure skating costumes.

Put on some pretty music. Cheer for each other.

But most of all, have fun and move like a figure skater!

For More Figure Skating Information:

The U.S. Figure Skaing YouTube channel has a lot of great videos posted of current and past figure skating routines. Watch a few to find some new movements for this game.

What do all those technical terms mean anyway? I watch a lot of figure skating, but still couldn’t tell you the difference between a salchow and a toe loop. This article from Global News does a great job explaining the different terms.

Make an ice rink for your toys! Check out this fun idea from I Can Teach My Child.

Olympic Rings Collage

February 10, 2014 By Terri Thompson

Have you been watching the Olympics?

We have and we’ve been loving every minute. Of course, we couldn’t let the moment pass without some fun activities.

This week at Creative Family Fun, we will be celebrating the Winter Olympics with some fun crafts and activities. And, we’re starting out with this fun Olympic Rings collage.

Disclosure: There are Amazon Affiliate and other affiliate links in this article which means, at no additional cost to you, we could receive compensation for our recommendations. You can read our full disclosure policy on our Disclosure Page for more details.

Supplies Needed:

Thin cardboard (cereal or cracker boxes)
2 sizes of circles to trace
Scissors
Paint (Red, black, blue, green, and yellow)
Paper, ribbon, and fabric scraps in the same colors as your paint

To begin, we traced 5 circles on our cereal boxes. We used a saucer for our outer circle and a jar lid for the inner circle.

Our circles were big, so we were only able to get two rings from each cereal box. Good thing I’ve been hoarding cereal boxes!

Once we had our circles traced, we cut out our rings.

Once we had our rings cut out, we started painting.

You can view a picture of the rings and the Olympic flag here. We had a red, blue, black, yellow, and green ring.

After painting, we started on our collages.

We had sorted through a lot of our scraps we save for collages. We had fabric, paper, foam pieces, tissue paper, and ribbon. You can also use magazine pages or card scraps. Anything that you can glue down to your cardboard ring would work. We found all sorts of fun things for our collages.

Once we were finished and our glue had dried, we arranged them in the correct order.

We’ll be hanging them up outside the girls’ room, which has been renamed Olympic Village for the duration of the games.

Our resident pretend snowboarder and pretend figure skater need a place to stay while competing!

To Learn More About the Olympics:

Visit Fact Monster for a lot of fun facts about the Olympics, including the meaning of the colors in the Olympic Rings.

The official Sochi 2014 Website will keep you up-to-date on all the Olympic results. Find out the countries involved, the sporting events, and a medal count.

For another kid project, check out Crayon Box Chronicles. You can find out how to make a set of origami Olympic bracelets. So cool!

10 Ways to Play This Weekend ~ All About Valentine’s Day

February 7, 2014 By Terri Thompson

I don’t know how things are at your house, but around here we’ve been knee deep in Valentine’s crafts and activities.

It’s quite possibly one of our favorite holidays for crafting and decorating.

Here are 10 Valentine’s activities I’ve found recently that would be perfect for some weekend fun.

Which one do you want to try?

Disclosure: There are Amazon Affiliate and other affiliate links in this article which means, at no additional cost to you, we could receive compensation for our recommendations. You can read our full disclosure policy on our Disclosure Page for more details.

Make animal out of hearts. Housing A Forest shows you how to make 7 different heart animals. (We’ve already made 3 and have plans to make all 7!)

Have fun painting with Conversation Heart Sensory Paint with Frogs, Snails, and Puppy Dog Tails.

Play with Cinnamon Heart Cloud Dough at And Next Comes L.

Do some Valentine’s Day Yoga with Kid Yoga Stories.

Make some mini sensory bin Valentines to give to your friends with Life Lesson Plans.

Make a string heart heart with How Wee Learn.

Do a Heart Tissue Paper by Number with Crayon Box Chronicles.

Conduct a Valentine potion and tasting experiment with Inspiration Laboratories.

Make salt dough heart magnets with The Connections We Share.

Make tin-foil and tissue paper hearts with Happy Hooligans.

And if you’re still looking for more activities, you can find all of our Valentine’s projects at this link.

How are you going to play this weekend?

Beaded Heart Pencil Toppers

February 6, 2014 By Terri Thompson

*Disclosure: CraftProjectIdeas.com provided most of the supplies used in this project. Project idea and opinions are my own. There are Amazon Affiliate and other affiliate links in this article which means, at no additional cost to you, we could receive compensation for our recommendations. You can read our full disclosure policy on our Disclosure Page for more details.

This year, we don’t have to worry about classroom Valentine’s. My daughter’s 1st grade class is working on them in school for a writing project. (I love this!)

But, if we did, we would have made even more of these fun beaded heart pencil toppers.

Add a simple gift tag and they’re ready to hand out to classmates – no candy required.

Supplies Needed:

Pencils
Fuzzy sticks/pipe cleaners
Variety of beads
Scissors & card stock (for gift tags)

To start the process, wrap one end of your fuzzy stick around the pencil. Wrap it around tight enough that it doesn’t slide up and down by itself.

Next start beading. We had a variety of beads: pony beads, tri-beads, fun star beads, and silver letter beads. The type of bead doesn’t matter, so use whatever you think looks best.

Keep beading until you are left with a long enough section of your pipe cleaner to wrap around your pencil again (at least 2 inches). I bent my stick in the shape of a heart before beading so I could see how my pattern was going. This step is not necessary.

We made patterns with our beads. We even spelled a few Valentine’s words, like “love” and “xoxo”, on a few. It would be fun to spell out classmates names!

Once you are finished beading, wrap the other end of your fuzzy stick around your pencil at the same place as you began. Overlap the initial wrapping so that the two ends stay together.

Shape your beaded stick into a heart. Pull the heart down so that the entire shape rests against your pencil. We left ours like this, but if you want to add a bit of stability, cut a small piece of pipe cleaner and secure the top bent section of your heart to the pencil.

Wouldn’t these make a perfect classroom Valentine? What are your kids handing out this year?

STEM at Home: Design a Valentine Card Holder

February 5, 2014 By Terri Thompson

STEM, which stands for science, technology, engineering, and mathematics, is an important concept in schools nowadays.

My 1st grader goes to a STEM school, so it’s emphasized on a daily basis. I love the concept and I love how my daughter’s day is more hands-on and less worksheet heavy.

We try to support this at home as much as we can.

When I was contemplating making Valentine’s Day card holders with my girls, I came up with several options. They were all standard crafts and would have been fun to do, but then it hit me… maybe I should let them design the card holders themselves. What would they come up with?

Disclosure: There are Amazon Affiliate and other affiliate links in this article which means, at no additional cost to you, we could receive compensation for our recommendations. You can read our full disclosure policy on our Disclosure Page for more details.

While they were off playing, I set out some supplies on the table.

Each girl had two paper plates. I then added Valentine stickers, markers, scissors, yarn, a stapler, paint brushes, red and pink paint, paper scraps, glue, and cardboard tubes shaped into hearts to the table.

I added a little note with the instructions. Step 1: Be an engineer! Design your card holder. Step 2: Construct your card holder. Step 3: Decorate. When they came to the table, I asked them to turn their two paper plates into a Valentine card holder.

They started bending and maneuvering right away. In my mind, I had envisioned stapling the two plates together into a pouch. (And that was what my project would have been if I had went with my original plan.)

But of course, my girls don’t think the way I do, nor do they spend time browsing through Pinterest to see all the wonderful Valentine’s Day ideas that are shared.

Miss First-Grader bent and stapled until her two plates resembled a mail box. Miss Preschool stapled and cut until her resembled a rather large platter. She must be expecting a lot of Valentines!

I was impressed with their ingenuity and loved their final product. I will admit, though, that it was really hard for me to just step back and let them create without my input.

Once they were finished, it was time to decorate. I think they used about every supply I had on the table.

They each added a giant string so that they could hang their holders from our highest curtain rod. They were proud of their card holders and, boy, did they ever have fun.

I loved this project even more than I would have if we would have made my original idea. The girls were able to be creative, to design, and to be an engineer. It was a fun process and one that we’ll do again and again.

The next time you want to do a craft, let your kids design it themselves. It’s so much fun to see what they make!

  • « Go to Previous Page
  • Page 1
  • Interim pages omitted …
  • Page 103
  • Page 104
  • Page 105
  • Page 106
  • Page 107
  • Interim pages omitted …
  • Page 190
  • Go to Next Page »

Primary Sidebar

Footer

Categories

Archives

Copyright © 2026 ยท Designed by The Blog Surgery

Creative Family Fun uses cookies to improve your experience. These cookies provide feedback to our analytics and advertisers. We use the information to track views of the site, where you go and to know if you are a regular visitor or brand new as well as provide a personalized experience where possible. We'll assume you're ok with this, but you can opt-out if you wish.Accept Reject Read More
Privacy & Cookies Policy

Privacy Overview

This website uses cookies to improve your experience while you navigate through the website. Out of these, the cookies that are categorized as necessary are stored on your browser as they are essential for the working of basic functionalities of the website. We also use third-party cookies that help us analyze and understand how you use this website. These cookies will be stored in your browser only with your consent. You also have the option to opt-out of these cookies. But opting out of some of these cookies may affect your browsing experience.
Necessary
Always Enabled
Necessary cookies are absolutely essential for the website to function properly. This category only includes cookies that ensures basic functionalities and security features of the website. These cookies do not store any personal information.
Non-necessary
Any cookies that may not be particularly necessary for the website to function and is used specifically to collect user personal data via analytics, ads, other embedded contents are termed as non-necessary cookies. It is mandatory to procure user consent prior to running these cookies on your website.
SAVE & ACCEPT