• Skip to secondary menu
  • Skip to main content
  • Skip to primary sidebar
  • Skip to footer
  • Home
  • About
    • Email Me
    • Disclosure & Copyright
  • Start Here
  • Subscribe
  • Privacy Policy
  • Books for Moms

Creative Family Fun

Your one-stop shop for kids activities and family fun

  • Facebook
  • Instagram
  • Pinterest
  • Twitter
  • Spelling Activities
  • Family Fun
  • STEM
  • Movie Night
  • Toddler Activities

Terri Thompson

Paper Plate Puffin Masks

January 20, 2014 By Terri Thompson

This week, we’ll be doing some fun activities all about Arctic animals. We had a lot of fun learning about some of the different animals that live in the polar regions.

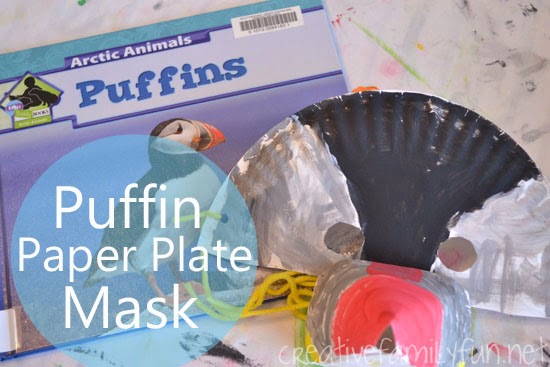
First up is the puffin. Did you know that puffins are so bad at flying that they often crash while landing? Or that puffin mothers only lay one egg at a time?

We learned all we could about these colorful birds and then made some fun paper plate masks so we could spend the rest of the day pretending to be puffins.

Disclosure: There are Amazon Affiliate and other affiliate links in this article which means, at no additional cost to you, we could receive compensation for our recommendations. You can read our full disclosure policy on our Disclosure Page for more details.

Supplies Needed:

Paper plate (1 per mask)
Scissors
Paint (Black, white, orange, red, yellow)
Clear tape
Hole punch
Yarn

To begin, cut your paper plate in half.

Fold the sides in on one of your halves, similar to the picture above. This will be your beak.

Turn the half over and start painting your strips

The curved, ridged side will be the part of the beak closest to your face.

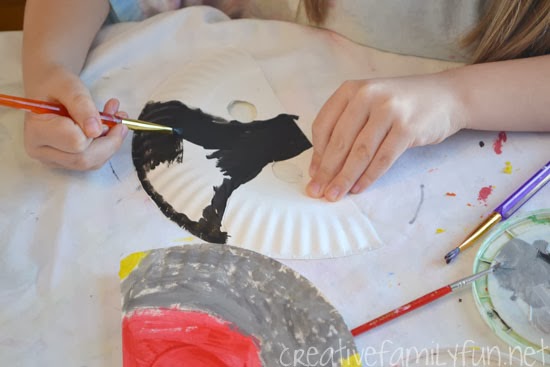
While the paint on your beak is drying, cut out the eye holes on your other half. (I usually do this part myself since I use my sharpest scissors.)Draw a few guidelines and paint the head of your puffin. Use black to paint the middle section and leave the parts around the eyes white (or gray or red as my daughters preferred!).

After your paint has dried, overlap the folded ends of your beak and pull together. (See picture above.)

Allow the painted part of the beak to curve upwards. Tape your beak together securely.

Bend the top of your beak under just a bit and secure it to your head piece with more tape.

I taped on the beak directly underneath the eye holes.

See, looks just like a puffin profile!

The girls loved wearing their masks and running around like puffins.

Plus, some of those fun facts we read stuck securely in their minds. We love learning about animals and found the puffin endlessly fascinating.

For more information about puffins:

Read a book about puffins. Check at your library in the nonfiction section for a good choice. We read Puffins (Arctic Animals) by Julie Murray.

Check out the Atlantic Puffins Creature Feature at National Geographic Kids. Learn facts, look at pictures, see a map where they live, and even watch a short video.

Visit Project Puffin. Project Puffin from the National Audubon Society is chock full of information. Find out about research project and conservation efforts. And, in the spring, during mating season, they’ve got a couple of puffin cams for you to watch!

Have fun learning about puffins!

Simple Sewing ~ Constellation Wall Hanging

January 14, 2014 By Terri Thompson

I’ve never been good at spotting constellations in the sky.

I’ve always wanted to be because there’s something endlessly appealing about laying back and seeing all those pictures in the sky. Maybe I’ll try again this summer once it’s warm enough to sit outside at night for long periods!

I created this project to learn about and celebrate the beauty of the constellations. It’s perfect for elementary-aged kids, tweens, teens, or even adults.

Even if you’ve never picked up a needle, you should be able to create these fun constellation wall hangings.

Disclosure: There are Amazon Affiliate and other affiliate links in this article which means, at no additional cost to you, we could receive compensation for our recommendations. You can read our full disclosure policy on our Disclosure Page for more details.

Supplies Needed:

Dark blue (or black) felt
White embroidery thread
Needle
Sharp scissors

Tacky Glue

Ribbon (for hanging)

Before beginning this project, you need to decide which constellations you want to create. I used this constellation guide at StarDate.org. You can also find printable constellation maps at Mr. Printable. I chose a few to create (Canis Major and Cygnus) and drew them on paper.

Cut your felt into small rectangles. I had sheets of craft felt and cut it into quarters. This left me with 4-3/4 inches by 6 inches per rectangle

You will need two rectangles per wall hanging.

Next, transfer your constellation drawing to your felt. This step doesn’t need to be difficult. I used one of our washable markers and lightly made dots on my felt for each star. If you keep your markings small, your stitches will cover it.

Start stitching your stars. Embroidery thread is thick with six strands of thread combined. Cut off a length of thread and then pull the strands apart, so that you are stitching with three strands instead of six. For each star, I stitched an x over top of a +. Some stars were bigger than others according to how the constellation was pictured. Then, I stitched long lines in between each star, using my drawing as a guide.

Once you’ve sewn your constellation, you’ll want to label it.

I tried two different methods. For my first constellation (Cygnus), I chose to stitch the name with my embroidery thread. Honestly, this method was a bit difficult and you wouldn’t want to try it if you are a beginning sewer.

The second method was to attach a label. For Canis Major, I used a scrap piece of fabric and wrote the name with permanent marker (a Sharpie). I cut it down to fit on my picture and simply stitched it into the corner. I prefer this method because it was easier and I thought it looked much better than the stitched name.

After you are finished and satisfied with your constellation, it’s time to cover up that ugly back. No matter how good of a seamstress you are, the back never looks good.

I used another rectangle of felt, cut the same size as my wall hanging, to cover the back.

Instead of sewing my back on, I used Tacky Glue. (This stuff is amazing and will hold the felt together. I’m not sure if any other brands of glue would work as well.) If you prefer, you can sew the front to the back using thread that matches the color of the felt.

If using the glue, run a line all around the edge. Cut a piece of ribbon for hanging and stick it down on the glue (see picture below) before attaching the back. If you let your glue dry completely before hanging, your ribbon will stay put.

Once your glue has dried, hang your creations on the wall. Make a few or a lot. I think it would be stunning to make a small gallery of your favorite constellations.

For more information about the constellations:

Play the Constellation Hunt game at Astronomy for Kids. This game challenges you to spot the different constellations in the night sky.

Read the book, A Child’s Introduction to the Night Sky: The Story of the Stars, Planets, and Constellations–and How You Can Find Them in the Sky by Michael Driscoll. This book covers everything and is perfect for a kid who is fascinated by the night sky.

Print and make a star finder at Nasa.gov. You can also find kid-friendly information about finding these constellations in the sky.

10 Ways to Play With Snow

January 10, 2014 By Terri Thompson

I hope you enjoyed all the snow fun we’ve had here at Creative Family Fun this week.

The weather has been so cold here that we’ve had to do most of our snow play indoors. But if it’s warm enough, get outside!

Here are 10 more ways to have fun in the snow from some of the best Kid Activity Bloggers.

If you don’t have any snow to play with, the last few items can all be done indoors!

Disclosure: There are Amazon Affiliate and other affiliate links in this article which means, at no additional cost to you, we could receive compensation for our recommendations. You can read our full disclosure policy on our Disclosure Page for more details.

Make snow faces on your trees with The Chocolate Muffin Tree

Take some of your play kitchen toys outside and do a little snow cooking with My Nearest and Dearest

Do some eye-dropper snow painting with How Wee Learn

Explore snow flakes and look at them up close with The Chocolate Muffin Tree

Make potato heads in the snow with The Happy Hooligans

Blow a frozen bubble with What Do We Do All Day?

Create with ice jewels in the snow with Fireflies and Mud Pies

Make a snow storm in a bag with JDaniel4’s Mom

Experiment with fizzy melting snowmen with Inspiration Laboratories

Create a simple snow sensory & small world play set-up with Creative Family Fun

What are your favorite ways to play with snow?

Art for Kids: Snowy Landscapes

January 7, 2014 By Terri Thompson

Even if you don’t have a winter wonderland outside your home, you can still create a pretty snowy landscape to enjoy indoors.

This simple art project can be easily adapted for both preschoolers and elementary-aged kids.

Disclosure: There are Amazon Affiliate and other affiliate links in this article which means, at no additional cost to you, we could receive compensation for our recommendations. You can read our full disclosure policy on our Disclosure Page for more details.

Supplies Needed:

White paper
Blue paper
Scissors
Glue
White paint
Bubble wrap

Use your white paper to make some rolling hills, mountains, snowy trees, or all three for your landscape.

A simple curvy strip cut from the white paper makes a lovely rolling hillside. Small triangles work great for snowy pine trees.

Arrange and glue your white paper to your blue construction paper.

Now it’s time to add the snow.

Cut a small bit of bubble wrap and paint white paint all over the bumpy side. Turn it over and start stamping you picture.

Keep repeating until you are satisfied with the amount of snow.

In the end, my daughter and I had a lot of fun making these landscapes together.

Often, I’ll sit side-by-side with my girls and craft with them. It keeps me from hovering and trying to control the process.

The result, my 4-year-old did all the work herself and was very proud of her finished landscape.

Get inspired by the snow and go craft with your kids!

January Notes

January 5, 2014 By Terri Thompson

Dear Reader,

Thank you for continuing to read and visit, but most of all thank you for your support. I hope to continue to provide you with fun crafts and activities to help you make the most of your time with your kids. I have lots of fun things planned for the year. So keep on stopping by!

Starting this month, I will be having theme weeks here at Creative Family Fun. I’m doing this to help *me* plan better, but I hope that it will give you something to look forward to and a reason to keep stopping by. You can find the themes for January listed below.

Disclosure: There are Amazon Affiliate and other affiliate links in this article which means, at no additional cost to you, we could receive compensation for our recommendations. You can read our full disclosure policy on our Disclosure Page for more details.

Following along is simple. You can stop by the blog and see what’s new or subscribe to Creative Family Fun in a feed reader. You can “like” Creative Family Fun on Facebook here. I post links to all my new posts and also share fun things I find on other blogs. If you want to follow along on Facebook, make sure to like status updates or comment on occasion. It’s the only sure way to make sure my status updates keep showing up in your feed. Plus, I really like getting to know you! If Facebook is not your thing, you can follow along on Pinterest. I pin each of my new posts on my Creative Family Fun board here. Or you can follow all (or whichever boards you are interested in) here. Another option you have is to subscribe to my newsletter. I’ll send out a weekly email every Saturday, starting January 11, with links to all the previous week’s posts. I’ll also provide a few links to other ideas I’ve found that go along with the week’s theme. Click here to subscribe to the newsletter.

And for one final piece of news, I’ve finally joined Instagram. Woot! Follow along here, for sneak peeks of blog projects in progress and glimpses of everyday life. I’m already loving it!

Hope you continue to enjoy what you find here at Creative Family Fun!

  • « Go to Previous Page
  • Page 1
  • Interim pages omitted …
  • Page 105
  • Page 106
  • Page 107
  • Page 108
  • Page 109
  • Interim pages omitted …
  • Page 190
  • Go to Next Page »

Primary Sidebar

Footer

Categories

Archives

Copyright © 2026 ยท Designed by The Blog Surgery

Creative Family Fun uses cookies to improve your experience. These cookies provide feedback to our analytics and advertisers. We use the information to track views of the site, where you go and to know if you are a regular visitor or brand new as well as provide a personalized experience where possible. We'll assume you're ok with this, but you can opt-out if you wish.Accept Reject Read More
Privacy & Cookies Policy

Privacy Overview

This website uses cookies to improve your experience while you navigate through the website. Out of these, the cookies that are categorized as necessary are stored on your browser as they are essential for the working of basic functionalities of the website. We also use third-party cookies that help us analyze and understand how you use this website. These cookies will be stored in your browser only with your consent. You also have the option to opt-out of these cookies. But opting out of some of these cookies may affect your browsing experience.
Necessary
Always Enabled
Necessary cookies are absolutely essential for the website to function properly. This category only includes cookies that ensures basic functionalities and security features of the website. These cookies do not store any personal information.
Non-necessary
Any cookies that may not be particularly necessary for the website to function and is used specifically to collect user personal data via analytics, ads, other embedded contents are termed as non-necessary cookies. It is mandatory to procure user consent prior to running these cookies on your website.
SAVE & ACCEPT