• Skip to secondary menu
  • Skip to main content
  • Skip to primary sidebar
  • Skip to footer
  • Home
  • About
    • Email Me
    • Disclosure & Copyright
  • Start Here
  • Subscribe
  • Privacy Policy
  • Books for Moms

Creative Family Fun

Your one-stop shop for kids activities and family fun

  • Facebook
  • Instagram
  • Pinterest
  • Twitter
  • Spelling Activities
  • Family Fun
  • STEM
  • Movie Night
  • Toddler Activities

Terri Thompson

Becoming Marc Chagall ~ A Stained Glass Project

February 20, 2014 By Terri Thompson

Maybe it’s because the only work by Marc Chagall that I’ve ever seen in person are the America Windows at the Art Institute of Chicago, but when I decided to do a mini lesson about Chagall, I knew we were going to do a stained glass window project.

Chagall was born in 1887 in the small village of Vitebsk, close to the Polish border. (Vitebsk is in Belarus, which at the time of Chagall’s birth was part of the Russian empire. Belarus is now an independent country.)

Chagall wasn’t even exposed to art until he was a teenager, yet he found a passion. He had to leave his home and his family and eventually even Russia to learn all he could and pursue his passion.

Because he was Jewish, he faced persecution every step of the way. His story is fascinating and his artwork exquisite.

After looking at several examples of Chagall’s paintings (we had checked this book out from the library, we talked about his stained glass projects.

Chagall was in his 70’s when he started working with stained glass and in his 90’s when he created America Windows at The Art Institute of Chicago. Pretty amazing, isn’t it? We then set out to make our own stained glass inspired project.

Disclosure: There are Amazon Affiliate and other affiliate links in this article which means, at no additional cost to you, we could receive compensation for our recommendations. You can read our full disclosure policy on our Disclosure Page for more details.

Supplies Needed:

White paper
Oil pastels
Ruler
Blue watercolors (we used liquid watercolors)

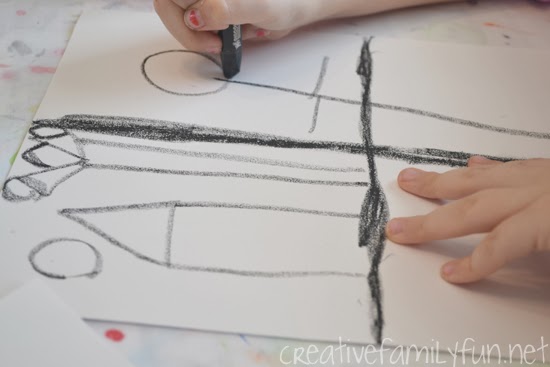
We began by dividing our paper into four sections. We used the ruler to divide our paper evenly, then went over the lines with our black oil pastel several time to make them thick and dark. (You can do this project with crayon if you don’t have any oil pastels, just make sure you make dark, heavy lines.)

Next, we drew our pictures. I encouraged the girls to overlap their panes, to create pictures that were big. We also added some additional lines to mimic the look of stained glass.

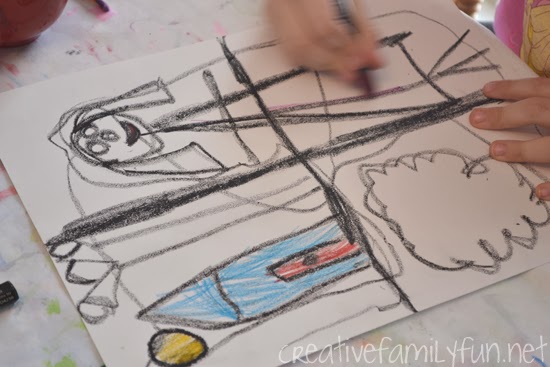
After we had our drawings completed, we used our oil pastels to add a bit of color.

Both girls had a big yellow sun in their picture. They also added red, pink, and white.

We didn’t color in everything and left some spots as black outlines.

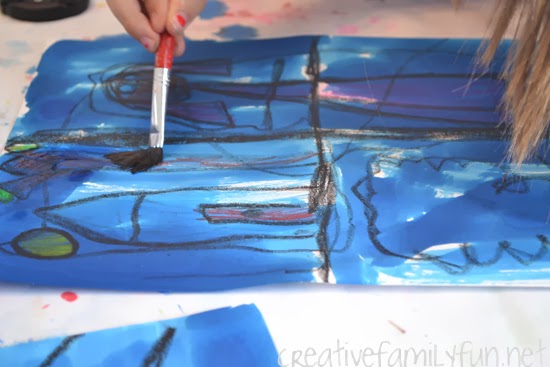
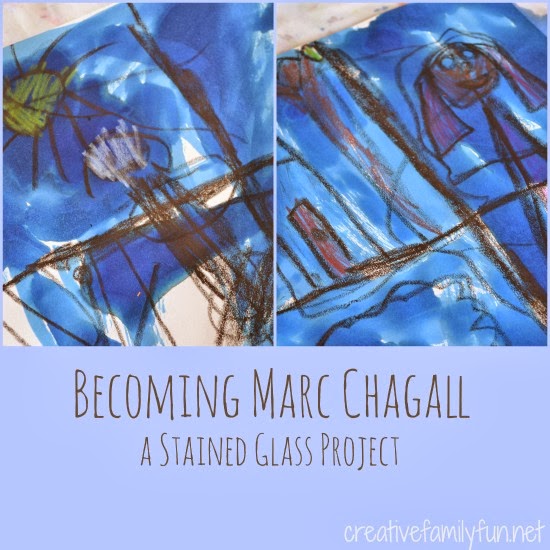
Once our pictures were complete, we painted over the entire thing with blue watercolor to look like our inspiration piece, America Windows.

I love how the finished product came out. The blue water color combined with the black oil pastel really gave our pictures the look of stained glass and you can definitely see the influence of Marc Chagall.

Have you ever done a project based off of a famous piece of art?

For More Information:

View this video about the history, creation, conservation, and installation of America Windows produced by the Art Institute of Chicago.

View some of Chagall’s painting at the Marc Chagall gallery at Guggenheim.org

Your elementary-aged kids may enjoy doing this Marc Chagall inspired watercolor project from Art Projects for Kids

Exploring Russia: Creating the Onion Domes

February 19, 2014 By Terri Thompson

Russia is so rich in culture, from the art, to the music, to the architecture. We could spend months learning about all these wonderful treasures. Wouldn’t that be fun?

One of the things I wanted to expose the girls to was the onion dome.  I chose the onion domes for this project because they are so prevalent throughout Russia.

You can find them adorning churches and cathedrals, the most famous being St. Basil’s Cathedral.

With the help of a couple of easy-to-make stencils, we turned this into a fun art project.

Disclosure: There are Amazon Affiliate and other affiliate links in this article which means, at no additional cost to you, we could receive compensation for our recommendations. You can read our full disclosure policy on our Disclosure Page for more details.

Supplies Needed:

Black construction paper
Cardboard (for stencils)
Scissors
Oil pastels
Washable craft paint (we used Crayola brand)

1. Before beginning, create a few stencils from your cardboard. We used a recycled cereal box. Create a couple of different sizes of the domes. Keep the design simple with a pointed top, rounded sides, and a flat bottom.

2. Use the stencils to create several different dome shapes on your paper. Trace the stencil with a white oil pastel.

3. Finish the domes by making towers underneath (two straight lines) with a dot and tall cross on top. Use the white oil pastel for all the drawing.

4. Add details to your domes and towers with different colors of oil pastels. Refer to pictures of St. Basil’s Cathedral or create your own ideas. Add swirls to the domes and designs on the towers. Make them ornate!

5. Once you have your towers and domes decorated, use your craft paint to paint your towers. I liked using washable paint because it did not completely cover the oil pastel designs. We painted completely over our designs creating a bit of a resist effect and more subtle coloring. You can also choose to use your designs as guidelines and paint up to them, not over them.

6. Once you are finished painting, retrace your outlines with the white oil pastel. It makes the colors and designs pop.

The onion domes are beautiful and I can only imagine how awe-inspiring they are in real life.

Enjoy making this simple art project with your kids and learn a little about Russian architecture in the process.

The Gigantic Turnip Story Sequencing Game

February 18, 2014 By Terri Thompson

 Enhance your learning with this fun reading game to go along with the book The Gigantic Turnip. This Gigantic Turnip story sequencing game is easy to prep and so much fun to play.

This week, we’re taking a virtual trip to Russia.

Since we’ve been watching the Olympics lately, the girls have had a natural curiosity about the host country.

So, this week we’re going to explore Russian culture through folk tales and art.

Disclosure: There are Amazon Affiliate and other affiliate links in this article which means, at no additional cost to you, we could receive compensation for our recommendations. You can read our full disclosure policy on our Disclosure Page for more details.

We began with our favorite Russian folktale… let me correct that… one of our favorite folktales period, The Gigantic Turnip by Aleksei Tolstoy.

Enhance your learning with this fun reading game to go along with the book The Gigantic Turnip. This Gigantic Turnip story sequencing game is easy to prep and so much fun to play.

We work a lot on reading comprehension at home. Most of this is covered by our nightly chapter book readings.

But, sometimes I like to play games to make sure the girls are listening and understanding when we read. This time, we tried an easy story sequencing game.

In the book, a series of people and animals come to help pull the gigantic turnip out of the ground.

Before we read the book, I took a pile of index cards and wrote each helper on a separate card. Then, we settled in to read the story.

Enhance your learning with this fun reading game to go along with the book The Gigantic Turnip. This Gigantic Turnip story sequencing game is easy to prep and so much fun to play.

Once we were finished the story, I laid all the cards on the floor.

I challenged the girls to put all the characters in order from the first person who started pulling the turnip to the last.

I was pleasantly surprised to see how quickly they rearranged the cards.

Even if your child is not able to recall the order, let them look back at the pictures in the book.

No matter the process, you are getting them to think about the book and remember what they read.

Enhance your learning with this fun reading game to go along with the book The Gigantic Turnip. This Gigantic Turnip story sequencing game is easy to prep and so much fun to play.

This is such an easy way to enrich a book and to sneak in a little learning at home.

My oldest is in school all day, so I don’t want to be duplicating the work of the teacher. I want our learning at home to be different and fun. This simple game fit the bill!

10 Ways to Play and Learn About the Olympics

February 14, 2014 By Terri Thompson

It’s been so much fun learning about the Olympics. We’ve been crafting, moving, and learning geography.

There are so many wonderful activities that you can do with your kids in celebration of the Olympics and I’ve rounded up ten of my favorite activities.

Which one do you want to try?

Disclosure: There are Amazon Affiliate and other affiliate links in this article which means, at no additional cost to you, we could receive compensation for our recommendations. You can read our full disclosure policy on our Disclosure Page for more details.

Have fun competing together with your own backyard Olympics with The Chaos and the Clutter.

Read a book about the Winter Olympics with The Educators’ Spin On It.

Make your own Olympic torches with Happy Hooligans.

Make a styrofoam Olympic rink for pretend play with Afterschool for Smarty Pants.

Play a Winter Olympic inspired outdoor game with Rain or Shine Mama.

Make and decorate edible Olympic medals with Sun Hats and Wellie Boots.

Create pretty Olympic Rings art using chalk pastels with Housing a Forest.

Make a flags of the world banner for the Olympics with No Time for Flashcards.

Make and enjoy Olympic Rings pretzels with I Can Teach My Child.

Do some Winter Olympics Yoga with Kids Yoga Stories.

If you’re looking for more fun activities, you can find our Olympic posts at this link.

Olympic Mapping Activity

February 13, 2014 By Terri Thompson

You know what’s great about the Olympics, besides all the awesome sports events?

It’s a wonderful introduction to world geography.

I took advantage of my girls’ natural curiosity about the athletes to show them the countries each one represents with this simple Olympic Mapping Activity.

Locate different countries on a world map and learn about their flags with this fun Olympic mapping activity you can do while watching the Olympic Games.

Disclosure: This post contains Amazon Affiliate and other affiliate links. Please see my Disclosure Page for more details.

Prep Your Olympic Mapping Activity

I began with a simple map of the world, which I pinned on a cork board.

We printed ours out at Maps of World. I was looking for one with the countries labeled, but didn’t have the busyness of latitude and longitude lines.

Locate different countries on a world map and learn about their flags with this fun Olympic mapping activity you can do while watching the Olympic Games.

Make Your Flags of the World

We then settled in with the computer and tiny flag making supplies.

We used the official Sochi 2014 Website, teams section to find the different countries participating in the Olympics along with a picture of that nation’s flag.

Another bonus to using the Sochi Website was that we were also able to see pictures of the athletes and could place them with their country.

Special Note: You can find the PyeongChang 2018 website here if you want to do an updated version of this activity for the 2018 Winter Olympics.

Locate different countries on a world map and learn about their flags with this fun Olympic mapping activity you can do while watching the Olympic Games.

We began with some of the top medal winners (Norway and Canada), our country (the United States), and the host country (Russia).

We then moved on to other countries that the girls found fascinating.

Locate different countries on a world map and learn about their flags with this fun Olympic mapping activity you can do while watching the Olympic Games.

To make our flags, we used pins and tiny pieces of paper. Each piece of paper was 1-inch wide by 3/4-inch tall. We used markers to create our flags.

It was a bit of a challenge creating some of those tiny flags (hello, Canadian maple leaf), but we worked at it.

We left the stars off the US flag cause we didn’t have room, but we did the best we could do on them all.

Once each flag was made, I taped it on a sewing pin (see the example in the above photo).

Locate different countries on a world map and learn about their flags with this fun Olympic mapping activity you can do while watching the Olympic Games.

Map the Olympic Games

Once each flag was finished, we placed it on our map.

We took note of the size of the country and where it was located. My girls could already find a few countries (US, Canada, Mexico, China, Australia), and were fascinated to see where other countries were located.

They took note of just how tiny some countries are when compared to a huge country like Russia.

Locate different countries on a world map and learn about their flags with this fun Olympic mapping activity you can do while watching the Olympic Games.

We’ve been gradually adding flags every day now. In fact, we’re still not finished with this Olympic mapping project. Quite frankly, I hope it continues for quite awhile.

Have you been taking advantage of the Olympic Games for learning opportunities?

For More Fun and Learning:

Create flags of the world puzzles. You can find the instructions at Inspiration Laboratories.

Work the atlas puzzles at National Geographic. So much fun for puzzle lovers!

This fascinating infographic at Colour Lovers show the colors most commonly used in flags around the world. You have to scroll down to the bottom of the page to see the full infographic. It’s so interesting!

Locate different countries on a world map and learn about their flags with this fun Olympic mapping activity you can do while watching the Olympic Games.

You May Also Like One of These Olympic Games Activities:

10 Ways to Play and Learn About the Olympics

Olympic Rings Collage

Creative Family Fun Nights: Family Olympics

Move Like a Figure Skater

  • « Go to Previous Page
  • Page 1
  • Interim pages omitted …
  • Page 102
  • Page 103
  • Page 104
  • Page 105
  • Page 106
  • Interim pages omitted …
  • Page 190
  • Go to Next Page »

Primary Sidebar

Footer

Categories

Archives

Copyright © 2026 · Designed by The Blog Surgery

Creative Family Fun uses cookies to improve your experience. These cookies provide feedback to our analytics and advertisers. We use the information to track views of the site, where you go and to know if you are a regular visitor or brand new as well as provide a personalized experience where possible. We'll assume you're ok with this, but you can opt-out if you wish.Accept Reject Read More
Privacy & Cookies Policy

Privacy Overview

This website uses cookies to improve your experience while you navigate through the website. Out of these, the cookies that are categorized as necessary are stored on your browser as they are essential for the working of basic functionalities of the website. We also use third-party cookies that help us analyze and understand how you use this website. These cookies will be stored in your browser only with your consent. You also have the option to opt-out of these cookies. But opting out of some of these cookies may affect your browsing experience.
Necessary
Always Enabled
Necessary cookies are absolutely essential for the website to function properly. This category only includes cookies that ensures basic functionalities and security features of the website. These cookies do not store any personal information.
Non-necessary
Any cookies that may not be particularly necessary for the website to function and is used specifically to collect user personal data via analytics, ads, other embedded contents are termed as non-necessary cookies. It is mandatory to procure user consent prior to running these cookies on your website.
SAVE & ACCEPT