• Skip to secondary menu
  • Skip to main content
  • Skip to primary sidebar
  • Skip to footer
  • Home
  • About
    • Email Me
    • Disclosure & Copyright
  • Start Here
  • Subscribe
  • Privacy Policy
  • Books for Moms

Creative Family Fun

Your one-stop shop for kids activities and family fun

  • Facebook
  • Instagram
  • Pinterest
  • Twitter
  • Spelling Activities
  • Family Fun
  • STEM
  • Movie Night
  • Toddler Activities

World Culture Activities for Kids

Colorful Buildings Paper Collages: Exploring Argentina Through Art

April 20, 2015 By Terri Thompson

We headed to South America for stop 7 in Project: Around the World to visit Argentina. Argentina is a vast country, the second largest in South America, and there were so many fascinating things to choose for inspiration. (See Argentina on a map here.) Would it be the pampas, which are the fertile grasslands, or the Andes Mountains? Would it be the tango, the dance that originated in Argentina, or the gauchos, the native cowboy of the pampas? We ended up using a small slice of Argentine life, the colorful buildings in the neighborhood of La Boca in Buenos Aires for inspiration.
Disclosure: This post contains Amazon Affiliate links. Please see my disclosure for more details.


Supplies Needed:
White paper
Construction paper in several bright colors
Scissors
Glue
Black marker
I love this project because the process is super simple. It’s an open-ended project with such fun results.
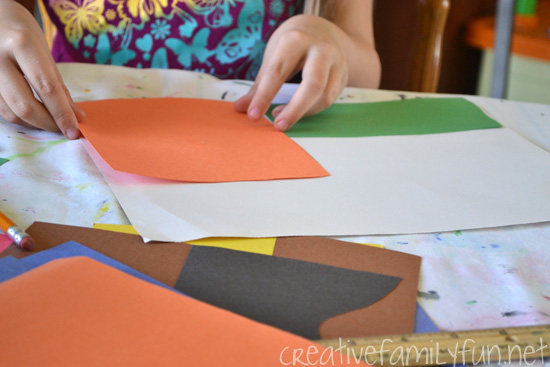
The first thing you need to do it to decide on your buildings. We make simple square and rectangular shapes. Try to fill in much of your paper with the larger shapes. Glue all your shapes down. Overlap your shapes if you want the look of a busy city block.
Next, use smaller pieces for roofs, windows, doors, and other details. Your shapes don’t have to be perfect! Arrange them on your paper until you’re pleased with the results, then glue them all down.
After you have all your collage complete, use your black marker to add in details. Add bars to the windows, door knobs, shutters, or anything else that strikes your fancy.
Thank you for coming along on our virtual trip to Argentina. If you’d like to see all of the projects we’ve done for Project: Around the World, please click here or on the button below.


Watercolor and Salt: Exploring Antigua and Barbuda Through Art

April 6, 2015 By Terri Thompson

Stop six in Project: Around the World took us to the sandy beaches of Antigua and Barbuda. The islands, located in the West Indies, became an independent nation in 1981. You can see Antigua and Barbuda on a map here. Many of the citizens today are descendants of African slaves brought by the British to work on sugar plantations. The sugar trade was once the main source of income for Antigua and Barbuda, but has since been replaced by tourism. Its pleasant climate, beautiful beaches, and world-class sailing draws tourists all year round.
Disclaimer: This post contains Amazon Affiliate links. Please see my disclosure for more details.


We took our inspiration for our art projects from the beautiful beaches of Antigua and Barbuda, specifically the pink sand beaches. (You can see plenty of beach images here at the Visit Antigua and Barbuda website.) I thought it would be the perfect project to experiment with watercolor and salt.
Supplies Needed:
Watercolor paper
Liquid watercolor
Salt
The project was very, very simple. The girls used pencil to draw a very light dividing line between the sand and the ocean on their watercolor paper. Then they started painting. They would paint a bit at a time and stop and sprinkle salt over the wet watercolor. They went bit by bit until they had covered their entire page. Once the paintings were completely dry, I shook both of them over a trash can to get rid of all the excess salt. Since I knew our paper would get rather wet during the process, I had the girls use watercolor paper which is thicker and better able to handle all the wet paint.
The painting itself was very simple, just two colors. We used the salt to create texture and add interest to the sand. The girls decided they liked the salt so much (of course) that they also added it their water. After all, the ocean is full of salt water! I love how the paintings ended up looking like an abstract beach scene using texture and blocks of color instead of detail.
It was so much fun talking a virtual tour of the beautiful beaches of Antigua and Barbuda. I’m so glad you came along!
If you would like to see the rest of our stops during Project: Around the World, please click here or on the image below.
Note: Facts about Antigua and Barbuda all came from this book, Antigua and Barbuda (Cultures of the World) by Sara Louise Kras, which we used for reference throughout this project.
 

Clay African Baskets: Exploring Angola Through Art

March 26, 2015 By Terri Thompson

Our fifth stop in our journey around the world through art was Angola. Angola is located in south-western Africa. (You can see it on a map here.) The Portuguese began exploring and settling in Angola in the 1400’s. Angola was a Portuguese colony until it gained independence in 1975 following almost 15 years of warfare. Angola still faces extreme poverty and social problems today.
Despite a lack of books about Angola, we were able to find many resources on the web. We found a culture that was rich in art. We found beautiful wood carvings, like this intricately carved chair. We also found amazing baskets. (See some examples here.) All of these examples show how an everyday object can be made beautiful. We took our inspiration from those baskets to create our Angola art project.
Disclaimer: This post contains Amazon Affiliate links. Please see my disclosure for more details.
How can you make your own version of these baskets? That question had me thinking for awhile. We couldn’t actually make our own baskets, so I had to come up with an alternative. Finally, I settled on the idea of clay pots painted in the style of the baskets. My friend Cerys at Rainy Day Mum has a baker’s clay recipe that I’ve been wanting to try, so I made up a batch. Please click here to get the recipe. I followed her recipe exactly and had enough clay for both of our pots.


The girls found the clay very easy to work with. They made simple pinch pots to create their basket shapes. They tried several versions before they settled on their preferred shape. Plus, they just really enjoyed the feel of the soft dough and wanted to play with it for awhile. After they were satisfied, I put the pots on a foil-lined baking sheet and dried them in the oven. Do check on it frequently. Our pots dried quicker than I had anticipated. (We typically use salt dough which can take a very long time to dry. I loved that this dried so much quicker.)


Even after the oven drying, we let our pots sit out over night to cool before painting. You don’t need to wait as long as we did. We were just busy and didn’t have a chance to paint until the next day. We used regular craft paint for our decorations. (This was the brand we used. Any similar paint would also work.) The clay was very easy to paint and we only needed one coat for full coverage. The girls used three different shades of brown for their designs.


No, they’re not carbon copies of the Angola baskets we saw. But, I think the girls really captured the feel of the baskets. They enjoyed the process and made it all their own. Plus, we had a lot of conversation about how talented the basket-makers are.
I hope you’re enjoying our virtual trip around the world through art. If you would like to see details of this project, please see my introductory post. You can find all the previous projects we did here or by clicking on the graphic below.
 

Puff Paint Ski Mountains: Exploring Andorra Through Art

March 12, 2015 By Terri Thompson

Disclosure: This post contains Amazon Affiliate links. Please see my disclosure for more details.
Quick geography pop quiz: who can tell me, without looking at a map, where Andorra is located? I’ve got a passion for geography, so I knew a bit about where it was located. But, once I started researching, I could find very little information about Andorra beyond a map. No books, no other projects, only information from travel sites. And that, my friends, is one reason why we are doing this project. We want to learn about all corners of the world and not just the most popular countries. I’ll admit that I struggled with the planning for Andorra for awhile. I didn’t have a book to read to the kids and I had a very hard time coming up iwth an idea for an art project?

Andorra is a tiny European country located in the Pyrenees Mountains between France and Spain. See Andorra on a map here. It’s size is only 181 squares miles and completely mountainous. Most citizens live in the few valley areas. Tourism is the biggest industry in Andorra, especially mountain sports. (Source: Oxford Atlas of the World) Since winter sports are so important to Andorra’s economy, we decided to focus on that for our art project. We made our own puff paint to create a simple ski mountain.

Supplies Needed:
Microwave puff paint (see recipe below)
Blue paper
2 craft sticks
2 toothpicks
Paint
Glue
Special note on this project: This project is more focused on the process and the experience and doesn’t necessarily produce a piece of art that you can keep. I’ll be creating a digital scrapbook of our journey with Project: Around the World, because I know I won’t have room to keep every project. So, it’s not important to me to be able to preserve each project. I will give you tips to help you preserve this project if you desire. But, despite this, the project is fun and it helped us learn about the country of Andorra.


Before we started using our puff paint, we painted our skis and poles. The girls used regular craft paint in some of their favorite colors. You only need to paint one side of each since you will be gluing them down. We found that painting these first gave them plenty of time to dry before it was time to glue to our snowy mountains.
Next, it was time to make the puff paint. It’s a simple recipe to follow and the girls loved being able to make their own paint. Our recipe made enough for both projects with just a little bit left over.
Microwave Puff Paint:
1/3 c flour
1 tsp baking powder
1 tsp salt
1/3 cup of water
Mix all of the dry ingredients in a bowl. Add water slowly, stirring after every couple of tablespoons, until your paint is the consistency of paste (thick, but spreadable). We used just shy of the 1/3 cup of water.
You need to use the paint soon after you make it, so don’t try to make it too far ahead of time!


We used our paint to make the side of a snowy mountain. We found that a small sponge brush works better than a regular paintbrush with this paint. If you don’t have a sponge brush, cut up a regular sponge into smaller pieces or you can even use your fingers.
Once we were satisfied with our mountains, it was time to pop it into the microwave to dry. I microwaved each in 10 second increments until the paint started getting hard. Our pieces were not fully dry when I felt the paper getting hot (after about 30 seconds). This did give us enough to work with because the paint was hard on the surface. It will continue to dry in the air. Once we microwaved our pictures, we glued our skis and ski poles to the mountain.


I’ll admit that I’ve never found this puff paint to keep well. Nonetheless, we love using it! The paper will curl up on the sides once it’s fully dry and it will crack and flake after awhile. There are a couple of options if you would like to keep these projects. First, you can make the pictures on thick cardboard, like the side of a packing box. Paint the sky blue after microwaving. This will prevent the curling of the edges, but not the cracking and flaking. You can also recreate this project with regular white paint. You won’t have the puffy effect, but you will be able to keep the project if that is what is important to you.


Even though we’ve just barely started our artistic journey around the world, we’ve already found such great value in it. We’re learning about countries that aren’t often introduced to kids until they’re much older and we’re doing it in a way that will help us remember a bit about them. This approach is also helping us find the beauty and the positive aspects of each location. I want to teach my girls to see the value in each and every corner of the world. I can’t wait to do more projects!
If you’d like to follow along with Project: Around the World, you can find the introduction post here. Or click here or on the image below to see all the projects we’ve done so far.


Prehistoric Rock Paintings: Exploring Algeria Through Art

February 25, 2015 By Terri Thompson

Our third stop in Project: Around the World was to the country of Algeria. Algeria is located on the northern coast of Africa. (See it on the map here.) The majority of the population lives along the coast line because about 80% of its land is covered by desert, specifically the Sahara Desert. Inspiration came easy for this project once we discovered the prehistoric rock paintings in Tassili n’Ajjer. The Tassili n’Ajjer rock paintings are some of the oldest artwork in the world and is considered one of the most important groupings of prehistoric art in the world. (You can read an extensive description, plus view many pictures of Tassili n’Ajjer, at this link from the World Heritage Convention.)
Disclosure: This post contains Amazon Affiliate links. Please see my disclosure for more details.
Supplies Needed:
Roll of brown kraft paper
Painter’s tape
Washable paint
Old sheet or drop cloth
To prep this project, I cut a length of the brown paper off the roll. I crumpled it up and smoothed it out before taping to the wall to mimic the texture of the rocks. I always use painter’s tape when I stick anything to the wall. It’s a bit hard to get off the back of the paper (and will sometimes peel a bit of the paper), but it will protect your wall. Spread out your drop cloth on the ground underneath your paper.
Note: I normally don’t specify the type of paint you should use, but for this project I would HIGHLY recommend the washable paint. You know, for that washable factor!


After viewing some online pictures of Algeria and reading the book, The Sahara Desert: The Largest Desert in the World by Megan Lappi, I showed the girls their invitation to create. We talked a bit about the Tassili n’Ajjer rock paintings before beginning. What colors do you see in the rock paintings? We knew the paint came from natural materials so we pulled out the brown and orange paints as best color matches. What materials did they use for painting? We decided that using their fingers was one possibility, so that’s what we used to do our paintings. We also talked about how these paintings sometimes told stories, so the girls decided to try and tell their own stories of the desert.


The girls had a lot of fun creating their rock paintings with their fingers. My 5-year-old especially got into it. She painted a fennec fox, a chameleon, and painted around her hand to represent humans. My 7-year-old painted a camel and mountains. It was so much fun and they proudly told their dad the stories once he came home from work.
We loved making our own versions of the prehistoric rock paintings of Tassili n’Ajjer and my 5-year-old want to do this again sometime. But, now it’s time to move on to another country. Andorra is coming up soon!
Thank you for joining us on our virtual trip around the world.
Click on the logo to find all of our Project: Around the World posts:


  • « Go to Previous Page
  • Page 1
  • Page 2
  • Page 3
  • Page 4
  • Page 5
  • Page 6
  • Interim pages omitted …
  • Page 11
  • Go to Next Page »

Primary Sidebar

Footer

Categories

Archives

Copyright © 2026 · Designed by The Blog Surgery

Creative Family Fun uses cookies to improve your experience. These cookies provide feedback to our analytics and advertisers. We use the information to track views of the site, where you go and to know if you are a regular visitor or brand new as well as provide a personalized experience where possible. We'll assume you're ok with this, but you can opt-out if you wish.Accept Reject Read More
Privacy & Cookies Policy

Privacy Overview

This website uses cookies to improve your experience while you navigate through the website. Out of these, the cookies that are categorized as necessary are stored on your browser as they are essential for the working of basic functionalities of the website. We also use third-party cookies that help us analyze and understand how you use this website. These cookies will be stored in your browser only with your consent. You also have the option to opt-out of these cookies. But opting out of some of these cookies may affect your browsing experience.
Necessary
Always Enabled
Necessary cookies are absolutely essential for the website to function properly. This category only includes cookies that ensures basic functionalities and security features of the website. These cookies do not store any personal information.
Non-necessary
Any cookies that may not be particularly necessary for the website to function and is used specifically to collect user personal data via analytics, ads, other embedded contents are termed as non-necessary cookies. It is mandatory to procure user consent prior to running these cookies on your website.
SAVE & ACCEPT