• Skip to secondary menu
  • Skip to main content
  • Skip to primary sidebar
  • Skip to footer
  • Home
  • About
    • Email Me
    • Disclosure & Copyright
  • Start Here
  • Subscribe
  • Privacy Policy
  • Books for Moms

Creative Family Fun

Your one-stop shop for kids activities and family fun

  • Facebook
  • Instagram
  • Pinterest
  • Twitter
  • Spelling Activities
  • Family Fun
  • STEM
  • Movie Night
  • Toddler Activities

World Culture Activities for Kids

3-D Paper Weaving: Exploring Bangladesh Through Art

April 21, 2016 By Terri Thompson

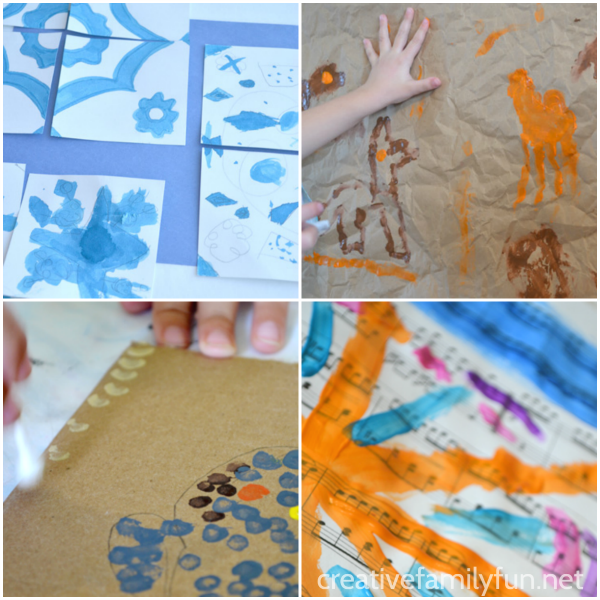
Inspiration for Project: Around the World can come in many places.

Sometimes we look at traditional (and very useful crafts) and at other time we look at famous artwork. We’ve been inspired by architecture, nature, and archaeological findings.

When we started learning about Bangladesh, we took our inspiration for our  project from a once common but now endangered native animal, the royal Bengal tiger.

We combined the traditional craft of weaving with the rich colors of the Bengal tiger for our art project inspired by Bangladesh: 3-D Paper Weaving.

Do a twist on the traditional paper weaving project, by making this 3-D paper weaving sculpture inspired by the country of Bangladesh.

About Bangladesh

Bangladesh is a small Asian country. It’s located on the east side of India. In fact India borders Bangladesh on the west, north, and east. Myanmar (formerly Burma) shares a small portion of the southeastern border. The Bay of Bengal is along the southern border. (You can see Bangladesh on a map here.)

Bangladesh is a very poor country. Because of its flat land and many waterways, it often suffers during monsoon season. Despite the harsh conditions for humans, nature thrives, it’s colorful, lush, and home to many diverse animals.

Disclosure: This post contains Amazon Affiliate links. Please see my Disclosure Page for more details.

Do a twist on the traditional paper weaving project, by making this 3-D paper weaving sculpture inspired by the country of Bangladesh.

Supplies needed:

1 piece orange construction paper
2 pieces black construction paper
Scissors
Tape or glue stick

How to get started

I had originally planned a simple paper weaving project. But, as I played around a bit, the idea of 3-D paper weaving came to fruition. It was a more difficult project than we’ve done in the past, but through trial and error (and some frustration) we came up with a fun project with awesome results.

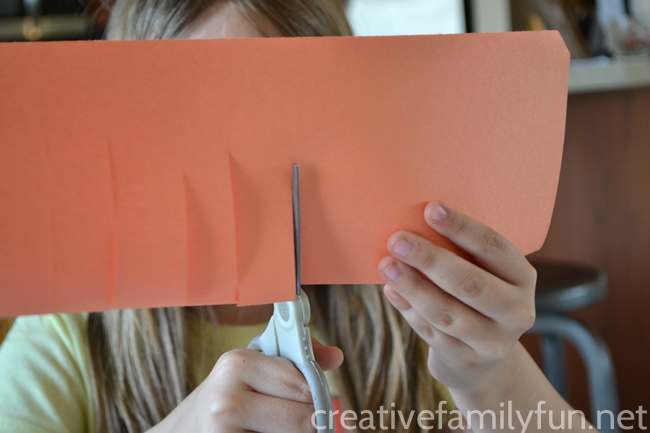
You start the same way as you would a traditional paper weaving project. Fold the orange piece of paper in half vertically. Start at the folded edge and cut strips. You don’t want to cut all the way through to the ends. Stop about 1 to 1-1/2 inches from the edge.

Next, cut the black construction paper into long strips. The strips should be the length of the longer side of the paper. You will be weaving vertically.
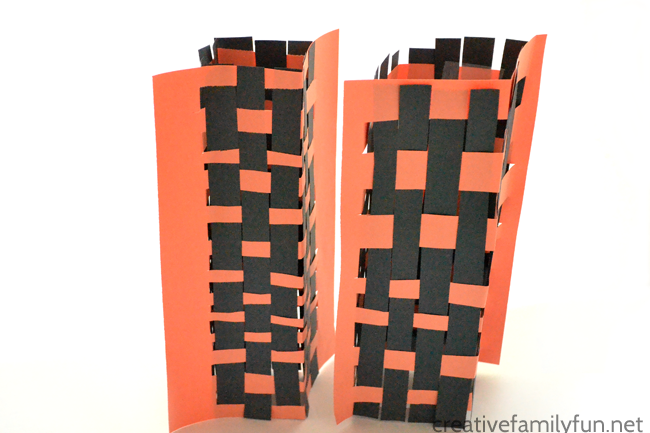
Do a twist on the traditional paper weaving project, by making this 3-D paper weaving sculpture inspired by the country of Bangladesh.

3-D paper weaving

Now it’s time to transform your orange paper from a flat piece of paper to a 3-D piece of paper.

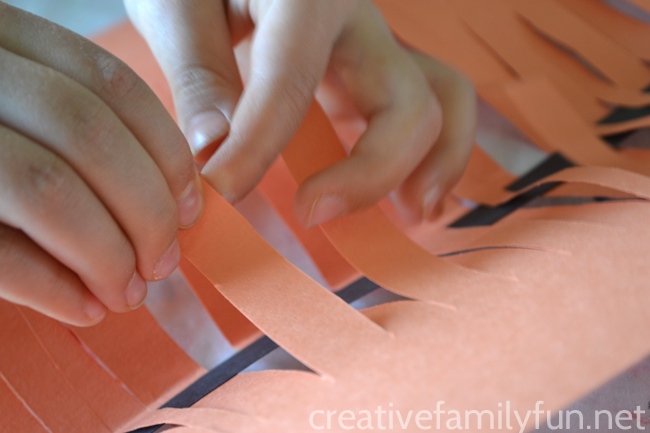
Go along your orange paper and reverse the direction of the crease of every other strip. You’ll want each strip to go in opposite directions. You can get  a good look at what I’m talking about in the picture above.

Do a twist on the traditional paper weaving project, by making this 3-D paper weaving sculpture inspired by the country of Bangladesh.

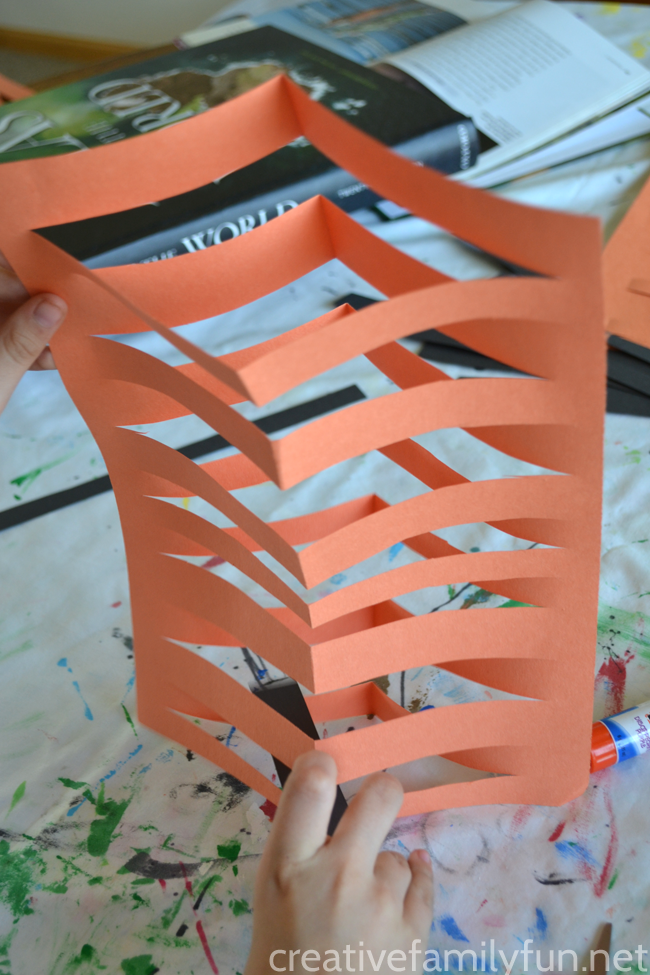
Once you have all your creases made, you should be able to stand your orange paper up on it’s end. It will look like a rectangular box just like the one in the picture above. It will be very floppy and not stand up by itself at this point.

Note: We did discover that the wider you cut the orange strips, the sturdier the rectangular box would be.

Do a twist on the traditional paper weaving project, by making this 3-D paper weaving sculpture inspired by the country of Bangladesh.

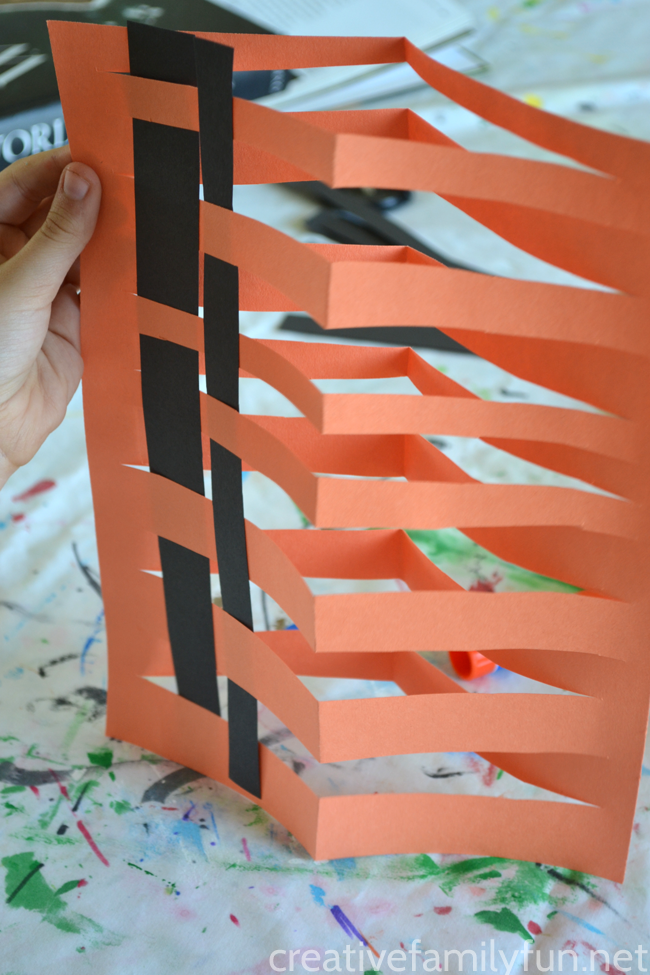
Now, it’s time to start paper weaving. Keep your orange paper in the 3-D form. Next, take a black strip of paper and start from the top. Weave over and under until you reach the bottom.

Keep going all the way around your rectangular box alternating the weaving as your go. (See above). As you go around your box, you’ll notice that the box will keep getting sturdier and sturdier.

Once you’re done, glue or tape the ends of the black strips. If you don’t do this, your strips will not stay in place.

The weaving step was the hardest and most frustrating part for the kids. We found that things moved much smoother if someone would hold the orange paper up while the other person weaves. It takes some perseverance. I would not recommend this for a group of preschoolers. It’s more suited for your elementary-aged kids. Also, this is not a quick project. Take your time and have some fun!

Once we had everything done and all the ends either glued or taped, our 3-D paper structures were able to stand on their own.

Add a fun twist to traditional paper weaving with this fun 3-D Paper Weaving art project for kids.

You can find inspiration anywhere

While no one would guess at first glance that this project was inspired by Bangladesh, each part was inspired by something we read. The weaving was inspired by the traditional craft still practiced to this day and the colors were inspired by the Bengal tiger, a native animal that has always been important to Bangladesh. Inspiration can come from many areas and it’s fun to combine a couple of areas of inspiration into one new art project.

Note: We found the book Bangladesh, Enchantment of the World by Tamra B. Orr to be a valuable resource for learning about Bangladesh. Check your local library for a copy.

You may also like one of these fun projects:

Illuminated Manuscript Initials: Exploring Armenia Through Art

Clay African Baskets: Exploring Angola Through Art

Watercolor Tiles: Exploring Afghanistan Through Art

Project: Around the World

Thank you for following along during our artistic journey around the world. To find all our projects so far, please click here or on the image below.


Clay Seals: Exploring Bahrain Through Art

March 16, 2016 By Terri Thompson

One thing I love about our virtual trip around the world, is discovering countries that I knew very little about.

One of those countries is Bahrain. I knew approximately where it was located, the Middle East, and therefore had a few ideas about what it is like. But, there were definitely lots of things I didn’t know.

It was fun to discover Bahrain together with my girls and make a fun clay art project in the process.

Learn about the history of Bahrain with a fun clay art project. Make clay seals inspired by an archaeological find from the Dilmun era.

About Bahrain

Did you know that Bahrain is an archipelago nation? It’s a small nation made up of 33 islands located off the east coast of Saudi Arabia. (You can see it on a map here.)

Because of it’s island location, it served as a center of trade for many, many years. It is greener and less barren than it’s neighbors in the Middle East, but very few animals make their home there.

Bahrain has a very rich history and we found our inspiration for our art project from its ancient history, the Dilmun Era, which was between 3200 and 2200 B.C. Dilmun was a great center of commerce and trade.

One of the most significant archaeological finds from this era was a Dilmun seal. A man would use this seal to “sign” an agreement. Because each person has their own unique seal, when he died his seal would be buried with him.*

We took our inspiration from these seals and created our own unique clay seals.

Disclosure: This post contains Amazon Affiliate links, please see my Disclosure Page for more details.

Learn about the history of Bahrain with a fun clay art project. Make clay seals inspired by an archaeological find from the Dilmun era.

Supplies needed for your clay art project

Air Dry Clay (We love the Crayola brand.)
Toothpicks
Wax Paper

We’ve used air dry clay a few times during Project: Around the World, like our clay baskets from Angola. We’ve been using the same tub of Crayola Air Dry Clay for all these projects. We find it easy to use and it dries nicely. It’s been well-worth the price.

Learn about the history of Bahrain with a fun clay art project. Make clay seals inspired by an archaeological find from the Dilmun era.

Making our clay seals

I gave each girl a small lump of clay, some wax paper, and a toothpick. We used the wax paper to keep our clay from sticking to the table. You can also use a plastic tray if you have one. But, wax paper does the job nicely.

The girls rolled their clay in a ball and flattened it into a round seal. Then, they used their toothpicks to draw their decorations. They worked on creating their own personal seal. Their challenge was to create something that reflected who they were.

Ask these questions to help with the design. 

What are your favorite things?

What words do you use to describe yourself?

What are your talents and interests?

What is your passion?

We chose toothpicks to create our designs because it’s a favorite choice of my girls. But, don’t let that limit you. You can use your fingers, forks, knives, other pieces of clay, LEGOs or other small toys. The possibilities are endless.

After you’re done, leave the seals on the wax paper and leave it to dry for at least one day.

Note: You will not be able to use this as a real seal. The clay soaks up paint and ink too easily and it will not stamp on paper. We did test it out and it didn’t work!

It was fun to create our own personal seals with this clay art project and learn a bit about the history of Bahrain in the process.

Explore the world through art! Make clay seals inspired by Dilmun seals, an ancient artifact found in Bahrain.

*Information about Bahrain came from the book Cultures of the World: Bahrain by Robert Cooper.

You may also like one of these art projects:

3-D Paper Weaving: Exploring Bangladesh Through Art

Painting on Music: Exploring Austria Through Art

Handprint Art: Exploring Argentina Through Art

Thank you for following along during our artistic journey around the world. To find all our projects so far, please click here or on the image below.


Learning About Ancient China Through Books and Activities #ReadYourWorld

January 21, 2016 By Terri Thompson

The Multicultural Children’s Book Day is an amazing initiative whose mission is to spread the word and raise awareness about the importance of diversity in children’s literature. There is nothing better than reading a book about a kid who is just like you. I’m a big believer in the fact that every kid should be able to see themselves in a book.

As part of the Multicultural Children’s Book Day, we were able to whisk ourselves back to ancient China. It was a fun and fascinating journey.

Disclosure: This post contains Amazon Affiliate links. Please see my Disclosure Page for more details. I was sent a free copy of this book for review. All opinions are my own.

I’m very grateful to have been introduced to Icy Smith through the MCCBD team. We were sent a copy of the Mystery of the Giant Masks of Sanxingdui, written by Icy Smith and illustrated by Gayle Garner Roski. It was a beautiful book that we greatly enjoyed.

In 1968, construction workers found an amazing discovery. Two pits full of over a thousand artifacts, containing bronze, jade, gold, and elephant tusks. This Sanxingdui site is considered one of the greatest archaeological discoveries in China. Who buried these? Why? What happened to the ancient Sanxingdui culture? Icy Smith tells the story of what she thinks may have happened through the eyes of a young girl Min and her older brother Wei.

The story was fascinating and quite approachable to my 1st and 3rd grade daughters. We enjoyed this glimpse into ancient China and we were happy to see it through the eyes of a young girl. We learned a lot and are eager to read more books from Icy Smith.

Extend the fun with some activities:

  • Build a replica of the Great Wall of China. Check out this amazing project from Confessions of a Homeschooler.
  • Planet Smarty Pants has a list of so many great activities that she and her daughter have done together. They explored through math, crafts, food and more.
  • Read a Chinese folktale. What Do We Do All Day has a fantastic list to choose from.
  • Learn some words in Chinese. Miss Panda Chinese is a wonderful blog dedicated to teaching children Mandarin Chinese.
  • Learn about pictograms, Terra Cotta Warriors, and more with these ancient China activities from Creekside Learning.


The Multicultural Children’s Book Day team’s mission to spread the word and raise awareness about
the importance of diversity in children’s literature. Our young readers need to
see themselves within the pages of a book and experience other cultures,
languages, traditions and religions within the pages of a book. We encourage
readers, parents, teachers, caregivers and librarians to follow along the fun
book reviews, author visits, event details, a multicultural children’s book
linky and via our hashtag (#ReadYourWorld) on Twitter and other social media 

“Our mission is to not only raise awareness for the kid’s books that celebrate diversity, but to get more of these of books into classrooms and libraries.”

The co-creators of this unique event are Mia Wenjen from Pragmatic Mom and Valarie Budayr from Jump Into a Book/Audrey Press. You can find a bio for Mia and Valarie here.

Thank you to all the sponsors of the Multicultural Children’s Book Day:

Multicultural
Children’s Book Day 2016 Medallion Level Sponsors! #ReadYourWorld
Platinum: Wisdom Tales Press * StoryQuest Books*Lil Libros
Gold: Author Tori Nighthawk*Candlewick Press,*
Bharat
Babies
Silver: Lee and Low Books*Chronicle Books*Capstone Young Readers T
Tuttle Publishing ,NY Media Works, LLC/KidLit TV


Bronze: Pomelo Books* Author Jacqueline Woodson*Papa Lemon Books* Goosebottom Books*Author
Gleeson Rebello
*ShoutMouse Press*Author
Mahvash Shahegh
* China
Institute.org
*Live Oak Media
Also, thank you to the hosts:

All Done Monkey,
Crafty Moms
Share
, Educators Spin on it, Growing Book by Book, Imagination Soup, I’m Not the Nanny, InCultural Parent,  Kid World Citizen, Mama
Smiles
, Multicultural Kid Blogs, Spanish Playground


Layered Paper Art Underwater Art Project

January 5, 2016 By Terri Thompson

I’m not a winter person at all. I don’t like being cold and I’m really not fond of snow, especially when I have to shovel it.

Luckily, Project: Around the World provided some welcome relief from the cold of winter.

I was very happy that we reached The Bahamas during the coldest time of the year. We got to experience a little bit of warmth as we spent a day exploring this group of islands in the Caribbean Sea. The Bahamas are a popular vacation spot for those of us in North America thanks to its tropical climate and miles and miles of beaches.

We went underwater to find our art inspiration and created these fun Layered Paper Underwater Art.

Create a fun ocean scene inspired by The Bahamas with this layered paper underwater art project for kids combining printmaking with wet-on-wet watercolor.

Fun Fact: The Bahamas is home to the largest flock of flamingos in the world! They make their home at Inagua National Park. 

When my girls and I started Project: Around the World last January, I had no idea how much we would love it. We’re learning so much about the world, making quite a lengthy travel wish list, and having fun together. We’ve made it though one year and all the countries that start with an “A,” now it’s time to move on to another year and another letter of the alphabet.

Disclosure: There are Amazon Affiliate and other affiliate links in this article which means, at no additional cost to you, we could receive compensation for our recommendations. You can read our full disclosure policy on our Disclosure Page for more details.

Create an underwater scene inspired by The Bahamas with this layered paper art project for kids combining printmaking with wet-on-wet watercolor. 

I’ve been inspired by the wealth of layered paper art projects I’ve seen all over Pinterest and have been wanting to try something similar with my girls. (Here’s a great example.)

We used two different art techniques to create our paper and combined the two together for our finished underwater art project.

Wet-On-Wet Watercolor

The first technique we used was wet-on-wet watercolor. This process is so simple and so fascinating. Kids can create beautiful artwork with this technique alone.

The key to the process is using thick paper suitable for watercolors. Regular copy paper will tear easily once wet.

Before painting, we soaked our paper briefly in water. Don’t leave it sitting in the water; you don’t want soggy paper. Once our paper was nice and wet, we use our pan of watercolors to paint the paper. We weren’t trying to make actual pictures, just a pretty colorful design.

Tip: Put your wet paper on a plastic tray for painting, so you don’t get the table wet.

Create an underwater scene inspired by The Bahamas with this layered paper art project for kids combining printmaking with wet-on-wet watercolor.

Bubble Wrap Printmaking

While our wet on wet watercolors were drying, we used a printmaking technique to make our background.

We used another sheet of watercolor paper, blue and white craft paint, and bubble wrap for this part of the project. Thanks to all the packages we received recently, we had a variety of sizes of bubble wrap to choose from.

I cut small pieces from an assortment of bubble wrap. The girls used the paint to paint over the bumpy side of the bubble wrap. Then, they turned it over and pressed it onto their paper. They did this over and over using different colors of paint (blue, light blue, and white) layering it on top of each other until they were satisfied that it looked like water.

Create an underwater scene inspired by The Bahamas with this layered paper art project for kids combining printmaking with wet-on-wet watercolor.

Combine to make your layered paper underwater art project

We waited a couple of days until we finished our project. We had some plans which kept us really busy, which is why we waited so long. You only need to wait overnight for all of your paper to dry.

Once everything was dry, the girls drew fish on their watercolor paintings. Then, they traced the fish and added details with a black Sharpie. They cut out their fish and arranged them on their bubble-wrap printed paper. For the last step, they glued all their fish to the paper.

It was so much fun exploring a tropical location with a on a cold winter’s day with our underwater art. We stayed inside, stayed warm, and learned a lot. I love this project!

Create an underwater scene inspired by The Bahamas with this layered paper art project for kids combining printmaking with wet-on-wet watercolor.
If you enjoyed this underwater layered paper art project, the above photo is perfect for sharing on Facebook or you can share on Pinterest.

Travel the world without leaving home with art projects inspired by all the countries. To find all our projects so far, please click here or on the image below.

You may also like one of these ocean crafts:

Watercolor and Salt Beach Scene

Beach Themed Paper Plate Wreath at Rainy Day Mum

Coral Reef Watercolor Art Project at Rainy Day Mum

Recycled Egg Carton Ocean Animals at Homeschool Preschool

Best of 2015 – Project: Around the World

January 2, 2016 By Terri Thompson


Earlier this week, I counted down the top-viewed posts of 2015. Now, I’d like to share my favorite posts of 2015. They’re all part of a fun project my girls and I started at the very beginning of the year, Project: Around the World. We thought it would be fun (and challenging) to make our way around the world and to do an art project inspired by each country. We decided to go alphabetically so it would be easy to keep track of the countries we’ve done and the ones still to go. It’s been an incredibly rewarding project so far. The things we have learned have been amazing!
 
Disclosure: There are Amazon Affiliate and other affiliate links in this article which means, at no additional cost to you, we could receive compensation for our recommendations. You can read our full disclosure policy on our Disclosure Page for more details.
 
It is hard for me to pick a favorite project from this series. I’ve loved everything we have done so far. So, I went to see what was the most popular post. It was our Colorful Building Paper Collages from Argentina (pictured above). We used the colorful buildings in the neighborhood of La Boca in Buenos Aires for our inspiration. You can read all the details at this link.


What else have we done?
 
We were inspired by the famous Blue Mosque in Mazar-e Sharif, Afghanistan and created watercolor tiles. (Top left)
 
We created our own version of prehistoric rock paintings inspired by Tassili n’Ajjer in Algeria. (Top right)
 
We learned about the Aboriginal culture in Australia and made paintings in the style of Aboriginal dot painting. (Bottom left)
 
We listened to the music of Mozart and painted on top of sheet music while we explored Austria. (Bottom right)
 
The projects have been varied, creative, and fun. You can find the full list of our projects from Project: Around the World here.
 
Now you know my favorite project from 2015, why don’t you check out some of the other favorite posts from my fellow bloggers below.


Top Parenting Posts
 
 
An InLinkz Link-up

,

Top Educational Posts
 
 
An InLinkz Link-up
Top Craft Posts


An InLinkz Link-up


  • « Go to Previous Page
  • Go to page 1
  • Go to page 2
  • Go to page 3
  • Go to page 4
  • Interim pages omitted …
  • Go to page 11
  • Go to Next Page »

Primary Sidebar

Footer

Categories

Archives

Copyright © 2022 · Designed by The Blog Surgery

Creative Family Fun uses cookies to improve your experience. These cookies provide feedback to our analytics and advertisers. We use the information to track views of the site, where you go and to know if you are a regular visitor or brand new as well as provide a personalized experience where possible. We'll assume you're ok with this, but you can opt-out if you wish.Accept Reject Read More
Privacy & Cookies Policy

Privacy Overview

This website uses cookies to improve your experience while you navigate through the website. Out of these, the cookies that are categorized as necessary are stored on your browser as they are essential for the working of basic functionalities of the website. We also use third-party cookies that help us analyze and understand how you use this website. These cookies will be stored in your browser only with your consent. You also have the option to opt-out of these cookies. But opting out of some of these cookies may affect your browsing experience.
Necessary
Always Enabled
Necessary cookies are absolutely essential for the website to function properly. This category only includes cookies that ensures basic functionalities and security features of the website. These cookies do not store any personal information.
Non-necessary
Any cookies that may not be particularly necessary for the website to function and is used specifically to collect user personal data via analytics, ads, other embedded contents are termed as non-necessary cookies. It is mandatory to procure user consent prior to running these cookies on your website.
SAVE & ACCEPT