• Skip to secondary menu
  • Skip to main content
  • Skip to primary sidebar
  • Skip to footer
  • Home
  • About
    • Email Me
    • Disclosure & Copyright
  • Start Here
  • Subscribe
  • Privacy Policy
  • Books for Moms

Creative Family Fun

Your one-stop shop for kids activities and family fun

  • Facebook
  • Instagram
  • Pinterest
  • Twitter
  • Spelling Activities
  • Family Fun
  • STEM
  • Movie Night
  • Toddler Activities

Crafts

Classic God’s Eye Craft for Kids

February 28, 2018 By Terri Thompson

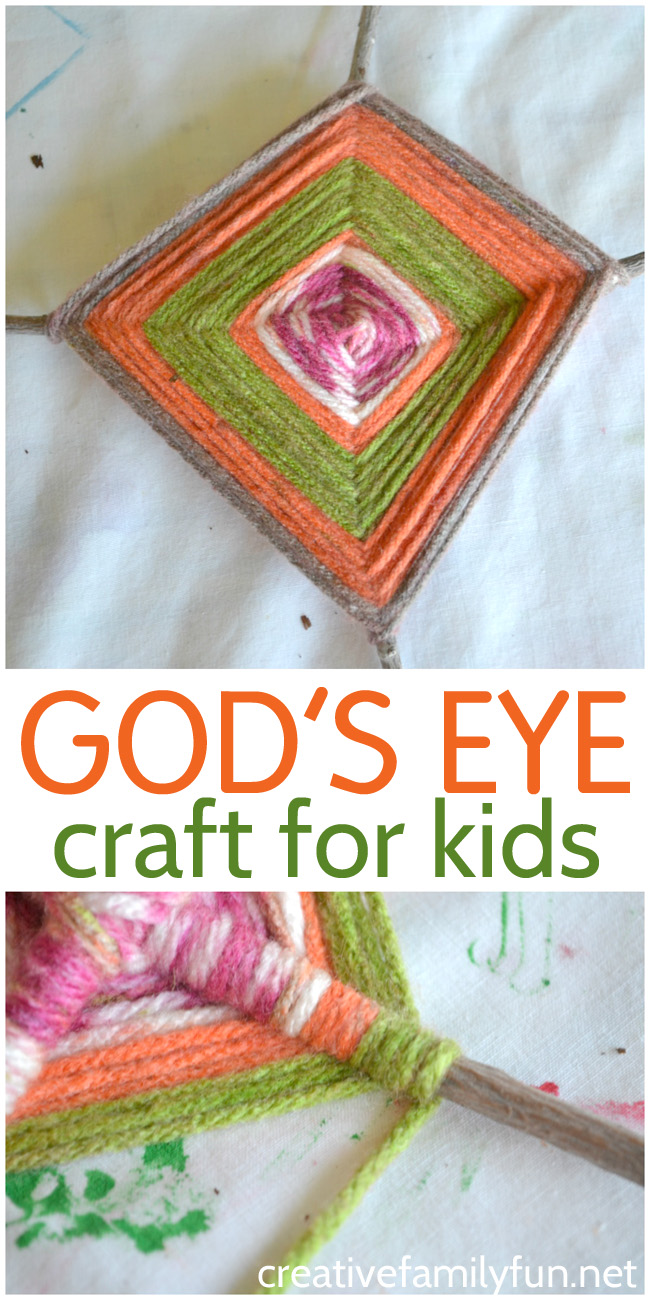
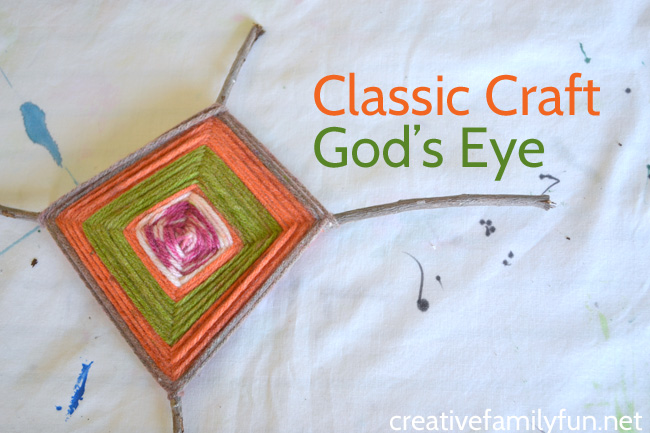
The God’s Eye, or Ojo de Dios, is the ultimate classic craft.

I made a God’s Eye craft as a kid, but the origin goes back much further than that with the Huichol Indians in the Sierra Madre Mountains of Mexico.

I’ve always found them beautiful and a great way to combine art, history, and culture in one creation.

Sit down with your kids to make this fun classic craft. This rustic God's Eye craft for kids uses simple supplies and it is easy to make your own unique version.

This time, we made a very rustic version using two sticks. The small supply list makes this a perfect craft to bring outdoors.

Disclosure: There are Amazon Affiliate and other affiliate links in this article which means, at no additional cost to you, we could receive compensation for our recommendations. You can read our full disclosure policy on our Disclosure Page for more details.

Supplies Needed

2 thing twigs
Yarn (use a multi-colored yarn for best results)

Sit down with your kids to make this fun classic craft. This rustic God's Eye craft for kids uses simple supplies and it is easy to make your own unique version.

How to make your God’s Eye craft

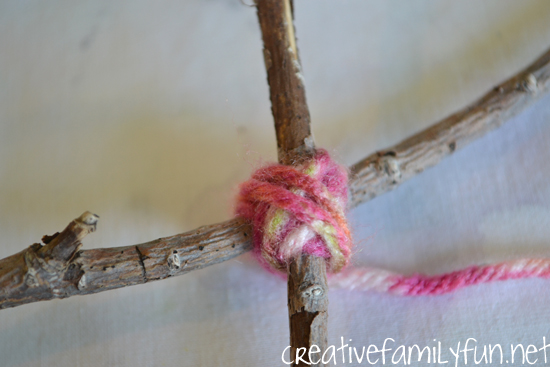
Start by crossing your two sticks in the middle so that they look like a plus sign (+).

Next, start wrapping your yarn around your sticks in an overlapping x-style.

Tucking the end of your yarn under your x will keep your God’s Eye from unraveling.

Finally, layer your yarn several times to hold your sticks steady.

Sit down with your kids to make this fun classic craft. This rustic God's Eye craft for kids uses simple supplies and it is easy to make your own unique version.

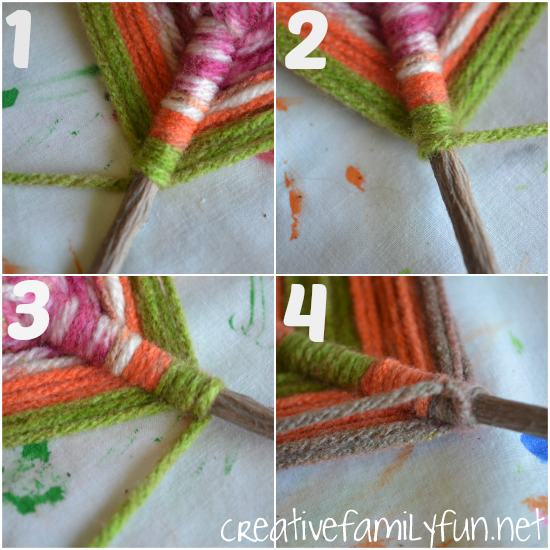
Now it’s time to start weaving your God’s Eye.

Step 1: Take your yarn underneath a stick.

Step 2: Wrap over the stick.

Next, for Step 3: Take your yarn back under the stick then bring the yarn to the next stick repeating steps 1-3 until your are finished with your weaving. Make sure you pull your yarn tightly, but not too tight.  If you are doing the weaving correctly, the sticks will not show in the front of your God’s Eye and they will look wrapped in the back.

Once you are satisfied with your God’s Eye, clip your yarn and secure with a tight knot around one of your sticks. (See picture 4.)

Sit down with your kids to make this fun classic craft. This rustic God's Eye craft for kids uses simple supplies and it is easy to make your own unique version.

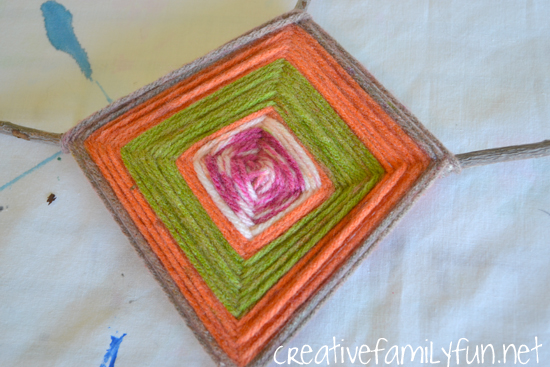
This craft is truly beautiful and you can make it in many various styles to make each one truly unique.

We used a yarn with variegated colors to achieve our striped look.

You can use one solid color, or alternate colors to achieve a color block pattern.

Have you ever made a God’s Eye craft before?

Sit down with your kids to make this fun classic craft. This rustic God's Eye craft for kids uses simple supplies and it is easy to make your own unique version.

You may also like one of these fun crafts for kids:

Craft Stick Initial Plaque

Classic Paper Plate Tambourine

School Spirit Washer Necklace

Pom Pom Picture Frame

Yarn-Wrapped DIY Wall Letters at Kids Craft Room

Planting a Rainbow Suncatcher Craft

February 25, 2018 By Terri Thompson

Have you ever read the book Planting a Rainbow by Lois Ehlert? It is a fun book which celebrates all the colors you can find in a flower garden.

After enjoying the book, we decided to “plant” our own rainbow on our window by making a Planting a Rainbow suncatcher collage.

Kids will have so much fun making this fun flower suncatcher inspired by the book Planting a Rainbow. Brighten up your windows with this Planting a Rainbow collage suncatcher.

Disclosure: There are Amazon Affiliate and other affiliate links in this article which means, at no additional cost to you, we could receive compensation for our recommendations. You can read our full disclosure policy on our Disclosure Page for more details.

Supplies Needed

Clear Contact Paper
Colored tissue paper, cut or torn into small pieces
Green strips of paper

Kids will have so much fun making this fun flower suncatcher inspired by the book Planting a Rainbow. Brighten up your windows with this Planting a Rainbow collage suncatcher.

How to make a Planting a Rainbow suncatcher collage

I taped a large piece of contact paper, sticky side out, to our patio window.

I then gave the girls the green strips of paper and all the tissue paper bits.

Before they began, I had prepped the projects by cutting some circles from the tissue paper. The kids can help with the tearing.

Once we were all set up, I asked the girls to work together to create their own rainbow garden.

Kids will have so much fun making this fun flower suncatcher inspired by the book Planting a Rainbow. Brighten up your windows with this Planting a Rainbow collage suncatcher.

The girls loved working together to create their masterpiece.

They made rainbow flowers, then added a sky, several suns, clouds, grass, and even a few seeds.

It turned out beautiful! It looked like such a magical world with the multiple sun and the stained glass sky.

When the girls were finished, I turned the contact paper around so that the sticky side was on the glass. We hung our masterpiece on the patio window so the sun can shine through it during the day.

And, when we’re ready to take it down, the contact paper will come off the window easily. (It will not leave a sticky residue on your window even if you leave it up for weeks. I’ve tried it!)

Kids will have so much fun making this fun flower suncatcher inspired by the book Planting a Rainbow. Brighten up your windows with this Planting a Rainbow collage suncatcher.

Get out the craft supplies and plant a rainbow!

Kids will have so much fun making this fun flower suncatcher inspired by the book Planting a Rainbow. Brighten up your windows with this Planting a Rainbow collage suncatcher.

You may also like one of these fun kid’s crafts

Phases of the Moon Mobile

Egg Carton Fairy House Craft

In the Tall, Tall Grass Book and Craft

Spring Button Flowers

How to Make Spring Flowers from Egg Cartons at Kitchen Counter Chronicles

Magic Wand Reading Pointers

February 13, 2018 By Terri Thompson

I remember as a kid using my finger to track the words on a page.

I advanced to following along with my bookmark, until I found I didn’t need anything any more.

It’s a natural progression of training your eyes to track the words on a page.

Fingers have always been the default reading pointer, but sometimes you’ve got to add a little fun. So, the girls and I got out some of our craft supplies and made a set of these fun Magic Wand Reading Pointers.

Your new readers will love making their own Magic Wand Reading Pointers that they can use to keep their place while reading.

Disclosure: Thank you to CraftProjectIdeas.com for proving the supplies for our project. There are Amazon Affiliate and other affiliate links in this article which means, at no additional cost to you, we could receive compensation for our recommendations. You can read our full disclosure policy on our Disclosure Page for more details.

Supplies Needed:

Colored Craft Sticks
Stick-On Jewels
Sparkly Foam Star Stickers

Don’t let my supply list restrict you. There are so many other elements you can use to make these fun reading pointers!

Try simple foil star stickers, glitter washi tape, or metallic foil stickers.

Your new readers will love making their own Magic Wand Reading Pointers that they can use to keep their place while reading.

How to make your Magic Wand Reading Pointers

These Magic Wand Reading Pointers were so easy to make and completely mess-free. All you need to do is take a colorful craft stick and add your bling.

The girls decided that all magic wands needed a star on the top.

They took two stickers of the same size and put them back-to-back on the top of their stick. They sandwiched enough of the craft stick between the stickers so the star top would stay put.

Then they used the stick-on jewels to add just the right amount of sparkle and shine.

Your new readers will love making their own Magic Wand Reading Pointers that they can use to keep their place while reading.

We discovered that the point of the star made it very easy to track your words on a page.

My 6-year-old has found them a welcome helper, especially since she transitioned quickly from books with fewer words on a page to chapter books with many words.

She’ll use it as a cool bookmark so she’ll have a pointer available whenever she needs it. It’s working out perfectly.

You’ve got to make a few Magic Wand Reading Pointers to add a little magic to reading time at home or at school. It’s much more fun than using your finger.

Your new readers will love making their own Magic Wand Reading Pointers that they can use to keep their place while reading. It's an easy way to make reading magical.

P.S. My daughter is using her reading pointer with a newly discovered book series that she has fallen madly in love with, Magic Animal Friends by Daisy Meadows. I haven’t read any yet, but my 6-year-old highly recommends them. They’re a great choice for kids who love animals or are fans of the Rainbow Magic Fairy books. In fact, they’re written by the same author.

Find more ideas to make reading fun here:

Go on a Fact Finding Mission

Sight Word Tallies

Library Scavenger Hunt

Word Family Four Square at Better Than Homework

All Star Sports Reading Pointers at Better Than Homework

Are you looking for more activities?

Join our fun Facebook community, Creative Family Fun for Busy Families, for daily activities that are great for kids and families. We’ll chat, share, and have fun. It’s a safe and private place to share idea for family and kids activities.

I’d love for you to join me! Just click the link below, request to join, and answer the questions (they’re easy, I promise). Come join the fun! Join the Creative Family Fun for Busy Families community here.

Cardboard Tube Elephant Craft

January 10, 2018 By Terri Thompson

Do you love elephants?

I do! Despite their enormous size, they’re just so cute.

So, to add on to our cardboard tube zoo, we’re making a cardboard tube elephant craft (or two or three)!

Grab some paint and googly eyes to transform a cardboard tube into a cute and fun elephant craft. Recycled crafts don't get any better than this!

Disclosure: This post contains Amazon Affiliate and other affiliate links. Please see my Disclosure Page for more details.

Supplies Needed:

Empty cardboard tube
Thin cardboard (from a cereal or cracker box)
Scissors
Gray craft paint
Glue
Googly eyes

You should have most of the supplies you need in both your recycling bin or craft closet. Let’s get crafting!

Grab some paint and googly eyes to transform a cardboard tube into a cute and fun elephant craft. Recycled crafts don't get any better than this!

How to make your Cardboard Tube Elephant Craft:

First, you need to paint your entire cardboard tube with your gray paint.

While that’s drying, you can create your ears and trunk.

Draw two ears and a trunk on your thin cardboard. (You can see the basic shapes below.) Basically, you want two fat bean shapes for the ears and one tube with one end fatter than the other for your trunk.

Grab some paint and googly eyes to transform a cardboard tube into a cute and fun elephant craft. Recycled crafts don't get any better than this!

Paint the ears and the trunk with your gray paint.

After the paint has dried, cut out your trunk and ears.

Fold your trunk accordion style a couple of time for a more three-dimensional look.

Grab some paint and googly eyes to transform a cardboard tube into a cute and fun elephant craft. Recycled crafts don't get any better than this!

Finally, glue on all your pieces.

Glue the ears onto the backside of your cardboard tube, so you see the gray side from the front of your elephant craft. The top of the ears should only be a little higher than the top of your cardboard tube.

Glue the wide end of your trunk to the front of the tube high enough that the bottom of the trunk is even with or slightly higher than the bottom of your tube.

Next, glue your two eyes above the trunk.

Once you’re done, let the glue dry and then your Cardboard Tube Elephant is ready to add to your zoo.

Grab some paint and googly eyes to transform a cardboard tube into a cute and fun elephant craft. Recycled crafts don't get any better than this!

If you enjoyed this elephant craft, the above photo is perfect for sharing on Facebook or you can save the photo below on Pinterest.

Grab some paint and googly eyes to transform a cardboard tube into a cute and fun elephant craft. Recycled crafts don't get any better than this! #kidscraft #recycledcraft #CreativeFamilyFun

You may also like one of these animal crafts:

Cardboard Tube Cheetah Craft

Cardboard Tube Hippo Craft

Koala Bookmark

Crumpled Newspaper Elephant at Buggy & Buddy

The Cutest Bear Crafts for Kids

November 4, 2017 By Terri Thompson

Oh, the cuteness!

Do you think bears are cute? I do. Anywhere from teddy bears to those cute bear cubs on nature shows. Granted, I don’t think I ever want to encounter one in the wild, but when it comes to crafting, I want to make them all.

These bear crafts for kids are the cutest of the cute. So grab some craft supplies, gather your kids, and have some fun.

Gosh, they’re adorable!

These bear crafts for kids are the cutest of the cute! Grab your craft supplies, gather your kids, and get ready to have some fun together. These ideas are fun for all ages of kids. #kidscrafts #bearcraft #CreativeFamilyFun

Disclosure: There are Amazon Affiliate and other affiliate links in this article which means, at no additional cost to you, we could receive compensation for our recommendations. You can read our full disclosure policy on our Disclosure Page for more details.

Fun Brown Bear Crafts for Kids

Take a plastic spoon, work a little magic, and create a cute little bear. We shared the tutorial for this Spoon Bear craft here.

Make a brown bear paper bag puppet. Check out Coffee Cups and Crayons to make a super-cute bear version of this classic craft.

Use a fun painting process to turn a paper plate into a cool textured bear. Find the directions for this Fuzzy Brown Bear at What Can We Do With Paper and Glue.

Have you ever tried using a fork to paint? It looks like so much fun! Try this method to make this fork-painted bear at Crafty Morning.

Try a little simple origami to make a cute bear hear. Find the tutorial here at All For the Boys.

Use wooden spoons to make some fun bear puppets. Find all the direction here at Messy Little Monster. You can even find out how to make Goldilocks so you can put on a fairy tale puppet show.

Grab your craft supplies and get started making some of these brown bear crafts for preschoolers. They are the cutest ones you'll find!

More Cute Bear Crafts Ideas

A little bit of paint and paper will transform an empty cardboard tube into a cute bear craft. Find out how to make a Cardboard Tube Bear with our tutorial here.

Roar! Grab a couple of paper plates and start painting to make this super cute Paper Plate Bear from Crafty Morning.

Grab some twine and cardboard to make this fun Wrapped Bear Craft from The OT Toolbox.

Paper plates make great masks. Visit I Heart Crafty Things to see how to transform one into a cool Bear Mask.

Or, you can try this version of a Paper Plate Bear Mask at JDaniel4’s Mom. Both versions look like so much fun!

Make a paw print potato stamp and make paw prints everywhere! Visit Mrs. Plemon’s Kindergarten for the details (and find many other fun bear themed ideas for your little ones).

So many fun bear crafts for kids! Which one is your favorite?

Grab your craft supplies and get started making some of these brown bear crafts for kids. They are the cutest ones you'll find!

You may also like one of these kids craft ideas:

Cardboard Tube Tiger Craft

Polar Bear Bookmark

My Book of the Four Seasons: A Paper Bag Book

Cardboard Tube Hippo Craft

Get inspired with one of these great bear books:

Combine one of these fun bear crafts with a great book and you’ll have the ultimate family craft time. Here are a few I suggest:

Do you want to do more activities with your kids?

Join our fun Facebook community, Creative Family Fun for Busy Families, for daily activities that are great for kids and families. We’ll chat, share, and have fun. It’s a safe and private place to share ideas for family and kids activities.

I’d love for you to join me! Just click the link below, request to join, and answer the questions (they’re easy, I promise). Come join the fun! Join the Creative Family Fun for Busy Families community here.

  • « Go to Previous Page
  • Page 1
  • Interim pages omitted …
  • Page 9
  • Page 10
  • Page 11
  • Page 12
  • Page 13
  • Interim pages omitted …
  • Page 31
  • Go to Next Page »

Primary Sidebar

Footer

Categories

Archives

Copyright © 2026 · Designed by The Blog Surgery

Creative Family Fun uses cookies to improve your experience. These cookies provide feedback to our analytics and advertisers. We use the information to track views of the site, where you go and to know if you are a regular visitor or brand new as well as provide a personalized experience where possible. We'll assume you're ok with this, but you can opt-out if you wish.Accept Reject Read More
Privacy & Cookies Policy

Privacy Overview

This website uses cookies to improve your experience while you navigate through the website. Out of these, the cookies that are categorized as necessary are stored on your browser as they are essential for the working of basic functionalities of the website. We also use third-party cookies that help us analyze and understand how you use this website. These cookies will be stored in your browser only with your consent. You also have the option to opt-out of these cookies. But opting out of some of these cookies may affect your browsing experience.
Necessary
Always Enabled
Necessary cookies are absolutely essential for the website to function properly. This category only includes cookies that ensures basic functionalities and security features of the website. These cookies do not store any personal information.
Non-necessary
Any cookies that may not be particularly necessary for the website to function and is used specifically to collect user personal data via analytics, ads, other embedded contents are termed as non-necessary cookies. It is mandatory to procure user consent prior to running these cookies on your website.
SAVE & ACCEPT