• Skip to secondary menu
  • Skip to main content
  • Skip to primary sidebar
  • Skip to footer
  • Home
  • About
    • Email Me
    • Disclosure & Copyright
  • Start Here
  • Subscribe
  • Privacy Policy
  • Books for Moms

Creative Family Fun

Your one-stop shop for kids activities and family fun

  • Facebook
  • Instagram
  • Pinterest
  • Twitter
  • Spelling Activities
  • Family Fun
  • STEM
  • Movie Night
  • Toddler Activities

Crafts

Jack Be Nimble Candlestick Craft

October 24, 2017 By Terri Thompson

Nursery rhymes played a big role in my daughters’ early childhood. We read them, acted them out, did activities about them, and just had tons of fun with nursery rhymes.

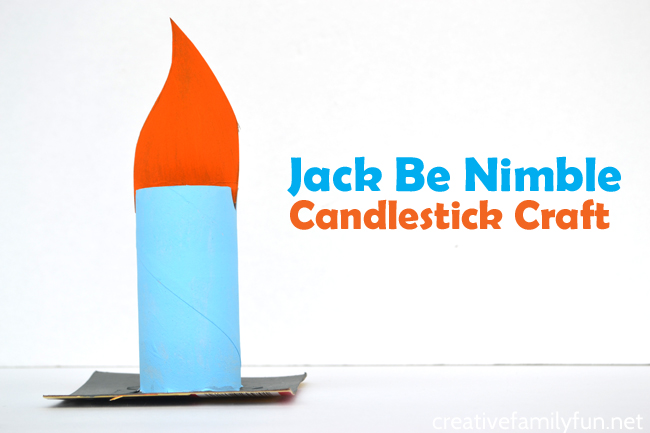
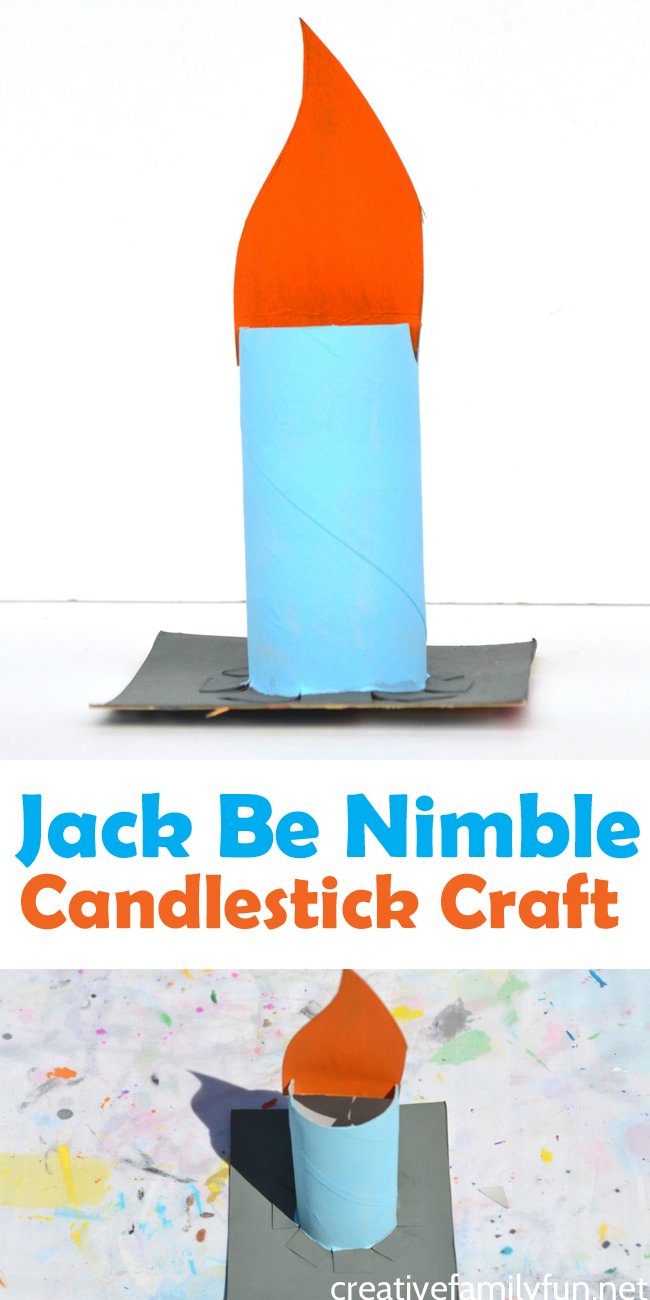
Now that they’re older, they still love them and can recite so many of them by memory. So, we’re gathering some of our favorite nursery rhymes for a few fun craft projects starting with this adorable Jack Be Nimble Candlestick Craft.

Make nursery rhymes fun when you use recycled materials and other simple craft supplies to make this Jack Be Nimble candlestick craft for kids.

Disclosure: This post contains Amazon Affiliate and other affiliate links. Please see my Disclosure Page for more details.

Supplies Needed:

Empty cardboard tube
Thin recycled cardboard (from a cereal or cracker box)
Scissors
Glue
Craft Paint

Make nursery rhymes fun when you use recycled materials and other simple craft supplies to make this Jack Be Nimble candlestick craft for kids.

How to make your Jack Be Nimble Candlestick Craft

First, cut a square from your thin cardboard that is approximately 4 inches by 4 inches for your candle base. Flip the cardboard over so that the glossy printed side is on the bottom.

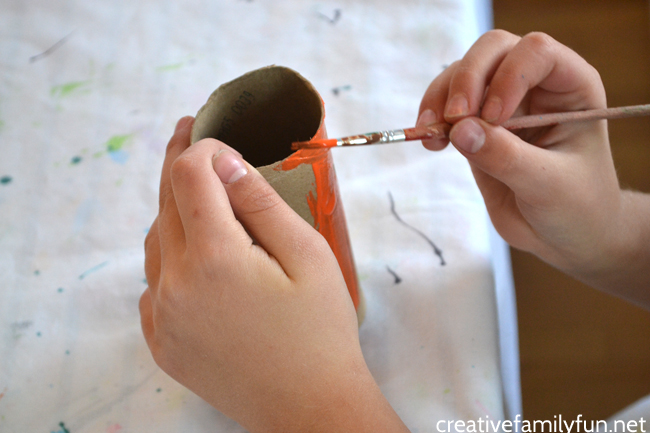
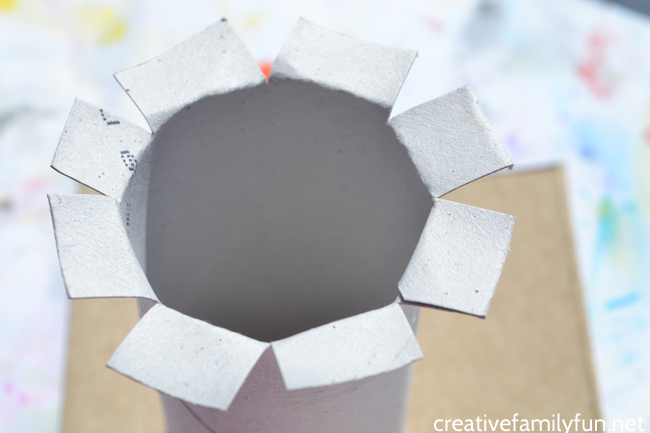
Next, we need to attach our candlestick to our base. On one end of your cardboard tube, cut 1/2 inch long slits all the way around. Make them about 1/2 inch apart. Fold all your notches down so that your tube resembles the picture above.

Make nursery rhymes fun when you use recycled materials and other simple craft supplies to make this Jack Be Nimble candlestick craft for kids.

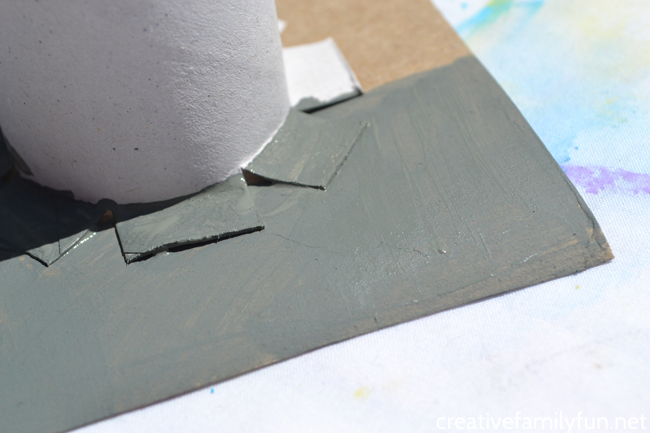
Finally, glue your cardboard tube to the center of your candlestick base. Press down and let the glue dry.

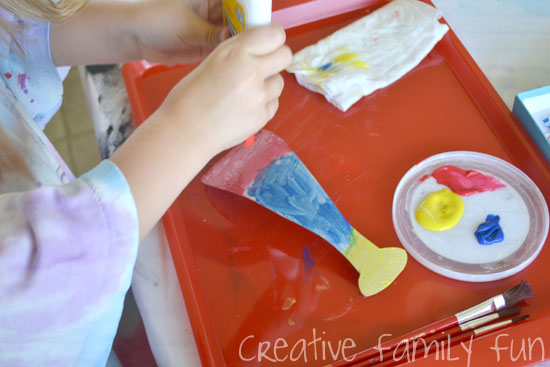
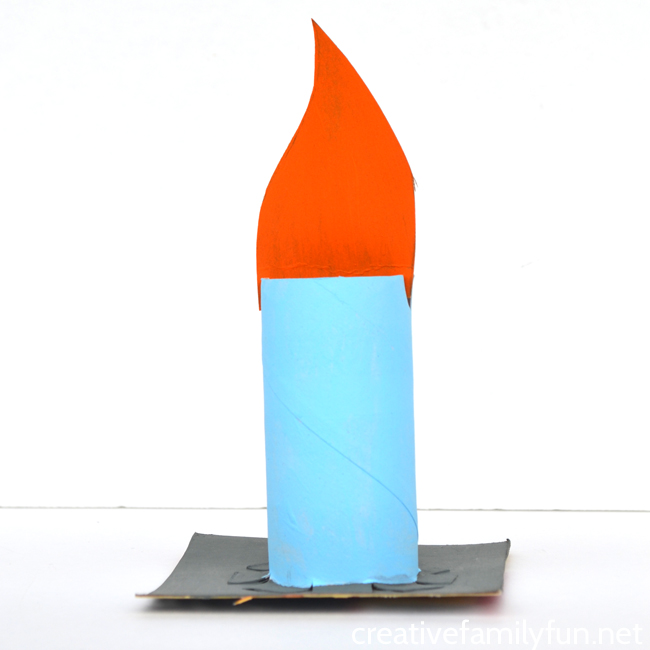
While the glue is drying, pick out your candlestick paint colors. You can paint it all one color, or as many colors as you like. This is a great time to get creative!

Paint your entire candlestick and base once your glue has dried.

Make nursery rhymes fun when you use recycled materials and other simple craft supplies to make this Jack Be Nimble candlestick craft for kids.

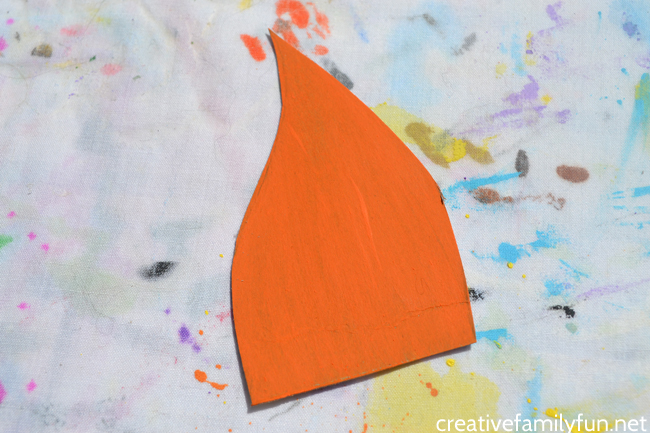
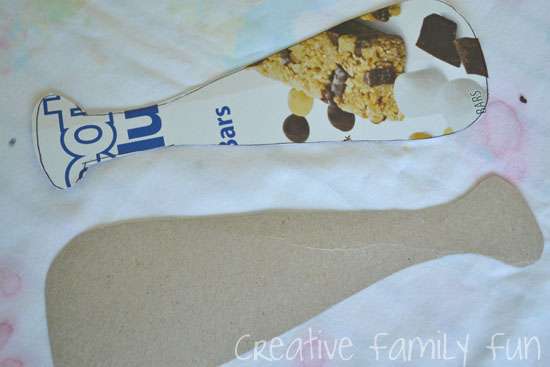
While your paint is drying, you can make your flame. Draw a simple flame shape on another piece of your thin cardboard. Make sure the base of your flame is wider than your candlestick.

Cut out and paint your flame so that it looks like fire.

After your candlestick and flame is dry, cut two slits in the top of your candlestick directly across from each other. Insert your flame into the too of the candlestick.

Now it’s time to play!

Use your cardboard candlestick as a fun prop to act out Jack Be Nimble. Can you jump over your candlestick?

Make nursery rhymes fun when you use recycled materials and other simple craft supplies to make this Jack Be Nimble candlestick craft for kids.

If you enjoyed this Jack Be Nimble Candlestick Craft, the above photo is perfect for sharing on Facebook or you can save the photo below on Pinterest.

Make nursery rhymes fun when you use recycled materials and other simple craft supplies to make this Jack Be Nimble candlestick craft for kids.

You may also like one of these kids activities:

Cardboard Baseball Bat Kids Craft

Cardboard Cookies

Egg Carton Fairy House Craft

Jack Be Nimble Science at Better Than Homework

45 Nursery Rhyme Crafts at How Wee Learn

Mini Apple Print Notebook

September 18, 2017 By Terri Thompson

I love notebooks. Do you?

I’ve got them in all shapes and sizes and use them for everything. There’s nothing like a fresh notebook to inspire!

While any notebook is fun, a special homemade notebook is even more fun. So, we’re going to grab an apple, make some apple prints, and turn them into this cute Mini Apple Print Notebook.

Make a fun little book from apple prints to encourage writing with kids. These Mini Apple Print Notebooks are so easy to make!

Disclosure: This post contains Amazon Affiliate and other affiliate links. Please see my Disclosure Page for more details.

What do you think? I think we all need a small pile of these fun mini notebooks.

Let’s get started!

Supplies Needed:

Apple
Red Paint
White cardstock
Scissors
Pencil
Notebook paper
Stapler

Make a fun little book from apple prints to encourage writing with kids. These Mini Apple Print Notebooks are so easy to make!

How to make a Mini Apple Print Notebook

To make these notebooks, you need to start with your apple print.

Cut an apple in half vertically, and dry the inside off a bit with a paper towel. Brush red paint thickly on the cut half of the apple and press it down on your cardstock.

Add some more paint to your apple and make a second apple print next to your first one. Leave a small space between the two prints. See the above photo for an example.

Make a fun little book from apple prints to encourage writing with kids. These Mini Apple Print Notebooks are so easy to make!

Once your paint is dry, cut out the cover of your notebook. Cut around both of the apple prints in a simple apple shape. Leave the two prints connected in the middle.

Fold your cover in half. If you want to trim the edges up a little at this point, you can.

Unfold your cover and place it down on your small pile of notebook paper. I used five sheets of notebook paper, so that when folded, my mini notebook had ten pages. Trace around the entire cover.

Cut your notebook paper along the traced lines.

Make a fun little book from apple prints to encourage writing with kids. These Mini Apple Print Notebooks are so easy to make!

Stack your notebook paper with the cover on top and fold all along the middle. Stack it neatly and staple it all together in the middle along the crease (see picture above).

Once your mini apple print notebook is put together, you can trim the edges of your inside pages so that everything is neat.

Now it’s time to write!

Fun things to write in your notebook

You can write about almost anything, but here are some fun apple topics you can write about in your apple print notebook.

Write about a trip to an apple orchard.

Record your favorite apple recipe (or two).

Do an apple taste test and record the results in your mini notebook.

Make a list of your favorite apple foods.

What would you write about?

Make a fun little book from apple prints to encourage writing with kids. These Mini Apple Print Notebooks are so easy to make!

If you enjoyed this Mini Apple Print Notebook, the above photo is perfect for sharing on Facebook, or you can save the photo below on Pinterest.

Make a fun little book from apple prints to encourage writing with kids. These Mini Apple Print Notebooks are so easy to make!

You may also like one of these fun apple crafts:

A is for Apple Print Wreath 

Apple and Pumpkin Mini Books (with writing prompts)

Black and White Apple Prints

Yarn Apple Craft for Kids at Hands On As We Grow

A is for Apple Print Wreath Kids Craft

September 12, 2017 By Terri Thompson

September is Apple Month.

Well, not officially (even though it should be), but apples are definitely everywhere this month. And, I love it!

I love crafting and decorating with apples and so do my kids. So, we had a little fun with apple prints to make this Apple Print Wreath.

This fun Apple Print Wreath is a fun apple craft for kids to make this fall. It's a great craft for preschool and older kids and a fun fall decoration.

Disclosure: This post contains Amazon Affiliate and other affiliate links. Please see my Disclosure Page for more details.

This simple fall kids craft is fun for kids from preschool through elementary school.

It’s easy to make and uses only a few easy-to-find supplies.

This fun Apple Print Wreath is a fun apple craft for kids to make this fall. It's a great craft for preschool and older kids and a fun fall decoration.

Supplies Needed:

Paper plate

Sharp scissors (for the grown-ups)

Green craft paint

Small piece of sponge (use the cheap kind you find at the dollar store)

Red craft paint

Apple

Paint brush

White card stock

Glue

Prep your paper plate

Before beginning this craft, a grown-up needs to cut the middle out of the paper plate. Save the middle for a future craft.

This fun Apple Print Wreath is a fun apple craft for kids to make this fall. It's a great craft for preschool and older kids and a fun fall decoration.

How to make your Apple Print Wreath

First, you’ll need to paint your paper plate green.

We used a small piece of sponge to dab green paint on our plate. You can certainly just paint your paper plate with a paint brush, but I thought the sponge gave this wreath a fun texture.

Once you’ve painted your paper plate wreath, set it aside to dry.

This fun Apple Print Wreath is a fun apple craft for kids to make this fall. It's a great craft for preschool and older kids and a fun fall decoration.

Now it’s time for the apple prints. A grown-up will want to slice an apple in half. Cut it vertically from top to bottom in order to get the fun apple shape.

Dry off your apple a bit with a paper towel and paint red paint on your apple slice. Paint quickly and put it on thick because the apple will soak up the paint.

Make two apple prints on your card stock. You’ll need to add more paint between each print. Press down firmly for several seconds and then lift up. Let your apple prints dry.

This fun Apple Print Wreath is a fun apple craft for kids to make this fall. It's a great craft for preschool and older kids and a fun fall decoration.

Once everything is dry, cut out your two apple prints.

Arrange them on your paper plate wreath and glue them down. Once your glue is dry, it’s time to hang up your wreath and enjoy your apple decoration.

This fun Apple Print Wreath is a fun apple craft for kids to make this fall. It's a great craft for preschool and older kids and a fun fall decoration.

If you enjoyed this A is for Apple Print Wreath, the above photo is perfect for sharing on Facebook or you can save the picture below on Pinterest.

This fun Apple Print Wreath is a fun apple craft for kids to make this fall. It's a great craft for preschool and older kids and a fun fall decoration.

You may also enjoy one of these fun apple activities:

Pumpkin and Apple Mini Books

Black and White Apple Prints: A Lesson in Contrast

Storybook Snack Time: Baked Apples

Apple Pinch Pots at Red Ted Art

Stuffed Paper Apples at Buggy and Buddy

Cardboard Tube Tiger Craft for Kids

September 5, 2017 By Terri Thompson

Our cardboard tube zoo is growing and it’s time to add a tiger to our collection of animals.

No zoo is complete without a tiger, right? It’s one of my favorites!

So, we grabbed our supplies and set to work adding a cardboard tube tiger craft to our collection.

Grab some cardboard and paints to make this fun Cardboard Tube Tiger craft for kids. It's so much fun to make and play with!

Disclosure: There are Amazon Affiliate and other affiliate links in this article which means, at no additional cost to you, we could receive compensation for our recommendations. You can read our full disclosure policy on our Disclosure Page for more details.

Supplies Needed

Empty cardboard tube
Orange craft paint
Black craft paint
Orange construction paper
Google eyes
Glue
Black marker

Grab some cardboard and paints to make this fun Cardboard Tube Tiger craft for kids. It's so much fun to make and play with!

How to make your cardboard tube tiger craft

First, you’ll want to paint your cardboard tube with your orange craft paint.

While your paint is drying, use your orange construction paper to make your ears. The ears are small, so you only need a scrap of paper.

Cut out two rounded triangles for your ears. Use your black marker to draw smaller triangles on each ear for the inner ear.

Grab some cardboard and paints to make this fun Cardboard Tube Tiger craft for kids. It's so much fun to make and play with!

Once your paint is dry, you can make your tiger’s face.

Glue your google eyes where you want your face. While the glue is drying, use your black marker to draw a nose (upside down triangle), mouth (“w” shape), and whiskers.

Glue your ears to the inside of the top of your cardboard tube so they peek out from the top. Line them up directly above the eyes.

Grab some cardboard and paints to make this fun Cardboard Tube Tiger craft for kids. It's so much fun to make and play with!

Finally, it’s time to add your stripes to your cardboard tube tiger.

Use your black craft paint and paint stripes all around your tiger. We left an open space in the front, since we noticed in pictures that tigers don’t have stripes on their belly.

Once you’re satisfied with your stripes, let your paint dry.

Ta-da! That’s it. Once your paint and glue have dried, your tiger is ready to join your zoo.

What other animals do you want in a cardboard tube zoo?

Grab some cardboard and paints to make this fun Cardboard Tube Tiger craft for kids. It's so much fun to make and play with!

If you enjoyed this cardboard tube tiger craft, the above photo is perfect for sharing on Facebook. Or, you can share the photo below on Pinterest.

Grab some cardboard and paints to make this fun Cardboard Tube Tiger craft for kids. It's so much fun to make and play with!

You may also like one of these fun animal crafts

Cardboard Tube Cheetah Craft

Cardboard Tube Hippo Craft

All About Tigers: Books, Crafts, and Activities

Tiger Finger Puppets at Moms and Crafters

Cardboard Baseball Bat Kids Craft

July 18, 2017 By Terri Thompson

After our salt dough baseballs, we wanted to have a little bit more fun with baseball.

In baseball, you can’t have a ball without a bat. Am I right?

So, to go along with out baseballs we grabbed some recycled materials to make this cardboard baseball bat craft.

Disclosure: This post contains Amazon Affiliate and other affiliate links. Please see my Disclosure Page for more details.

I found the book Players In Pigtails by Shana Corey at the library and knew the girls would love it.

Players In Pigtails tells the story of the All American Girls Professional Baseball League. We learned that “Take Me Out To the Ball Game” was originally written about a baseball-crazy girl named Katie Casey. This book was the story of the fictional Katie Casey.

The girls were thrilled to read about girls playing baseball and loved the story of the All American Girls Professional Baseball League.

After reading the story and singing a few rounds of “Take Me Out To the Ball Game,” we designed our own baseball bats.

Supplies Needed

Cardboard (recycled cereal or cracker boxes work well)
Scissors
Paint
Glue
Glitter
Stickers

How to make your cardboard baseball bat

Before we started, I cut a few simple baseball bat shapes out of the cardboard and then set out a fun selection of supplies for decorating our bats, such as glitter, paint, and stickers.

After we read the book, I asked the girls to design a bat that they would like to use while playing for the All American Girls Professional Baseball League.

They thought for awhile about their design, and then off they went!

My girls got creative and started painting, gluing, and glittering.

And glittered… a lot!

Have you ever seen such a glittery baseball bat?

After the glitter dried, we decorate more. My girls grabbed the stickers and went to town. We had some leftover 4th of July stickers that worked well for the project.

After a lot of decorating, my girls declared their bats finished. I don’t think I’ve ever seen such flashy bats! They look fantastic!

Ask your kids to design their own baseball bats. It would be fun to see what they come up with.

Grab a few supplies from the recycling bin and craft closet to make this fun colorful and glittery cardboard baseball bat kids craft.

If you enjoyed this cardboard baseball bat craft, the above photo is perfect for sharing on Facebook or you can share the photo below on Pinterest.

Grab a few supplies from the recycling bin and craft closet to make this fun colorful and glittery cardboard baseball bat kids craft.


You may also like one of these fun kids crafts:

Salt Dough Baseballs

Cardboard Cookies

Cereal Box Stencils

Baseball Activities, Crafts, Recipes, and More at Kitchen Counter Chronicles

  • « Go to Previous Page
  • Page 1
  • Interim pages omitted …
  • Page 10
  • Page 11
  • Page 12
  • Page 13
  • Page 14
  • Interim pages omitted …
  • Page 31
  • Go to Next Page »

Primary Sidebar

Footer

Categories

Archives

Copyright © 2026 · Designed by The Blog Surgery

Creative Family Fun uses cookies to improve your experience. These cookies provide feedback to our analytics and advertisers. We use the information to track views of the site, where you go and to know if you are a regular visitor or brand new as well as provide a personalized experience where possible. We'll assume you're ok with this, but you can opt-out if you wish.Accept Reject Read More
Privacy & Cookies Policy

Privacy Overview

This website uses cookies to improve your experience while you navigate through the website. Out of these, the cookies that are categorized as necessary are stored on your browser as they are essential for the working of basic functionalities of the website. We also use third-party cookies that help us analyze and understand how you use this website. These cookies will be stored in your browser only with your consent. You also have the option to opt-out of these cookies. But opting out of some of these cookies may affect your browsing experience.
Necessary
Always Enabled
Necessary cookies are absolutely essential for the website to function properly. This category only includes cookies that ensures basic functionalities and security features of the website. These cookies do not store any personal information.
Non-necessary
Any cookies that may not be particularly necessary for the website to function and is used specifically to collect user personal data via analytics, ads, other embedded contents are termed as non-necessary cookies. It is mandatory to procure user consent prior to running these cookies on your website.
SAVE & ACCEPT