• Skip to secondary menu
  • Skip to main content
  • Skip to primary sidebar
  • Skip to footer
  • Home
  • About
    • Email Me
    • Disclosure & Copyright
  • Start Here
  • Subscribe
  • Privacy Policy
  • Books for Moms

Creative Family Fun

Your one-stop shop for kids activities and family fun

  • Facebook
  • Instagram
  • Pinterest
  • Twitter
  • Spelling Activities
  • Family Fun
  • STEM
  • Movie Night
  • Toddler Activities

Terri Thompson

Easter Egg Dye Pour Painting

April 15, 2014 By Terri Thompson

I’ve always loved the tradition of dying Easter eggs.

We typically do the traditional method of mixing up cups of egg dye made from food coloring and vinegar and dipping our eggs.

We’re still going to do that this year. We usually dye eggs the Saturday before Easter.

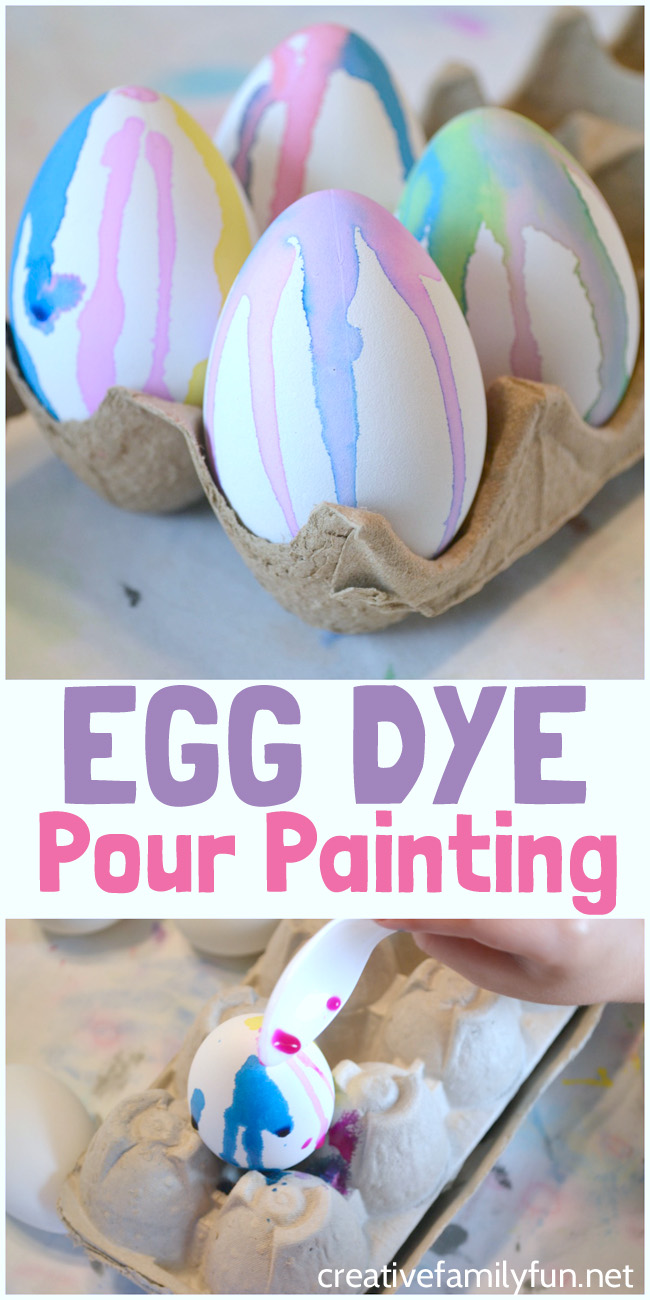
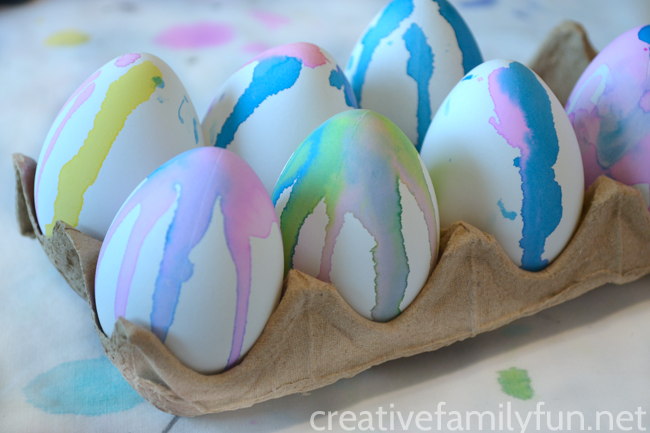
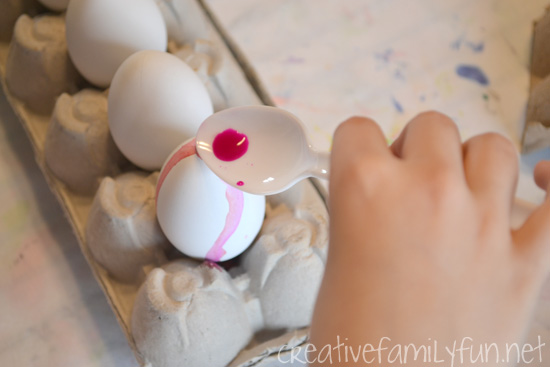
But, I also wanted to do a little egg dying experiment this year. For this project, we spooned our dye over top of our eggs to make these Easter Egg Dye Pour Painting Eggs.

Decorate your Easter eggs this year with a fun twist on classic egg dying. This Easter Egg Dye Pour Painting is so much fun and results in pretty striped Easter Eggs.

Disclosure: There are Amazon Affiliate and other affiliate links in this article which means, at no additional cost to you, we could receive compensation for our recommendations. You can read our full disclosure policy on our Disclosure Page for more details.

Set up your project

I ran across a dozen plastic dye-able eggs at a big box store to use for this project.

We used these so we could keep them out all week and use them again next year.

But, you can certainly use this technique with regular hard-boiled eggs or blown-out eggs. (TinkerLab has a few great tips for blowing out an egg if you want to go that route.)

Decorate your Easter eggs this year with a fun twist on classic egg dying. This Easter Egg Dye Pour Painting is so much fun and results in pretty striped Easter Eggs.

To make these eggs, you can either use a traditional egg dye or liquid watercolors.

We chose the liquid watercolors because there wasn’t any prep work involved.

Decorate your Easter eggs this year with a fun twist on classic egg dying. This Easter Egg Dye Pour Painting is so much fun and results in pretty striped Easter Eggs.

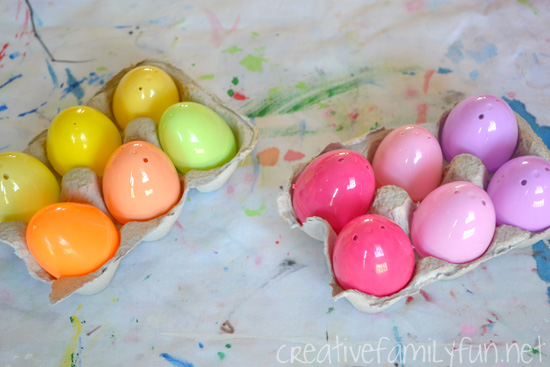
Turn an extra egg carton upside down and prop your eggs in between the cups.

This is a great trick. The egg carton will hold your egg upright for you and you can use both hands for decorating. Plus the egg carton soaks up all the excess dye and keeps it from running all over the table.

If you don’t have paper egg cartons, put a baking sheet under the eggs to help catch your egg dye.

Decorate your Easter eggs this year with a fun twist on classic egg dying. This Easter Egg Dye Pour Painting is so much fun and results in pretty striped Easter Eggs.

How to make your Easter Egg Dye Pour Painting Eggs

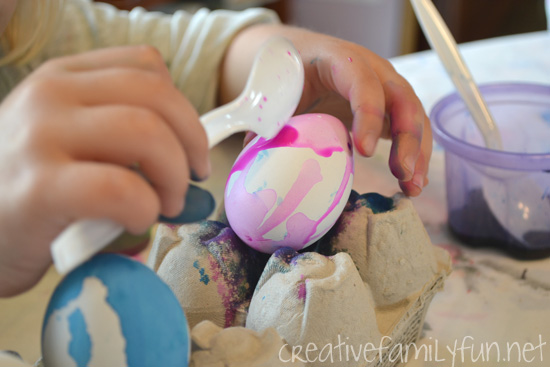
Once we were all set up with cups of our liquid watercolors, egg cartons, and spoons for each color, the girls got to work.

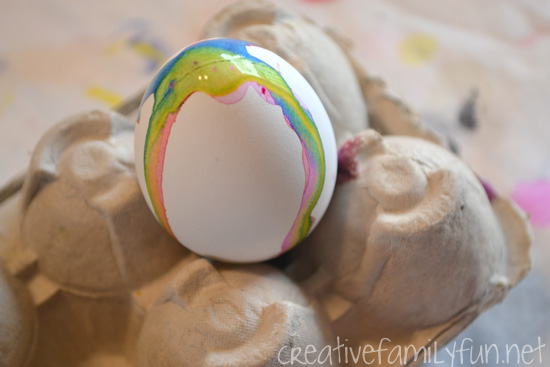
My oldest was very deliberate with her color choices and even managed to make a fun rainbow effect.

My preschooler started turning her eggs every which way to get the best coverage.

There really is no right way to do this project. Just pour and create.

Decorate your Easter eggs this year with a fun twist on classic egg dying. This Easter Egg Dye Pour Painting is so much fun and results in pretty striped Easter Eggs.

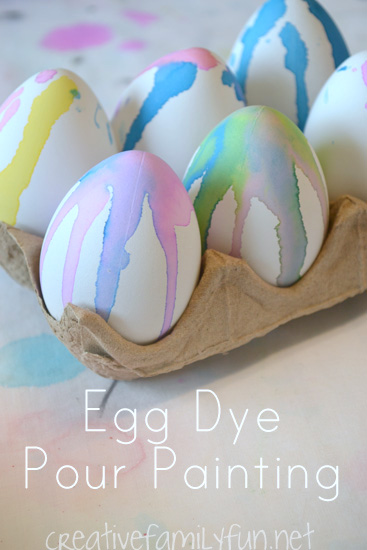
I love these eggs and I’m so happy we’ll have then for Easter decorating every year.

Have you decorated your eggs yet? Do you use a traditional dye, natural dyes, or a fun technique? Or are your going to try this Easter Egg Dye Pour Painting technique?

Decorate your Easter eggs this year with a fun twist on classic egg dying. This Easter Egg Dye Pour Painting is so much fun and results in pretty striped Easter Eggs.

You may also like one of these Easter activities for kids:

Watercolor Easter Eggs

Egg Carton Easter Baskets

Painted Easter Egg Suncatchers

Plastic Egg People

Fancy Shaker Eggs at Mama Smiles

My Life on Instagram

April 11, 2014 By Terri Thompson

I love Instagram. I love capturing a moment. I love seeing the details. I love the beauty of the everyday. I love the reminder of the little things.These are just a few of the things I’ve captured on Instagram over the last couple of weeks.

Now that spring has sprung, our sandbox is no longer under a couple of feet of snow. The sand is at a perfect slightly wet, mold-able state. The girls just can’t stay out of it – not that I’d stop them. This is what they’ve been doing the last few afternoons.
I’ve been trying to participate daily in the Tinkerlab Sketchbook Challenge. Since we’ve been spending so much time outdoors, a lot of my sketching has been done on the driveway, like this 1-minute challenge sketch. I haven’t been able to participate everyday, but I’m enjoying the chance to draw and stretch my creative muscles.
This, my friends, is my favorite sign of spring. My tulips are poking their way out of the mulch and I couldn’t be happier.

Sewing. It’s kind of my thing. I’ve become addicted in the last couple of years and this year I decided to make both girls a new dress for Easter. This is Miss First Grader’s. I’m nearing my deadline and I still have one dress to go. Ack!


We’ve been doing some of the TinkerSketch Challenge together. Drawing on foil day was way too much of a fun idea to do by myself. The girls and I sat around the table one afternoon with my Sharpies and sheets of aluminum foil. This is Miss First Grader’s masterpiece.
I’ve never, ever been able to capture a good sunset pic. Apparently, all I needed was a smart phone. That’s what I get for being behind the times! Thank you Instagram for the pic.
If you want to see more of my day-to-day, you can follow me on Instagram at this link. I’d love to follow you too!
 

12 Ways to Play With Plastic Easter Eggs

April 8, 2014 By Terri Thompson

Despite the fact that we already own a ton, we always get new plastic Easter eggs every year? Do you do this too?

We’ve accumulated quite a few over the years and it’s time to start using some of them. Luckily, there are a ton of fun ways to play with plastic Easter eggs. I’ve gathered up 12 of my favorite ideas to share with you. Which one do you want to try?

What do you do with all those leftover plastic Easter eggs? Here are 12 fun ways to play with plastic Easter eggs from crafts to art projects and also learning games.

Disclosure: There are Amazon Affiliate and other affiliate links in this article which means, at no additional cost to you, we could receive compensation for our recommendations. You can read our full disclosure policy on our Disclosure Page for more details.

Ways to play with plastic Easter eggs

Get out the glue gun and make plastic egg sculptures with Fun-A-Day. (pictured)

Make plastic egg people. We’ll show you how. (pictured)

Paint with them along with Buggy & Buddy! (pictured)

Use them to create a fine motor color sort game for toddlers with Minne Mama.

Fill them with puzzle pieces and let your kids go on a puzzle Easter egg hunt with Make the Best of Everything. (pictured)

Make fancy shaker eggs with Mama Smiles. (pictured)

Add paint inside for a fun (and messy) “crack open the egg and paint” project at Teach Preschool.

Make a DIY toy by turning them into magnetic eggs with Frugal Fun 4 Boys.

Use the eggs for a creative way to tell the Easter story with Teach Beside Me.

Make a Easter egg sound matching game with A Mom With a Lesson Plan.

Make funny dancing eggs with Frog in a Pocket!

Use them to make a pattern matching game for toddlers from Childhood 101. (pictured)

What do you do with all those leftover plastic Easter eggs? Here are 12 fun ways to play with plastic Easter eggs from crafts to art projects and also learning games.

You may also like one of these fun Easter activities:

Egg Carton Easter Basket

Painted Easter Egg Suncatcher

Easter Word Scramble Printable

Pretty Easter Garland Crafts for Kids

Plastic Egg Bunnies and People

April 1, 2014 By Terri Thompson

You know what’s fun? Turning things over to the girls and letting them invent, create, and have fun. When we found out that Tinkerlab was having another Creative Challenge for kids, we were all in. The challenge this month, eggs.

What can you do with eggs? We made plastic egg bunnies and people too!

Turn your plastic Easter eggs into fun bunnies and cute kids. This fun kids craft is open-ended and creative. Try this fun activity, Plastic Egg Bunnies, this Easter.

Disclosure: There are Amazon Affiliate and other affiliate links in this article which means, at no additional cost to you, we could receive compensation for our recommendations. You can read our full disclosure policy on our Disclosure Page for more details.

Set up your creative challenge

I began by pulling out our (way too) large collection of plastic eggs.

I asked my girls what they would like to make with the eggs.

They could turn them into something. They could use them to make art. Or, they could even make a game.

Turn your plastic Easter eggs into fun bunnies and cute kids. This fun kids craft is open-ended and creative. Try this fun activity, Plastic Egg Bunnies, this Easter.

The first thing they wanted to do was have an egg hunt. They love egg hunts.

But, I wanted them to think beyond the typical use. I nudged them past that idea and promised them lots of egg hunts up until Easter.

Now that that was settled, they moved on to bigger things. In the end, Miss First Grader wanted to make egg girls and Miss Preschooler wanted to make bunnies.

Turn your plastic Easter eggs into fun bunnies and cute kids. This fun kids craft is open-ended and creative. Try this fun activity, Plastic Egg Bunnies, this Easter.

How to make plastic egg bunnies and people

We talked about the items we needed and ended up with yarn, ribbon, and Sharpies. I got out the glue gun so we could attach the ribbon and yarn to the eggs.

The girls started creating. I was in charge of the glue gun. We only have a high heat glue gun and the girls really don’t like to use it. They ended up telling me where to put the glue and they did the rest.

Turn your plastic Easter eggs into fun bunnies and cute kids. This fun kids craft is open-ended and creative. Try this fun activity, Plastic Egg Bunnies, this Easter.

Once they were satisfied with their hair (or ears, or collars), they used the Sharpies to draw faces.

The process was very simple, but the process was their own. They laughed. They tried drawing the “cutest bunnies ever.” They got creative. And, they had fun making their plastic egg bunnies and people.

Who knows, maybe one of these days they’ll have their own crafty column here at Creative Family Fun!

Turn your plastic Easter eggs into fun bunnies and cute kids. This fun kids craft is open-ended and creative. Try this fun activity, Plastic Egg Bunnies, this Easter.

Do you want to follow along and see all the other great ideas? Stop by Tinkerlab by clicking the button below and check out all the creative kids. You can even link up your own!

Make it a family adventure!

Cost: Under $5. Plastic eggs are very inexpensive to buy if you don’t already have some extras.

Planning time: 5 – 10 minutes to gather supplies and set up an area for creating.

Ages: 5 and up. Make sure you have a grown-up helper or two if you’re using a glue gun.

Time needed: At least 30 minutes. Have extra time available if everyone gets in a creative groove.

To help move things along smoothly, set up creation stations. Have the loose parts in one area, the glue gun in another, and the markers in another. Have a grown-up sitting next to the glue gun to help the kids.

Turn your plastic Easter eggs into fun bunnies and cute kids. This fun kids craft is open-ended and creative. Try this fun activity, Plastic Egg Bunnies, this Easter.

You may also like one of these Easter activities for kids:

Egg Carton Easter Crafts

Watercolor Easter Egg Garland

Painted Easter Egg Suncatcher

Easter Egg Dye Pour Painting

Four Seasons Mobile with Recycled Coloring Books

March 25, 2014 By Terri Thompson

Do your kids have a lot of coloring books? Mine certainly do.

We have so many that I decided to put them to use and make a Four Seasons Mobile.

We all worked as a team to put this together and I love how it turned out!

Recycle your old coloring books or coloring pages to find something to represent each of the seasons so you can make this Four Seasons Mobile.

Disclosure: There are Amazon Affiliate and other affiliate links in this article which means, at no additional cost to you, we could receive compensation for our recommendations. You can read our full disclosure policy on our Disclosure Page for more details.

Supplies Needed

Old coloring books
Colors
Scissors
Glue stick
Card stock or construction paper
Empty paper towel tube
Paint
Hole punch
String

Recycle your old coloring books or coloring pages to find something to represent each of the seasons so you can make this Four Seasons Mobile.

Find your pictures

For the first step of this project, the girls thumbed through their coloring books looking for pictures that would represent each of the four seasons.

The pictures are big so we only looked for one per season. We also made sure we picked pictures that were easy to cut out.

We found an elf (Hermey from Rudolph the Red Nosed Reindeer) for winter, a rabbit with a basket of flowers for spring, a sand castle for summer, and a basket of apples for fall. It wasn’t at all difficult to find a picture for each season.

If you don’t have any coloring books, you can find what you need by doing a quick online search for coloring pages.

The girls divided up the pictures and colored each one.

Recycle your old coloring books or coloring pages to find something to represent each of the seasons so you can make this Four Seasons Mobile.

Make your four seasons mobile

While the girls were coloring, I decided to help out and paint the paper towel tube. My help was not at all necessary, but I’m always looking for an excuse to paint something!

We chose a light blue from our stash of paint. But, you can use whatever color you want for this step.

Recycle your old coloring books or coloring pages to find something to represent each of the seasons so you can make this Four Seasons Mobile.

After the girls were done with their pictures, we cut then all out.

We then glued the pictures onto card stock.

We used colored card stock that went along with each season: blue for winter, light purple for spring, yellow for summer, and orange for fall.

I chose card stock for the stiffness, but if you don’t have card stock use construction paper instead.

Recycle your old coloring books or coloring pages to find something to represent each of the seasons so you can make this Four Seasons Mobile.

After the glue dried, we cut around each picture again leaving a small border of the card stock.

Recycle your old coloring books or coloring pages to find something to represent each of the seasons so you can make this Four Seasons Mobile.

Once our paper towel tube dried, we punched a hole in both ends. I tied one piece of string to both ends of the tube. I left the string long enough so that when you hold the string up, it forms a triangle with the paper towel tube.

We then punched a hole in the top of each picture. I tied a string through the hole in the picture, then wrapped it around the tube. We hung all the pictures at different levels so you could see each one while it was hanging.

Recycle your old coloring books or coloring pages to find something to represent each of the seasons so you can make this Four Seasons Mobile.

It’s always so much fun to sit around the table with my girls and work on a project. We were all so proud of this one and the girls couldn’t wait to show it off to Daddy once he got home.

What are you waiting for, dig out those old coloring books and turn them into a four seasons mobile!

You may also like one of these craft projects:

Sun and Rain Sensory Bottles

Hand Print Sunflower

Tie-Dye Suns

Bubble Wrap Trees for Every Season at To Be a Kid Again

  • « Go to Previous Page
  • Page 1
  • Interim pages omitted …
  • Page 99
  • Page 100
  • Page 101
  • Page 102
  • Page 103
  • Interim pages omitted …
  • Page 190
  • Go to Next Page »

Primary Sidebar

Footer

Categories

Archives

Copyright © 2026 ยท Designed by The Blog Surgery

Creative Family Fun uses cookies to improve your experience. These cookies provide feedback to our analytics and advertisers. We use the information to track views of the site, where you go and to know if you are a regular visitor or brand new as well as provide a personalized experience where possible. We'll assume you're ok with this, but you can opt-out if you wish.Accept Reject Read More
Privacy & Cookies Policy

Privacy Overview

This website uses cookies to improve your experience while you navigate through the website. Out of these, the cookies that are categorized as necessary are stored on your browser as they are essential for the working of basic functionalities of the website. We also use third-party cookies that help us analyze and understand how you use this website. These cookies will be stored in your browser only with your consent. You also have the option to opt-out of these cookies. But opting out of some of these cookies may affect your browsing experience.
Necessary
Always Enabled
Necessary cookies are absolutely essential for the website to function properly. This category only includes cookies that ensures basic functionalities and security features of the website. These cookies do not store any personal information.
Non-necessary
Any cookies that may not be particularly necessary for the website to function and is used specifically to collect user personal data via analytics, ads, other embedded contents are termed as non-necessary cookies. It is mandatory to procure user consent prior to running these cookies on your website.
SAVE & ACCEPT