• Skip to secondary menu
  • Skip to main content
  • Skip to primary sidebar
  • Skip to footer
  • Home
  • About
    • Email Me
    • Disclosure & Copyright
  • Start Here
  • Subscribe
  • Privacy Policy
  • Books for Moms

Creative Family Fun

Your one-stop shop for kids activities and family fun

  • Facebook
  • Instagram
  • Pinterest
  • Twitter
  • Spelling Activities
  • Family Fun
  • STEM
  • Movie Night
  • Toddler Activities

Learning Activities for Kids

All About Monkeys: A Learning Basket

May 15, 2013 By Terri Thompson

Recently my girls decided they wanted to learn everything they could about monkeys. And not just monkeys, all primates.

We went to the library and checked out books about monkeys, chimpanzees, and gorillas. We got both fiction and nonfiction.

Then we settled in for a day all about monkeys.

Disclosure: There are Amazon Affiliate and other affiliate links in this article which means, at no additional cost to you, we could receive compensation for our recommendations. You can read our full disclosure policy on our Disclosure Page for more details.

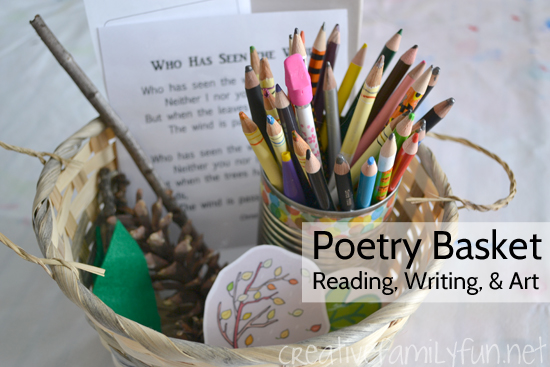
I filled a basket with all the supplies we would need for our projects and wrote down all the projects we were going to try.

We started by reading. We read as many books as we could handle, then we moved on to our projects. (See Amazon carousel below for book recommendations.)

Next, we made little books to remember what we learned.

We drew pictures of what monkeys ate, where they lived, and even traced our hands since monkeys have similar hands to ours.

The booklets were simple. I cut pieces of brown construction paper in half, and then folded each of those halves in half. I sandwiched two together and then stapled them along the folds.

We also did a fun hand print craft that I found on Red Ted Art. They turned out so cute!

Next we made monkey masks. I was inspired by this paper plate craft on Learn Create Love. Here’s what we did.

Supplies Needed:

Paper plate
Brown paint
Brown construction paper
Glue
Scissors
Large craft stick

We painted our paper plate brown.

While they were drying, we cut our mouth and ears out of brown construction paper.

We traced a sour cream lid for the mouth circle and the lid to one of my spice bottles for the ears.

After the paint was dry, I helped the girls by cutting out the eye holes.

The girls glued their mouth and ears onto their paper plates and used a black marker to add the details.

They also glued a craft stick onto the bottom of their masks so that they could hold it up to their face. Then it was time to run around and act like monkeys – OohOohAahAah!

Playful Ways to Learn Shapes

May 10, 2013 By Terri Thompson

Shapes are fun to learn and there are a multitude of hands-on ways to learn them.

Here are some of the playful ways we’ve learned about shapes.

Disclosure: There are Amazon Affiliate and other affiliate links in this article which means, at no additional cost to you, we could receive compensation for our recommendations. You can read our full disclosure policy on our Disclosure Page for more details.

Go outside and play shape hospscotch

Play hide & seek with circles while going on this fun circle hunt

Shapes are all around us. See how many you can find with this outdoor shape hunt

Have fun sewing while you sew up these simple sewing circles

Get crafty and make these fun square monsters

Go on a square hunt and find out how many squares are around your house

Get out the sidewalk chalk and make a driveway shape maze

Paint Square Cat!

Go on a shape hunt and round up all the shapes you can find in your house

Create beautiful watercolor resist circles

Make pretty shape collages

Have fun with giant circles on your driveway

What are some other fun ways to learn about shapes?

Poetry Basket for Creative Writing Fun

April 23, 2013 By Terri Thompson

We love poetry. We own a few kid’s poetry books and frequent the poetry section at the library.

We’ve experimented with writing our own poems and illustrating poetry.

Recently, I wanted to delve a bit deeper and see how we could be inspired by one poem. I was inspired by Montessori poetry baskets, but wanted to add in more elements to inspire my Kindergartner to do a little creative writing.

Disclosure: There are Amazon Affiliate and other affiliate links in this article which means, at no additional cost to you, we could receive compensation for our recommendations. You can read our full disclosure policy on our Disclosure Page for more details.

I started with the poem Who Has Seen the Wind? by Christina Rossetti. It’s a simple poem with beautiful imagery. I also knew the girls would easily identify with the poem. After all, we’ve experience many a windy day.

I printed out the poem and laminated it for durability.

I also printed out a few pieces of clip art of trees and leaves. I included felt leaves, small sticks, pine cones, and acorns.

I added some drawing paper, writing paper, and colored pencils to round out the basket.

You can do this with any poem. Just add items mentioned in or inspired by your poem of choice.

We read the poem aloud a few times.

We talked about the wind. We talked about ways in which we would see the wind.

Then we pulled out the drawing paper.

Drawing Prompts:

*If the wind were a person, what would it look like?

*Draw a tree with its leaves blowing in the wind.

*What are some other ways that we can “see” wind? Draw them.

After drawing for awhile, it was time to start writing.

I provided some writing paper that had a square at the top for a picture and 5 short lines for writing.

My daughter is just starting to get comfortable writing and I didn’t want to overwhelm her with too much space for writing.

Writing Prompts:

*Write an acrostic poem using the word WIND.

*Write a pretend conversation between you and your imagined wind person. What would you ask him/her? How would he/she answer?

*How many words can you come up with that rhyme with wind?

*Write a poem about your favorite part of nature. Will you write about the sun, the moon, trees, flowers?

We chose to write the acrostic poem. My daughter enjoyed this style of poetry when we first learned about it and she wanted to try it again.

The above poem is all hers… spelling mistakes and all. I think I’ll keep it forever!

We definitely got our creative juices flowing, because by the time we were done writing our poems, the girls wanted to make kites. We found some construction paper, markers, and yarn and made a couple of simple kites.

The girls loved the poetry basket so much that they’ve requested more poems. What poem should we choose next?

Recycled Robots

April 11, 2013 By Terri Thompson

I’m very pleased to introduce some blogging friends of mine to you. Over the next couple of months they will be visiting here to share some fun ideas. First up is Asia who writes the fabulous blog Fun At Home with Kids. It’s a new blog that’s already full of great ideas. I know you’ll want to pop on over after you see these fun recycled robots!

We’ve been saving the colored caps from X’s food pouches, and I’ve been trying to think of ways to use them because they’re so nice and bright.I’ve seen these tin can robots a few times online, and when I went to Lowe’s to pick up safety goggles and a hammer for S for her plaster excavation, I was surprised to find how inexpensive nuts, bolts, and washers were!

For just a few dollars I was able to get a variety of robot hardware.  Next up, I bought some round magnets.

Disclosure: There are Amazon Affiliate and other affiliate links in this article which means, at no additional cost to you, we could receive compensation for our recommendations. You can read our full disclosure policy on our Disclosure Page for more details.

A few washed tin cans later, S and I were in business!We grabbed some googly eyes (Dollar Store!) and pipe cleaners from our stash in the Art Room, my hot glue gun, and a hammer and nail.

I wanted the robots to have crazy hair and I’m always looking for ways to use pipe cleaners (we have an astronomical number of pipe cleaners we’ve accumulated through gifts from relatives) so it seemed like a perfect fit!

I used the hammer and nail to poke holes to fit some brightly colored pipe cleaner hair.

Some of the bottle caps were metal, so S could just use a magnet between them and the can, as she could with the nuts, bolts, and washers.For the plastic caps, we needed to use glue (we talked about why the magnet wouldn’t work on plastic).  I also made some magnetic googly eyes by gluing on magnets.

They were so cute and fun, I had to join in!  Here is S posing with a crazy face next to my robot creation.  :)We discovered that the magnets were strong enough to hold on to the metal centers of pipecleaners, so we could make mustaches and smiles!

All four of these guys were S’s creations.  The only help I offered was zig-zagging some of the pipecleaner hair.

S was so proud that she thought to use just plain magnets for eyes.  I love that this guy has a cute little smirk – and a bright blue mustache!

The next day we made even crazier eyes by sandwiching a bolt between the can and the bottle cap eyes.

So many robot parts to choose from!

Putting the finishing touches on her robot’s hair.

The robot bodies and parts are all in a plastic storage container (with a locking lid for X’s safety) and S can use them as a sort of busy box whenever she’d like.

Please always supervise your infant/child at play.  Please stay within arms reach and never leave infants/children unattended.

I am a SAHM mom to two young kids: X (an infant) and S (a preschooler). Before becoming a full-time mom, I was a science teacher and ran my own tutoring business. As a former science teacher, I know how important it is for kids to be able to explore and ask questions about the world around them. I also place a high value on creativity and being able to “think outside the box”. For that reason, I strive to engage my children in open-ended play that encourages exploration and fosters their creativity. I try to choose activities that aren’t cost prohibitive, so that anyone could do them at home with their children.

 
Follow Asia here:
Fun At Home With Kids
Facebook
Google+
Pinterest

Messy Fun with Goop!

April 10, 2013 By Terri Thompson

Goop, also called oobleck, was a new experience for us.

It was inexpensive, easy to make, very mess, and a whole lot of fun!

Disclosure: There are Amazon Affiliate and other affiliate links in this article which means, at no additional cost to you, we could receive compensation for our recommendations. You can read our full disclosure policy on our Disclosure Page for more details.

Supplies Needed:
Corn starch
Water
Plastic bin

We set up on the kitchen floor; you really don’t want to do this in a carpeted area.

I found an empty plastic bin and dumped a whole box of cornstarch in it. I let the girls feel the cornstarch to see how soft it was.

Then we started adding our water.

Mix it up as you’re adding water. We just used our hands for mixing.

Add the water until it’s a soft liquid, about the consistency of honey.

Now it’s time for fun.

Squish it quickly with your hands; it feels solid and crumbly.

Run your hands slowly through it; now it feels liquid.

Grab a handful and squish it like a ball. Now, open your hands and watch it flow slowly out.

Goop is an interesting mixture that is both a solid and a liquid.

After playing for awhile, we added a bunch of old kitchen tools from our sandbox. We had whisks, scoops, and measuring spoons.

Try whisking quickly. It’s hard to do!

They loved the sensory experience and spent a lot of time pouring it on their arms.

The goop did make a massive mess. But, it does clean up easily. I was able to sweep it off my kitchen floor once it had dried. Also, it came off their clothes with a simple washing.

The Science Behind Goop

The mixture of cornstarch and water is a suspension.

The two substances combine, but will eventually separate again. Another example of a suspension is muddy water.

The viscosity, or thickness and resistance of flow, of this mixture reacts to force. So, when you quickly grab a handful, the cornstarch particles temporarily trap the water particles. When you release, the mixture turns to liquid again.

You can read this post at Steve Spangler Science about cornstarch science for a more detailed explanation.

Have you ever made goop? It’s a fun science and sensory experience.

  • « Go to Previous Page
  • Page 1
  • Interim pages omitted …
  • Page 47
  • Page 48
  • Page 49
  • Page 50
  • Page 51
  • Interim pages omitted …
  • Page 61
  • Go to Next Page »

Primary Sidebar

Footer

Categories

Archives

Copyright © 2026 ยท Designed by The Blog Surgery

Creative Family Fun uses cookies to improve your experience. These cookies provide feedback to our analytics and advertisers. We use the information to track views of the site, where you go and to know if you are a regular visitor or brand new as well as provide a personalized experience where possible. We'll assume you're ok with this, but you can opt-out if you wish.Accept Reject Read More
Privacy & Cookies Policy

Privacy Overview

This website uses cookies to improve your experience while you navigate through the website. Out of these, the cookies that are categorized as necessary are stored on your browser as they are essential for the working of basic functionalities of the website. We also use third-party cookies that help us analyze and understand how you use this website. These cookies will be stored in your browser only with your consent. You also have the option to opt-out of these cookies. But opting out of some of these cookies may affect your browsing experience.
Necessary
Always Enabled
Necessary cookies are absolutely essential for the website to function properly. This category only includes cookies that ensures basic functionalities and security features of the website. These cookies do not store any personal information.
Non-necessary
Any cookies that may not be particularly necessary for the website to function and is used specifically to collect user personal data via analytics, ads, other embedded contents are termed as non-necessary cookies. It is mandatory to procure user consent prior to running these cookies on your website.
SAVE & ACCEPT