• Skip to secondary menu
  • Skip to main content
  • Skip to primary sidebar
  • Skip to footer
  • Home
  • About
    • Email Me
    • Disclosure & Copyright
  • Start Here
  • Subscribe
  • Privacy Policy
  • Books for Moms

Creative Family Fun

Your one-stop shop for kids activities and family fun

  • Facebook
  • Instagram
  • Pinterest
  • Twitter
  • Spelling Activities
  • Family Fun
  • STEM
  • Movie Night
  • Toddler Activities

Learning Activities for Kids

Math Play: Roll and Graph Game

June 18, 2014 By Terri Thompson

As a good-bye gift to her students, my daughter’s 1st grade teacher sent them all home with a pair of dice. Isn’t that a brilliant idea?

They used dice a lot in class and I thought it would be fun to continue using them for learning at home.

After all, dice usually mean a game. And, a game usually means fun.

So, we got out those dice, grabbed some paper, and started playing this fun roll and graph game.

Practice graphing skills with this fun math Roll and Graph Game. It's easy to set up, fun to play, and you'll learn a lot too!

Disclosure: There are Amazon Affiliate and other affiliate links in this article which means, at no additional cost to you, we could receive compensation for our recommendations. You can read our full disclosure policy on our Disclosure Page for more details.

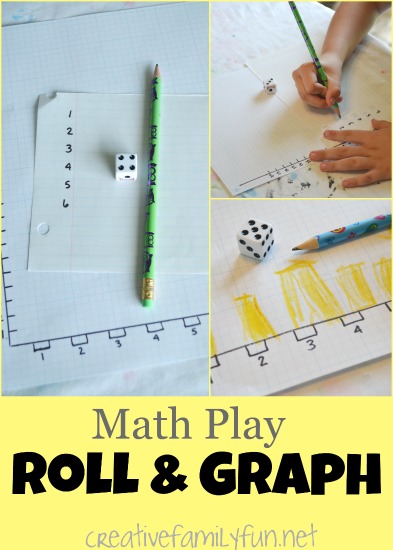
Make your Roll and Graph game

I prepped a simple graph for each of my girls.

I labeled 1 through 20 up the length of the paper and 1 through 6 across the bottom.

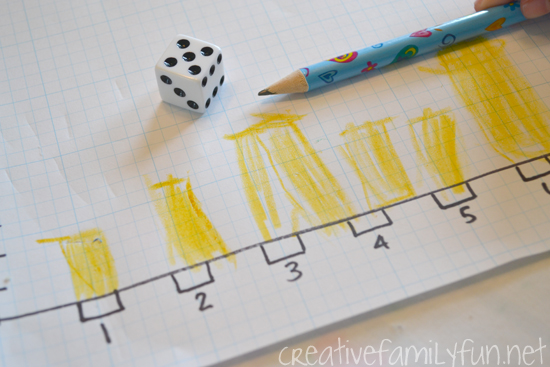
Once we gathered our data, the girls used this to make a simple bar graph. They also used another small piece of paper with the numbers one though six on it for their data.

Practice graphing skills with this fun math Roll and Graph Game. It's easy to set up, fun to play, and you'll learn a lot too!

How to play

I gave each girl one dice and asked them to throw it 20 times.

They had to record each number on their smaller data sheet using tally marks. They would mark one tally next to a number from one to six each time they threw that number.

Once they each tossed the dice 20 times, we took a look at our data.

Practice graphing skills with this fun math Roll and Graph Game. It's easy to set up, fun to play, and you'll learn a lot too!

It’s time to graph

Miss Preschool (who I should now call Miss Kindergarten) had never made a graph before, so this was a very new concept to her. And, I should add, it was probably over head. But, we persevered because she is always up for doing whatever her sister is doing.

We used the bottom row to record the numbers on the dice and drew a bar to show how many times we rolled that number. I made the graph up to 20 because there was the slight possibility (very slight) that someone would throw the same number 20 times. Luckily that didn’t happen and we had a much more even showing.

Practice graphing skills with this fun math Roll and Graph Game. It's easy to set up, fun to play, and you'll learn a lot too!

This simple Roll and Graph game was fun to play and I think Miss 1st Grader…errrr… Miss 2nd Grader will play it again and again. She had a lot of fun and easily caught on to the concept of the bar graph.

You may also like one of these fun math games:

Number Line Secret Code Math Activity

Domino Doubles Game

Number Stories Store: A Pretend Play Math Activity

Hundred Chart Hidden Number Game at Better Than Homework

Snail Race Graphing Game at Simple Fun for Kids

Sink or Float?

June 10, 2014 By Terri Thompson

Summer is in full swing around here, but that doesn’t mean we’ve shut off our brains. We’ve got plenty of outdoor play, plenty of free play, and plenty of reading. But, we’re also planning plenty of fun (emphasis on fun) learning activities. This easy sink or float experiment helped us brush up on our science skills and also added some real-life writing practice.

I set the stage with a large tub of water. This plastic container was perfect. I also went around the house and found several things that we could test. Go through your junk drawer or art supplies for some fun ideas. Just make sure the water won’t hurt it. I found a plastic ruler, a fork, piece of sponge, plastic ring, bottle cap, rock, pine cone, nickel, and foam block. Try to find a good selection of both floating or sinking items.

Disclosure: There are Amazon Affiliate and other affiliate links in this article which means, at no additional cost to you, we could receive compensation for our recommendations. You can read our full disclosure policy on our Disclosure Page for more details.

Before beginning our experiment, we made a simple chart. We had a columns for our items, our predictions, and the actual outcome. The girls took turns choosing one item at a time. They would pick an item, write down the name, and make their prediction. Then, it was time to see the actual results. It turned out that our prediction skills were spot on. And, it wasn’t just lucky guesses, the girls could explain why they chose sink or float.

This is an easy science project and it may be one that your child has already done in school. (My oldest daughter did.) But, it’s a good one for practicing those observation and prediction skills that are so important for young scientists. Adding the chart element also gave us a chance to practice our writing, a skill that needs to be second nature.

Adapt this for younger children: This project can also be done with pre-writers. Set the invitation the same way, but skip the chart. You can keep the chart for them if you want that element. Otherwise, just choose one item, make a prediction, and then find your results. It’s a great way to introduce prediction to your younger kids.

Have you ever done this experiment?

Are you looking for fun science ideas for preschoolers? Check out Three to Five: Playful Preschool for science ideas and more. Click here for purchasing information.

https://www.creativefamilyfun.net/2014/05/three-to-five-playful-preschool.html

Loon Craft and Learning About the Lakes of Minnesota

May 14, 2014 By Terri Thompson

Welcome to Minnesota!

The weather is finally getting nice. We’re know for our cold winters, with plenty of snow and temperatures plunging down below zero degrees Fahrenheit. But when the weather is nice, we get outside.

Minnesota marks the beginning of the Mississippi River in Itasca State Park. It begins as a small stream that you can walk across.

We’re known for our lakes and have over 90,000 miles of shoreline. That’s more than California and Florida – combined!

The lakes are where you often find our state bird, the common loon. And to celebrate our state bird, we’re going to make a fun loon craft.

Learn about Minnesota, its 10,000 lakes, and its state bird when you make this fun loon craft while you craft through all 50 states.

Disclosure: I received a free copy of the book, Travels With Charlie: Across the Midwest, in order to create this post. All opinions and activities are my own. This post also contains Amazon Affiliate and other affiliate links. Please see my disclosure for more details.

The common loon makes its summer home along the shorelines of our lakes. We’re always so excited to see a loon family, especially when their babies are little as they often ride on their mother’s back.

Even when you can’t see the loons, you can hear them. Their call is distinct and sometimes quite haunting.

If you want to hear a loon, check out the Cornell Lab of Ornithology All About Birds site. They have several recordings of a loon call.

Learn about Minnesota, its 10,000 lakes, and its state bird when you make this fun loon craft while you craft through all 50 states.

We are already big fans of the common loon and wanted to their image in an art project. This project is easy to do with a very pretty result.

Supplies Needed:

Watercolor paper (this works best, but you can use any white paper you have on hand)
Watercolors
Black construction paper
Oil pastels
Scissors
Glue

Learn about Minnesota, its 10,000 lakes, and its state bird when you make this fun loon craft while you craft through all 50 states.

Create your loon craft

We began by painting our background.

Loons are often found swimming on a lake, so we used blue and white watercolors to paint lake waters for our background.

Learn about Minnesota, its 10,000 lakes, and its state bird when you make this fun loon craft while you craft through all 50 states.

While waiting for our background to dry, we worked on our loon.

We drew a simple silhouette on the black construction paper and cut it out.

We copied an image found in the book, Loon at Northwood Lake by Elizabeth Ring. It’s a wonderful book to read if you want to learn more about the common loon.

Learn about Minnesota, its 10,000 lakes, and its state bird when you make this fun loon craft while you craft through all 50 states.

Next, we used our oil pastels to draw the details on the loon.

My preschooler drew a red eye and white details. She opted for spots instead of the checked pattern on the loons back and included the white belly. She’s never been one to get bogged down in the details!

Once our background was dry, we glued our loon to it.

Learn about Minnesota, its 10,000 lakes, and its state bird when you make this fun loon craft while you craft through all 50 states.

I love the results of our loon craft and love learning more about Minnesota. Travels With Charlie: Across the Midwest served as our jumping off point for this project. It was so much fun to hear about some of the more quirky finds in our state, like the Giant Prairie Chicken Statue and the Jolly Green Giant Statue. I’ve got to see them both sometime!

About Booking Across the USA

Booking Across the USA is a collaborative project with over 50 bloggers participating. Stop by the landing page and see all the other stops on the route. You’ll be able to find a project for each of the 50 states. What fun! Hope you enjoy traveling across all 50 states.

You May Also Enjoy One of These Fun Projects:

Aboriginal Dot Painting: Exploring Australia Through Art

Cityscape Printmaking

Moose Silhouette Paintings

US State Trading Cards at Royal Baloo

Flower Personification ~ For After School Writing Fun

April 30, 2014 By Terri Thompson

Have you ever tried giving human characteristics to something nonhuman? It’s called personification and it’s a fun way to get kids hooked on writing. They may not realize it, but they’re probably very familiar with personification. It’s prevalent in many movies (Cars, Toy Story), tv shows (Doc McStuffins, Thomas & Friends) and children’s books (Corduroy, Otis, or The Little Engine That Could). And, those are just a few examples I could come up with off the top of my head. Recently, I set up this personification activity for my daughter to give her a little after school writing practice.

Disclosure: There are Amazon Affiliate and other affiliate links in this article which means, at no additional cost to you, we could receive compensation for our recommendations. You can read our full disclosure policy on our Disclosure Page for more details.

Supplies Needed:

Pictures of flowers
Notebook paper
Glue
Markers
Pen or pencil

Set-Up:

To set-up the project, I found several close-up pictures of flowers to print. I used the search term “flower” in the Creative Commons search and found many choices. (The Creative Commons is a great place to find royalty-free images to use for projects such as this.) I downloaded several different pictures, added them to a Word document, and printed in black-and-white. You could also search through coloring pages to find your images. Finally, I cut out each image and glued them to the top half of a sheet of notebook paper. The process was simple and only took a few minutes of my time.

When Miss First Grader got home from school, I had the sheets all ready for her. I let her pick out a flower then gave her a writing challenge.

Use the marker to give your flower a face and turn it into a person. Once you’re done, give your flower a name and then write four sentences about your flower person.

Since this was our first time doing this project, I guided her through the writing a bit. I asked questions such as: “Where does your flower live?” “What do they like to do?” “What are some of their favorite things?” I tried to get her thinking about her flower as a person and not just a flower.

Miss First Grader named her flower Daisy. Daisy is 6 years old, likes pizza, and is always happy. I love to see her imagination at work!

Is your child not interested in flowers? Look for pictures of vehicles, buildings, trees, or toys instead.

Make it a family adventure!
Cost: Under $5. You probably have everything you need already.
Planning time: 30 minutes. Most of your prep time will be spent finding images and printing.
Ages: 6 and up. This project is best enjoyed by kids who are comfortable writing. If you want to do this with a younger child, let them dictate their ideas and a parent or older sibling can help with the writing.
Time needed: Around 30 minutes

If you want to do this as a family adventure instead of an afterschool project, add in sharing time. Let everyone take turns acting out their flower character. It’s fun to see where everyone’s imagination takes them!

Tulip Letter Match Game

April 28, 2014 By Terri Thompson

This spring-themed Tulip Letter Match game is a fun way to help kids learn their uppercase and lowercase letters. I’m all about keeping learning fun at home and turning something into a game is the easiest way to add that element of fun. All it takes is a few supplies and a little bit of time to create this simple game.

Disclosure: There are Amazon Affiliate and other affiliate links in this article which means, at no additional cost to you, we could receive compensation for our recommendations. You can read our full disclosure policy on our Disclosure Page for more details.

Supplies Needed:

Two colors of construction paper
Scissors
Marker
Thin cardboard (recycled cereal box) for template

The game is very simple to make. I started out by making a quick template of a tulip with some cardboard I found in my recycling bin. I wanted all of my flowers to be the same size and tracing a template was the easiest way to achieve this. I traced 26 tulips on each color of construction paper and cut them all out. (The cutting took the most time out of the whole process.)

Next, using my marker, I wrote the lowercase letters on one color of tulip and the uppercase letter on the other color. Once you’re finished it’s time to play!

Ways to Play:<

Place them all face-up on the table. Encourage your child to match each set of letters.

Make it a little more difficult by only laying out one set of letters. Leave the other set in a pile and have your child pick up one letter at a time from the pile. They need to match that letter before moving on to the next one.

Place all the letters face-down on the table. Flip over two tulips at a time, one of each color. Play like you would a standard memory game and try to find matches. This is a perfect way to play if you’re looking for a little one-on-one time with your preschooler.

This game was so easy to make and cost me nothing. Not bad for some fun ABC time!

  • « Go to Previous Page
  • Page 1
  • Interim pages omitted …
  • Page 43
  • Page 44
  • Page 45
  • Page 46
  • Page 47
  • Interim pages omitted …
  • Page 61
  • Go to Next Page »

Primary Sidebar

Footer

Categories

Archives

Copyright © 2026 · Designed by The Blog Surgery

Creative Family Fun uses cookies to improve your experience. These cookies provide feedback to our analytics and advertisers. We use the information to track views of the site, where you go and to know if you are a regular visitor or brand new as well as provide a personalized experience where possible. We'll assume you're ok with this, but you can opt-out if you wish.Accept Reject Read More
Privacy & Cookies Policy

Privacy Overview

This website uses cookies to improve your experience while you navigate through the website. Out of these, the cookies that are categorized as necessary are stored on your browser as they are essential for the working of basic functionalities of the website. We also use third-party cookies that help us analyze and understand how you use this website. These cookies will be stored in your browser only with your consent. You also have the option to opt-out of these cookies. But opting out of some of these cookies may affect your browsing experience.
Necessary
Always Enabled
Necessary cookies are absolutely essential for the website to function properly. This category only includes cookies that ensures basic functionalities and security features of the website. These cookies do not store any personal information.
Non-necessary
Any cookies that may not be particularly necessary for the website to function and is used specifically to collect user personal data via analytics, ads, other embedded contents are termed as non-necessary cookies. It is mandatory to procure user consent prior to running these cookies on your website.
SAVE & ACCEPT