• Skip to secondary menu
  • Skip to main content
  • Skip to primary sidebar
  • Skip to footer
  • Home
  • About
    • Email Me
    • Disclosure & Copyright
  • Start Here
  • Subscribe
  • Privacy Policy
  • Books for Moms

Creative Family Fun

Your one-stop shop for kids activities and family fun

  • Facebook
  • Instagram
  • Pinterest
  • Twitter
  • Spelling Activities
  • Family Fun
  • STEM
  • Movie Night
  • Toddler Activities

Holidays

Glow-In-the-Dark Halloween Socks

October 18, 2012 By Terri Thompson

Disclosure: I wrote this post as part of a paid campaign with iLoveToCreate and Blueprint Social. The opinions in this post are my own.

Tie-dye and glow-in-the-dark… it’s a match made in heaven, or at least Halloween night. When I received a tie-dye and paint kit from iLoveToCreate, I knew I wanted to make something fun for the girls to wear for Halloween. Tie-dye shirts are a lot of fun and I almost made some until I found a couple of pairs of plain white knee socks. Every kid needs a pair of glow-in-the-dark Halloween socks, don’t they? My two certainly did.

The kit from iLoveToCreate was amazing. It had everything I needed minus the socks. It contained two squeeze bottles with the correct amount of powdered dye already inside. All I had to do was add water and shake. It also contained slick black paint and glow-in-the-dark paint. Not pictured are two pairs of plastic gloves and 20 rubber bands. The instructions were clear and the process was easy.

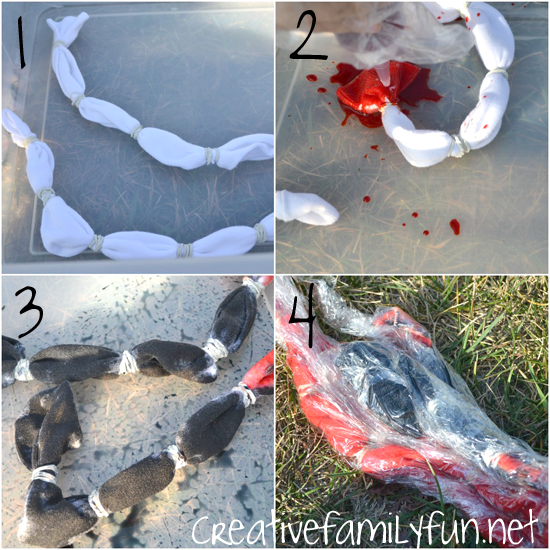
Step 1: Wrap 4-5 rubber bands around each sock about 2 inches apart. I was trying for a striped effect.

Step 2: Put on the plastic gloves and start squirting your dye. Since I was tie-dying with the girls, we took our supplies outside. I used a plastic under-bed storage bin for dying. The dye washes off the plastic easily with water.

Step 3: Completely color your socks with dye. I opted for one color per pair just to make it easier on the girls. Our socks were fully saturated with color. You don’t need as much as we used!

Step 4: Wrap the socks individually in plastic wrap. They will need to sit like this for 6-8 hours. After the allotted time, unwrap your socks and cut off the rubber bands. You will then need to follow the instructions in the kit for washing and drying.

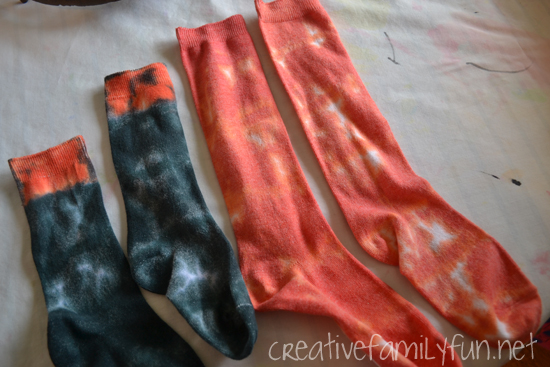
Once we were done, our socks were looking good! The girls were ready to wear them, but I wasn’t finished yet. That glow-in-the-dark paint was calling my name.

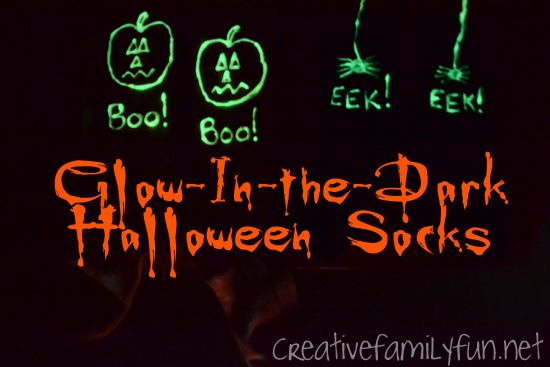
I used the paint to draw designs that would show up on the outsides of their socks. The paint goes on white, but dries clear. So in the daytime, they look like fun tie-dyed socks, but at night… Eek! Watch out for the spiders!

Thank you iLoveToCreate for the fun opportunity! Now, if only I can figure out how to get these socks off the girls. Any suggestions?

You can also find iLoveToCreate here:

  • Facebook Twitter Pinterest

Get Crafty: Simple Halloween Garland

October 16, 2012 By Terri Thompson

My 5-year-old has been constantly begging for Halloween crafts to do.

One day I had completely exhausted all the ideas I had and went searching through our craft supplies. I happened upon a bag of foam Halloween stickers and inspiration hit.

We could make a Halloween garland. It was a simple process and the girls were able to do most of it independently.

Disclosure: There are Amazon Affiliate and other affiliate links in this article which means, at no additional cost to you, we could receive compensation for our recommendations. You can read our full disclosure policy on our Disclosure Page for more details.

Supplies Needed:

Black construction paper
Orange construction paper
Foam stickers
Scissors
Yarn
Tape

The first step is to cut a supply of orange and black circles from the construction paper. You can use a circle punch or use a jar lid or drinking glass to trace circles in the size you want. (Ours were 2-inch circles.)

I gave the girls the circles and stickers with the instructions to put one sticker on each circle.

After each circle had a sticker, we arranged them in an alternating orange and black pattern. We taped each one to the yarn per the above picture approximately 2-inches apart.

Once we were done taping, we had a pretty and very simple Halloween garland.

Kid’s Co-op: More Halloween Fun

October 12, 2012 By Terri Thompson


It’s Kid’s Co-op time! Link up your favorite kid-related posts and then check out all the fun that has been linked up from other bloggers.

Last week there were so many fun ideas linked up to the Co-op.  Outdoor fun, indoor fun, cooking fun, and lots, lots more. This week I’d like to share some more fun ideas for Halloween.

Disclosure: There are Amazon Affiliate and other affiliate links in this article which means, at no additional cost to you, we could receive compensation for our recommendations. You can read our full disclosure policy on our Disclosure Page for more details.

 
And In Lieu of Preschool shared a fun way to paint pumpkins.
 
 
Now it’s time for you to share all the fun you’ve been having! Please join up and share your favorite post. (And, we’d love you forever if you’d link back to us!) Your link will show up on all of the hosts’ blogs. It’s time to link up, visit some new blogs, and have a lot of fun!


On-The-Go Tic Tac Toe

October 9, 2012 By Terri Thompson

Disclosure: I wrote this post as part of a paid campaign with Martha Stewart Crafts and Blueprint Social. The opinions in this post are my own.

Confession time: I love to craft. Don’t be shocked. When I’m not coming up with craft projects for my girls, I like to do a little crafting myself. When I was given the opportunity to come up with a craft project using supplies from Martha Stewart Crafts, I jumped at the chance. After playing around with a box FULL of fun crafts supplies, I decided to make a fun fall-themed game for the girls. This tic tac toe game is perfect for car trips, waiting in restaurants, or even at the doctor’s waiting room. And, the best part… it was easy to make.

I started with glass beads. I used the glass vase-filler beads you can find at the dollar store. They are flat on one side and rounded on the other. I also used Martha Stewart Crafts gloss opaque glass paint in mace and chestnut brown. The stencils came from the Holiday Icons II set of adhesive stencils.

The stencils are small and flexible, perfect for my glass beads. I applied the stencil to the rounded top being careful to press it down on all sides. If you press down well, the stencil will not bleed.

I used a small bit of sponge to apply my paint. I covered it lightly, then dabbed in layers until I had the solid covering I wanted. I made five pumpkins and five autumn leaves. The great thing about these stencils are that you can use them again and again… and believe me, I have!


After I made all my playing pieces, It was time for the pouch. I chose black felt for the pouch. I knew that the felt would hold up to the beads, plus, felt is very easy to sew. I used one sheet of good quality craft felt and cut it in half. I placed my game pieces down in a grid to see how big I needed to make the squares in my tic tac toe board. I used stick pins on one of my pieces of felt to mark the lines I needed to sew.

I used orange thread to stand out against the black and sewed my lines using a tight zig zag stitch. I used my sewing machine guides to help me get a straight stitch and once I had two lines down and two across, I had my game board. This is for the front of my pouch.

To make the pouch, I lined up my two pieces of felt. I sewed around three sides of my pouch leaving a 1/2-inch seam allowance. I wanted to make sure I had room to trim my sides and get rid of any uneven edges. With using felt, I didn’t have to worry about finishing any edges, so I left the top open.

As a finishing touch, I added two small strips of self-adhesive velcro to close the pouch. I trimmed up all my uneven edges and my pouch was finished.

Ever since I made this game, the girls have been playing it non-stop. They love the pouch and I love the fact that it’s easy to carry with us. And with all the cool Martha Stewart Crafts stencils I have, I think we may just need a Christmas-theme game, a Valentine-themed game, an Easter-themed game…. and I could go on and on.

           You can also find Plaid Crafts and Martha Stewart Crafts here:
  • Facebook Twitter Pinterest

Fun Spider Crafts for Kids

October 6, 2012 By Terri Thompson

Are you ready to make a fun Spider craft?

I definitely am!

Spiders are so much for for Halloween or any time of the year when you’re learning about these fun arachnids. These spider crafts for kids are perfect for October, and they’re also not too Halloween specific so you can make them throughout the year.

Make some spooky spiders with these fun Spider Crafts for Kids. These projects are fun for Halloween or any time of the year when you're learning about spiders.

I found fun art projects, simple crafts, and even fun robot spiders.

So, grab your craft supplies, pick out a project or two, and have some fun creating together with your kids.

Disclosure: There are Amazon Affiliate and other affiliate links in this article which means, at no additional cost to you, we could receive compensation for our recommendations. You can read our full disclosure policy on our Disclosure Page for more details.

Make some spooky spiders with these fun Spider Crafts for Kids. These projects are fun for Halloween or any time of the year when you're learning about spiders.

Fun Spider Crafts for Kids

Grab some cardboard tubes to make our adorable Cardboard Tube Spiders.

Turn a paper plate into one of our fun Googly Eye Spider Masks.

Try a STEAM project and make one of these Halloween Robot Spiders from Inspiration Laboratories.

Use natural materials to make these cute Twiggy Spiders from Kitchen Counter Chronicle.

Make some spooky spiders with these fun Spider Crafts for Kids. These projects are fun for Halloween or any time of the year when you're learning about spiders.

Rock painting is fun, but painting these Playful Rock Spiders from Kids Craft Room is even more fun.

Make some simple and cute Paper Plate Spiders like these from I Heart Crafty Things.

Turn a pine cone into a spider with this cute nature craft from Fireflies and Mud Pies.

Make your own spider ring with this fun craft from Fantastic Fun and Learning.

Make some spooky spiders with these fun Spider Crafts for Kids. These projects are fun for Halloween or any time of the year when you're learning about spiders.

String some beads to make this cute Beaded Spider from Hands On As We Grow.

Build some spiders out of LEGO Bricks with these plans from Frugal Fun for Boys and Girls.

Make a 3D spider out of paper with this cute craft from Red Ted Art.

Dress up like a spider with this simple Spider Headband Craft from Fantastic Fun and Learning.

Make some spooky spiders with these fun Spider Crafts for Kids. These projects are fun for Halloween or any time of the year when you're learning about spiders.

Make handprint spiders on a fun web with this idea from Happy Hooligans.

Or, you can turn your handprints into fun Spider Window Clings like this idea from Hands on As We Grow.

Turn a mason jar lid into a cute spider with this craft from Fireflies and Mud Pies.

Make some spider pencil toppers like this fun idea from Happiness is Homemade.

Make some spooky spiders with these fun Spider Crafts for Kids. These projects are fun for Halloween or any time of the year when you're learning about spiders.

Spider Web Crafts

Do some simple weaving with yarn to make one of our Paper Plate Spider Web Wreaths.

Add a little science to your art when you make this fun Fizzy Spider Web Art from Inspiration Laboratories.

Use watercolor resist to make some pretty spider web art like this at Let’s Lasso the Moon.

Use popsicle sticks to make these simple Spider Webs from Buggy and Buddy.

Which of these fun spider crafts is your favorite?

Make some spooky spiders with these fun Spider Crafts for Kids. These projects are fun for Halloween or any time of the year when you're learning about spiders.

If you enjoyed these fun Spider Crafts for Kids, the above photo is perfect for sharing on Facebook or you can save the photo below on Pinterest.

Make some spooky spiders with these fun Spider Crafts for Kids. These projects are fun for Halloween or any time of the year when you're learning about spiders.

You may also like one of these fun crafts for kids:

Pom Pom Caterpillar Craft for Kids

Three Blind Mice Craft

Hole-Punched Bookmark Craft for Kids

Cardboard Tube Penguin Craft

  • « Go to Previous Page
  • Page 1
  • Interim pages omitted …
  • Page 32
  • Page 33
  • Page 34
  • Page 35
  • Page 36
  • Interim pages omitted …
  • Page 39
  • Go to Next Page »

Primary Sidebar

Footer

Categories

Archives

Copyright © 2025 · Designed by The Blog Surgery

Creative Family Fun uses cookies to improve your experience. These cookies provide feedback to our analytics and advertisers. We use the information to track views of the site, where you go and to know if you are a regular visitor or brand new as well as provide a personalized experience where possible. We'll assume you're ok with this, but you can opt-out if you wish.Accept Reject Read More
Privacy & Cookies Policy

Privacy Overview

This website uses cookies to improve your experience while you navigate through the website. Out of these, the cookies that are categorized as necessary are stored on your browser as they are essential for the working of basic functionalities of the website. We also use third-party cookies that help us analyze and understand how you use this website. These cookies will be stored in your browser only with your consent. You also have the option to opt-out of these cookies. But opting out of some of these cookies may affect your browsing experience.
Necessary
Always Enabled
Necessary cookies are absolutely essential for the website to function properly. This category only includes cookies that ensures basic functionalities and security features of the website. These cookies do not store any personal information.
Non-necessary
Any cookies that may not be particularly necessary for the website to function and is used specifically to collect user personal data via analytics, ads, other embedded contents are termed as non-necessary cookies. It is mandatory to procure user consent prior to running these cookies on your website.
SAVE & ACCEPT