• Skip to secondary menu
  • Skip to main content
  • Skip to primary sidebar
  • Skip to footer
  • Home
  • About
    • Email Me
    • Disclosure & Copyright
  • Start Here
  • Subscribe
  • Privacy Policy
  • Books for Moms

Creative Family Fun

Your one-stop shop for kids activities and family fun

  • Facebook
  • Instagram
  • Pinterest
  • Twitter
  • Spelling Activities
  • Family Fun
  • STEM
  • Movie Night
  • Toddler Activities

Crafts

Kites

January 17, 2012 By Terri Thompson

Did you know that kites were invented in China thousands of years ago?

That fact stopped Lizzie in her tracks. She was ready to stop doing that “very important thing” she was doing and make a kite!

Disclosure: There are Amazon Affiliate and other affiliate links in this article which means, at no additional cost to you, we could receive compensation for our recommendations. You can read our full disclosure policy on our Disclosure Page for more details.

We started out by reading Kite Flying by Grace Lin for a little bit of inspiration. It’s a short and lyrical book about the process of making a kite. My favorite part was at the end, when the author provided a history of kites and kite flying. Lots of fun facts!

Supplies Needed

Craft sticks (1 large and 1 small for each kite)
Glue
Construction paper
Ruler
Scissors
Yarn
Tape

We started out by hot-gluing two craft sticks together. We used a large craft stick for the length and a small craft stick for the width.

Glue the small craft stick about a third of the way down the larger stick. Hot glue is not a necessity.

We used it so we didn’t have to wait long for the sticks to dry. Any craft glue or school glue would work fine.

We then took the ruler and drew straight lines in the shape of the kite using our craft sticks as a guide.

The next step was cutting out the kite.

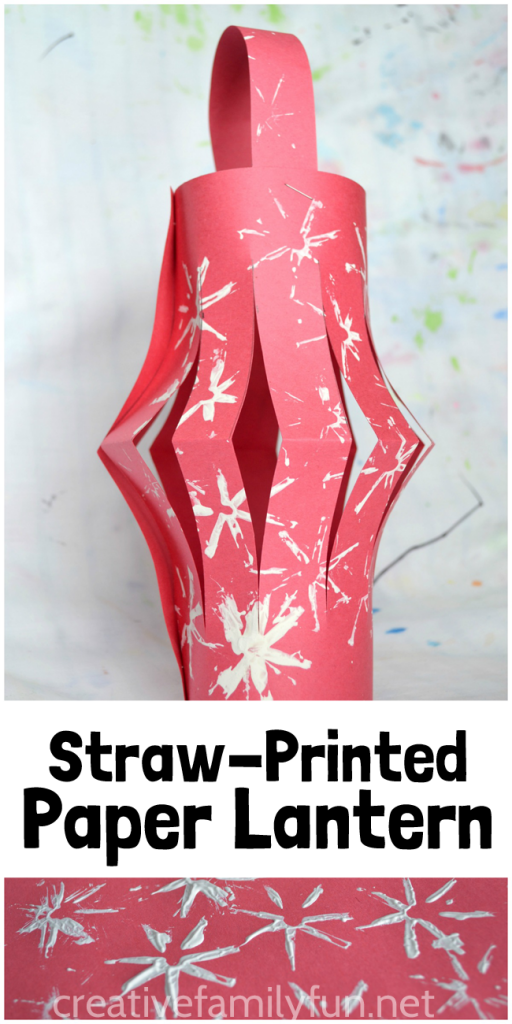
Once the kites were cut out, it was time to decorate!

We used markers because that’s been a favorite art supply around here lately.

But, really, anything goes. Get out the paint, the crayons, or even stickers.

After the girls were satisfied with their decorations, we attached the kite to the sticks. We also attached a piece of yarn for the kite string.

As you can see, we opted for tape. And we used a lot of tape! After all, there were a 4- and 2-year-old involved!

This is Lizzie’s finished kite. She decided to make a dragon face on her kite.

AJ wouldn’t let me take a picture of hers!

After making their kites, the girls spent the rest of the afternoon at a kite festival of their own design. They had signs, giant imaginary kites, their little kites, and a picnic of felt food. What a glorious way to spend an afternoon!

Straw-Printed Paper Lantern Craft

January 16, 2012 By Terri Thompson

We love to learn about other countries and cultures.Since Chinese New Year always falls at the beginning of the year, I thought it would be the perfect time to learn a bit about China.

Our first craft was making a paper lantern craft. To make this project a little more special, I combined two different techniques: straw printing and making paper lanterns.

This fun Straw-Printed Paper Lantern craft is a fun activity for Chinese New Year or anytime you're learning about China and Chinese culture.
 

Disclosure: There are Amazon Affiliate and other affiliate links in this article which means, at no additional cost to you, we could receive compensation for our recommendations. You can read our full disclosure policy on our Disclosure Page for more details.

Supplies Needed:

Red construction paper
Drinking straws
White paint
Scissors
Stapler

This fun Straw-Printed Paper Lantern craft is a fun activity for Chinese New Year or anytime you're learning about China and Chinese culture.

How to make your Straw-Printed Paper Lantern Craft

I stumbled across the idea of straw painting awhile ago and I thought it would be the perfect way to decorate our lanterns.

I cut a couple of straws in half, then cut strips at one of the ends (like the picture above). You’ll need to squish the cut end up a bit before giving it to the kids. This will make it easier for them to print with the straws.

This fun Straw-Printed Paper Lantern craft is a fun activity for Chinese New Year or anytime you're learning about China and Chinese culture.

Printing is easy, just dip the cut ends of the straw in paint and splat them on your paper.

We printed all over our paper. Then we had to let it dry before we could make the paper lantern craft. I love how it looks a bit like fireworks!

This fun Straw-Printed Paper Lantern craft is a fun activity for Chinese New Year or anytime you're learning about China and Chinese culture.

To make the lanterns, you’ll want to fold the paper in half lengthwise. Make sure the painted side is facing out.

This fun Straw-Printed Paper Lantern craft is a fun activity for Chinese New Year or anytime you're learning about China and Chinese culture.

Draw lines about an inch apart all the way down the paper.

You’ll start cutting on the folded side, then stop about an inch away from the outer edge. Do not cut all the way through!

This fun Straw-Printed Paper Lantern craft is a fun activity for Chinese New Year or anytime you're learning about China and Chinese culture.

After the lines are cut, unfold the paper. Roll the paper into a circle from short end to short end.

Staple at the top and bottom where both sides meet. Use a strip of construction paper for the handle. Just staple each end to the side of the lantern.

We originally used string for our handle, but found that the string kept slipping our of the staple. The construction paper handle works much better.

This fun Straw-Printed Paper Lantern craft is a fun activity for Chinese New Year or anytime you're learning about China and Chinese culture.

We now have beautiful paper lanterns ready for Chinese New Year! And apparently I also have a budding photographer/blogger on my hands!This fun Straw-Printed Paper Lantern craft is a fun activity for Chinese New Year or anytime you're learning about China and Chinese culture.

You may also like one of these China Activities and Crafts:

Chinese Rattle Drum Craft

Panda Bear Masks

35+ Ways to Learn About China

Joseph Had a Little Overcoat Book & Craft

January 13, 2012 By Terri Thompson

The first time I looked through the book Joseph Had a Little Overcoat by Simms Taback, I knew I wanted to do a craft project based on the illustrations.

If you’ve never read the book, you should. It’s a delightful book about a man who keeps turning his overcoat into something new, until it gets too tiny to transform anymore.

The book uses die-cut pages to show the transformation of the coat.

Well, die-cut is a bit too complicated for preschoolers and toddlers to tackle, so I thought and thought about what we could do. As I was flipping through the book, I landed on the inside cover and voila!

Disclosure: There are Amazon Affiliate and other affiliate links in this article which means, at no additional cost to you, we could receive compensation for our recommendations. You can read our full disclosure policy on our Disclosure Page for more details.

We were going to make a collage!

Supplies Used:
Black construction paper (background)
Various colors of card stock and scrapbooking paper (any sort of paper would work)
Scissors
Marker
Glue

We started working on cutting our paper and card stock. I have a supply of fun scissors, so I got those out.

We cut and cut.

I also got out the markers so we could draw patterns on our paper. I don’t have a lot of patterned paper, but I didn’t let that stop us. It’s easy and more fun to draw your own patterns.

We had fun and worked hard, as you can tell by our wonderfully messy table.

My goal was to step back and let the girls do as they please. I didn’t want to try and control the project. Of course, that meant I had to do my own!

Here are our finished projects:

Lizzie, age 4, had a lot of fun making patterns!

AJ, age 2, cut for a while. Then she had me cut. She glued a few pieces down, which she pulled up again so she could draw on them with the markers. She ended up with a pile of paper scraps and one slightly used piece of black construction paper. I loved watching this process!

Oh, and here’s mine. Just in case you were curious…

Have you read any good books lately?

Hey Diddle Diddle Collage

January 9, 2012 By Terri Thompson

Hey diddle diddle,
The cat and the fiddle,
The cow jumped over the moon;
The little dog laughed
To see such spot,
And the dish ran away
with the spoon.

For our final nursery rhyme craft, we did a simple collage based on “Hey Diddle Diddle.”

Lizzie, age 4, was able to work independently on this project while I helped AJ, age 2, with hers.

I presented the girls with pre-cut shapes: a moon, fiddle, cow, dish and spoon.

I also typed up the nursery rhyme, printed it, and cut it out as well.

All the shapes were simple and easy to cut with the exception of the cow. To make cutting the cow easier, I would suggest using clip art or tracing a picture from your favorite nursery rhyme book, then cutting.

Disclosure: There are Amazon Affiliate and other affiliate links in this article which means, at no additional cost to you, we could receive compensation for our recommendations. You can read our full disclosure policy on our Disclosure Page for more details.

The task was simple. I got out the glue sticks and had the girls glue the pictures down however they wanted.

While working, we recited “Hey Diddle Diddle” over and over and over again!

Lizzie wasn’t satisfied with her collage until she had found some markers and added strings to the fiddle. Because, you can’t play a fiddle without the strings.

AJ thought “Hey Diddle Diddle” would have a much better ending if the fiddle ran away with the spoon!

I hope you enjoyed our nursery rhyme crafts and activities! I really enjoyed working on this theme week and plan on doing more theme weeks in the future. Do you have any themes you want me to tackle?

Itsy Bitsy Spiders

January 6, 2012 By Terri Thompson

 The itsy bitsy spider went up the water spout
Down came the rain and washed the spider out
Out came the sun and dried up all the rain
Then the itsy bitsy spider climbed up the spout again.

We decided to try and make a few spiders of our own today since we love singing “Itsy Bitsy Spider” so much.The spiders aren’t pretty, but they’re fun and quite helpful in acting out the story.

Disclosure: There are Amazon Affiliate and other affiliate links in this article which means, at no additional cost to you, we could receive compensation for our recommendations. You can read our full disclosure policy on our Disclosure Page for more details.

Supplies Needed

Old magazines
Yarn (cut in 7-8 foot lengths)

Yep, that’s it. Only two things are needed and one can be found in the recycling bin!

Start by tearing out individual pages from the magazine and rolling them up tightly.

I found it worked best to start at one corner and roll to the other. Once your page is rolled up, twist them up tightly to hold the shape.

You will need four rolls for each spider.

We then crisscrossed the rolls and I tied one end of the yarn around the center. The girls then started rolling all that yarn around the middle of each spider.

Once they were finished wrapping, I tied the yarn up securely so it would not start unwrapping.

I left about 6-7 inches of yarn free at the end for dangling purposes.

So, there you have it. It was quick, it was easy, it was frugal, and not a bit pretty.

But, we have spiders and we have a favorite song. We have all we need.

Do you have a nursery rhyme you’d like us to come up with a craft or activity for? We’re up for the challenge!

  • « Go to Previous Page
  • Go to page 1
  • Interim pages omitted …
  • Go to page 25
  • Go to page 26
  • Go to page 27
  • Go to page 28
  • Go to page 29
  • Interim pages omitted …
  • Go to page 31
  • Go to Next Page »

Primary Sidebar

Footer

Categories

Archives

Copyright © 2022 ยท Designed by The Blog Surgery

Creative Family Fun uses cookies to improve your experience. These cookies provide feedback to our analytics and advertisers. We use the information to track views of the site, where you go and to know if you are a regular visitor or brand new as well as provide a personalized experience where possible. We'll assume you're ok with this, but you can opt-out if you wish.Accept Reject Read More
Privacy & Cookies Policy

Privacy Overview

This website uses cookies to improve your experience while you navigate through the website. Out of these, the cookies that are categorized as necessary are stored on your browser as they are essential for the working of basic functionalities of the website. We also use third-party cookies that help us analyze and understand how you use this website. These cookies will be stored in your browser only with your consent. You also have the option to opt-out of these cookies. But opting out of some of these cookies may affect your browsing experience.
Necessary
Always Enabled
Necessary cookies are absolutely essential for the website to function properly. This category only includes cookies that ensures basic functionalities and security features of the website. These cookies do not store any personal information.
Non-necessary
Any cookies that may not be particularly necessary for the website to function and is used specifically to collect user personal data via analytics, ads, other embedded contents are termed as non-necessary cookies. It is mandatory to procure user consent prior to running these cookies on your website.
SAVE & ACCEPT