• Skip to secondary menu
  • Skip to main content
  • Skip to primary sidebar
  • Skip to footer
  • Home
  • About
    • Email Me
    • Disclosure & Copyright
  • Start Here
  • Subscribe
  • Privacy Policy
  • Books for Moms

Creative Family Fun

Your one-stop shop for kids activities and family fun

  • Facebook
  • Instagram
  • Pinterest
  • Twitter
  • Spelling Activities
  • Family Fun
  • STEM
  • Movie Night
  • Toddler Activities

Terri Thompson

Halloween Black Cat Mask

October 6, 2014 By Terri Thompson

Black cats have always been one of my favorite symbols of Halloween. It’s not a mystery why.

We’ve got our own fuzzy black cat that calls our house her home. She’s not a bit spooky or scary. In fact, she’s often silly and sweet.

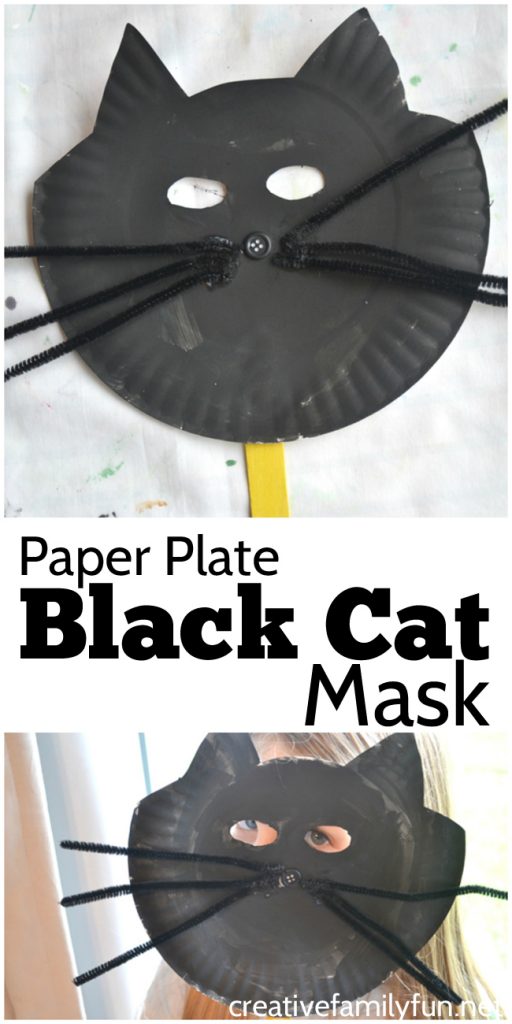
Black cats are a lot fun for kids who don’t like all the scarier parts of Halloween. This black cat mask is a fun Halloween craft for your preschool and elementary kids.

This paper plate Halloween Black Cat Mask is a little bit silly, a little bit spooky, but not a bit scary. It's fun for pretend play!

Disclosure: This post contains Amazon Affiliate links. Please see my Disclosure Page for more details.

This paper plate Halloween Black Cat Mask is a little bit silly, a little bit spooky, but not a bit scary. It's fun for pretend play!

Supplies Needed:

Paper plate

Scissors

Black paint

White glue

Black fuzzy craft sticks (pipe cleaners) – 3 per mask

Black button

Large craft stick

This paper plate Halloween Black Cat Mask is a little bit silly, a little bit spooky, but not a bit scary. It's fun for pretend play!

How to make a Black Cat Mask

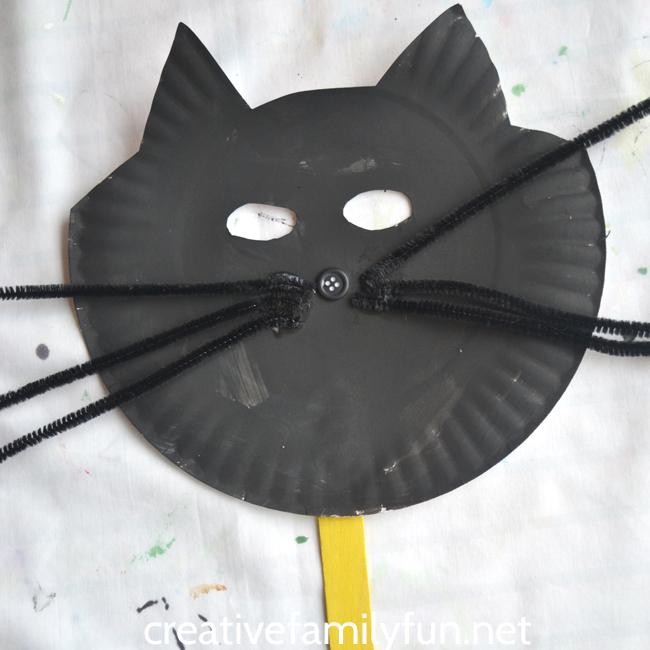
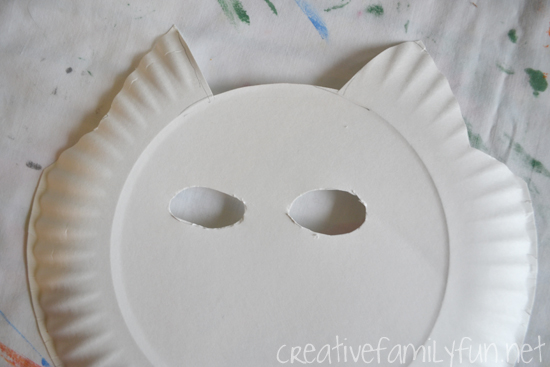
Draw a couple of simple pointy ears at the top of your paper plate and cut along your lines.

Also, cut two eye holes so you can see out of your mask.

I’ve found that it’s a lot easier to do any cutting before painting the mask. Also, depending on the ages of the kids doing this project, an adult may need to do the cutting before sitting down to make this craft.

This paper plate Halloween Black Cat Mask is a little bit silly, a little bit spooky, but not a bit scary. It's fun for pretend play!

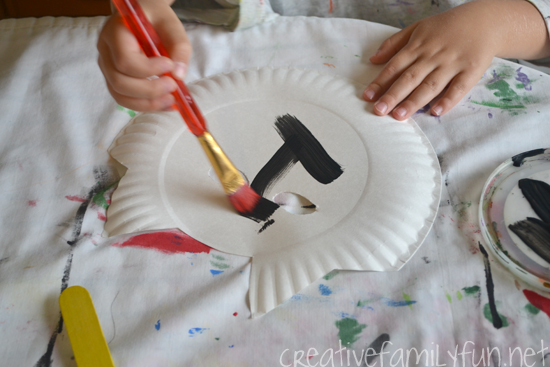
Once you’ve created your cat shape, use the black paint to paint the front of the mask.

The front of the mask is actually the bottom of the plate. You’ll want the plate to curve inwards toward your face.

This paper plate Halloween Black Cat Mask is a little bit silly, a little bit spooky, but not a bit scary. It's fun for pretend play!

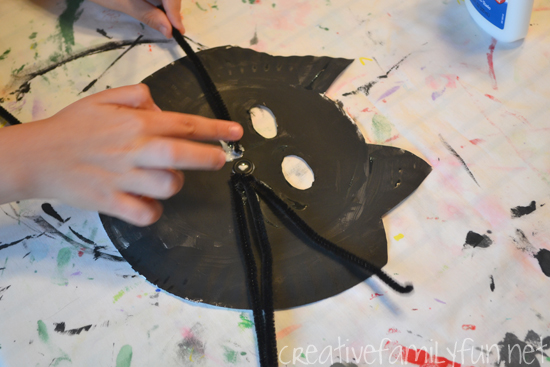
After the paint is dry, or almost dry, glue on a button for the nose.

Cut three pipe cleaners in half for your whiskers. Glue all six whiskers next to the nose, three on each side.

Letting the glue dry under the pipe cleaners is by far the hardest part of the mask. If you pick up the mask or move it around too much, the pipe cleaners will fall off while the glue is still wet. The best thing to do is to just walk away for awhile!

If you need a quicker drying time, consider using a low-heat hot glue gun to attach the nose and whiskers.

This paper plate Halloween Black Cat Mask is a little bit silly, a little bit spooky, but not a bit scary. It's fun for pretend play!

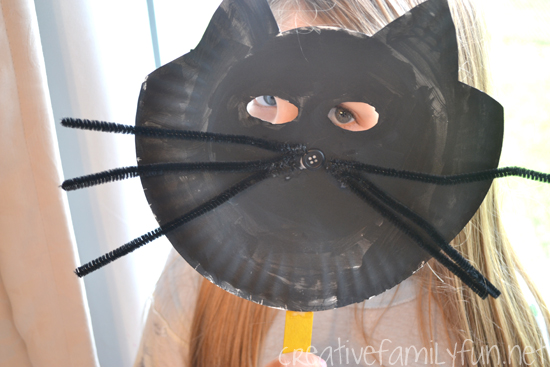
Once your glue is dry enough to move the mask around, glue a craft stick to the bottom of the mask so you can hold it up to your face. Let it dry for a bit and soon your mask will be done.

This Black Cat Mask is a little bit spooky, a little bit silly, not one bit scary, and very sweet. Your kids will love making one and playing with it later.

This paper plate Halloween Black Cat Mask is a little bit silly, a little bit spooky, but not a bit scary. It's fun for pretend play!

You may also like one of these fun Halloween Crafts:

Cardboard Tube Spiders for Halloween

No Sew Ghost Pencil Toppers

Spider Web Wreaths

Cute Hand Print Spiders in Webs at Kids Craft Room

Jack-O-Lantern Pencil Holder

October 2, 2014 By Terri Thompson

Wrapping yarn around a tin can is an easy way to dress it up so that it no longer looks like a recycle bin rescue.

We used this method to turn a tin can into a fun Jack-O-Lantern Pencil Holder.

It’s a fun way to jazz up your school supplies and make homework fun.

Store your Halloween pencils in this simple yarn wrapped Jack-O-Lantern Pencil Holder. It's a fun Halloween craft for kids and tweens.

Disclosure: There are Amazon Affiliate and other affiliate links in this article which means, at no additional cost to you, we could receive compensation for our recommendations. You can read our full disclosure policy on our Disclosure Page for more details.

Supplies Needed

Tin can
Orange yarn
Strong glue (I used Tacky Glue, but hot glue would also work)
Black felt

Store your Halloween pencils in this simple yarn wrapped Jack-O-Lantern Pencil Holder. It's a fun Halloween craft for kids and tweens.

Make your Jack-O-Lantern Pencil Holder

Before beginning, prep your can by washing and removing the label.

Don’t worry if you still have bits of glue and paper on the can. You will be covering it completely.

Store your Halloween pencils in this simple yarn wrapped Jack-O-Lantern Pencil Holder. It's a fun Halloween craft for kids and tweens.

Add a dollop of of glue to the bottom of the can and attach one end of your yarn to the glue. You don’t need to wait until it dries before beginning. You’ll want that extra glue to catch the yarn as you go around.

Start wrapping your yarn around the can. Try not to pull it too tight or leave it too loose.

Work straight from your skein of yarn. You’ll want one continuous string of yarn and it’s hard to measure just how much you need until you are done with your project.

Store your Halloween pencils in this simple yarn wrapped Jack-O-Lantern Pencil Holder. It's a fun Halloween craft for kids and tweens.

Wrap, wrap, and wrap. You may need to pause on occasion and push your yarn together so that no gaps are showing. The yarn has a tendency to get stuck in the grooves, but it’s nothing a little pushing won’t fix.

Keep wrapping until your entire can is covered.

When you get close to the top, add another dollop of glue, so you can catch the other end of your yarn.

Store your Halloween pencils in this simple yarn wrapped Jack-O-Lantern Pencil Holder. It's a fun Halloween craft for kids and tweens.

After you are done with your can, cut your jack-o-lantern face pieces from your felt.

This project uses only a small bit of felt. So, if you only have a scrap of felt, you probably have enough.

You can also use black foam or black fabric if you don’t have any felt.

Store your Halloween pencils in this simple yarn wrapped Jack-O-Lantern Pencil Holder. It's a fun Halloween craft for kids and tweens.

Arrange your face pieces around until you’re satisfied with the way they look. The nice thing about the yarn and felt is that the pieces will naturally stick together for awhile so you can move it around a bit before gluing.

Once you like the way it looks, use your glue to permanently attach your face. After it dries, you’re ready to go.

Store your Halloween pencils in this simple yarn wrapped Jack-O-Lantern Pencil Holder. It's a fun Halloween craft for kids and tweens.

This yarn-wrapped Jack-O-Lantern Pencil Holder is a perfect Halloween craft for your elementary-aged kids or tweens.

Decorate your recycled finds and make some cute and functional Halloween decorations.

Store your Halloween pencils in this simple yarn wrapped Jack-O-Lantern Pencil Holder. It's a fun Halloween craft for kids and tweens.

You may also like one of these fun Halloween projects:

Paper Plate Jack-O-Lanterns

Black Cat Masks

No-Sew Ghost Pencil Toppers

Halloween Neighborhood Scavenger Hunt

10 Ways to Learn About Animals

September 29, 2014 By Terri Thompson

Animals, animals, animals. There is never any shortage of animals in our house.

Between our two pets, piles of animal toys, and even bigger piles of animal books, my girls know more interesting facts about animals than most people I know. I know they’re not alone. So many kids connect with animals and want to learn more about them.

Animals can peak their interest in reading. They can teach them compassion and conservation. They can teach them science. A world without animals is no world at all.

So, let’s learn all we can with these fun 10 ways to learn about animals.

Kids are so fascinated by animals and it's such an easy subject to get them interested in. Here are 10 fun ways to learn about animals that your kids will sure to love.

In honor of World Animals Day 2014 (October 4), I’ve joined together with a group of kid bloggers for the Children Loving Animals Blog Hop with 10 of our favorite ways to learn about animals.

I’ve illustrated this post with several animal pictures I took over our summer vacation. We were able to observe many animals in their native habitat while on a vacation in the Black Hills of South Dakota.

Disclosure: There are Amazon Affiliate and other affiliate links in this article which means, at no additional cost to you, we could receive compensation for our recommendations. You can read our full disclosure policy on our Disclosure Page for more details.

Kids are so fascinated by animals and it's such an easy subject to get them interested in. Here are 10 fun ways to learn about animals that your kids will sure to love.

Fun Ways to Learn About Animals

Subscribe to an animal magazine

My kids have a subscription to Ranger Rick Jr. and in the past we’ve also received National Geographic Little Kids. Both also have versions for older kids.

I love these magazines because they are stuffed full of animal facts and beautiful pictures. It’s easy to pick one up and read for a few minutes.

Of course, the best part about a magazine is that you get a surprise in the mail once a month!

Observe them in the wild.

You don’t have to go on an African safari to observe animals in the wild (although that would be amazing).You just need to think small.

We had the opportunity to see amazing animals in the wild while visiting Custer State Park and Wind Cave National Park in South Dakota this summer. When visiting a state park or a national park, stop by the visitors center to find out the types of animals you can see and the best spots to find them.

If you don’t live near a state or national park, you can also visit a local nature center. Birds, deer, squirrels, and other small animals native to the area are often found at a nature center. We love to check out the turtles who hang out at our favorite nature center.

For great tips on observing nature with young children, you can visit my post here.

Go on a virtual trip.

If you can’t go on a real trip to observe animals, go on a virtual trip instead.

You can do this by watching an animal documentary. We love Disneynature: Chimpanzee and March of the Penguins.  Or, you can view some videos on YouTube. (As always, you will want to preview any video on YouTube before showing it to your kids.)

Kids are so fascinated by animals and it's such an easy subject to get them interested in. Here are 10 fun ways to learn about animals that your kids will sure to love.
 

Watch a webcam.

There are so many amazing webcams where you can watch animals in their native habits, zoo, or wildlife sanctuaries.

You can visit the giant pandas at the National Zoo. Check out an eagle’s nest with the Decorah Eaglecam. (Note, it does stop for the season during the beginning of September, but check back again next summer for live streaming.)

Take care of a pet.

If you have a family pet, invite your kids to play an active part in their care.

My girls are in charge of feeding our dog and our cat as well as letting the dog outside. They come along when we take the animals to visit the veterinarian. My girls have learned so much about caring for animals through our pets.

If you don’t have a pet of your own, you can offer to walk a neighbor’s dog or pet sit for a friend to get a taste of what it’s like to take care of an animal.

Get acquainted with the nonfiction section of the library.

You’ll find all of the animal books grouped together in one section of the library. We visit there often and have brought home so many amazing animal books. Our knowledge has grown and grown with each book we read.

Ask your librarian the next time you visit the library or go exploring and find it on your own. (It’s usually a large section!)

Visit a county fair.

Have you been to a county fair? I’ll admit it’s not always my favorite place to go, but it is a treasure-trove of animal learning.

Go through the animal barns and see the different farm animals. Chat with their owners if they’re around. They love to tell you all about their animals. Plus, your kids will absolutely love the fact that many of the animals were raised by kids their own age. Mind-blowing.

Kids are so fascinated by animals and it's such an easy subject to get them interested in. Here are 10 fun ways to learn about animals that your kids will sure to love.
 

Talk to an expert.

A zoo keeper, park ranger, or veterinarian is a wonderful source of animal information.

We learned so much from the park rangers on our vacation and the girls had the opportunity to feel bison horns and examine animal skulls thanks to the friendly rangers. You’ll usually find that they welcome questions and love curious kids.

Let your kids ask those questions they are wondering about. It’s so much fun and education to meet an expert.

Volunteer at a humane society.

Ask at your local humane society (or other animal shelter) and see if they need volunteers. You and your kids will get the chance to experience animals while serving the community. It’s a win-win all around.

Donate to an animal charity.

Do some research and donate to an animal charity. And, while you’re donating, research the animals they are protecting. Learn why they need your help. It may be a local animal shelter or a large international organization.

Teach your kids about why it’s important to help animals and show them just what they can do to help.

What are your favorite ways to learn about animals?

I’m thrilled to be participating once again a blog hop celebrating World Animal Day. Animals are such an important part of our life and I hope yours too.

Kids are so fascinated by animals and it's such an easy subject to get them interested in. Here are 10 fun ways to learn about animals that your kids will sure to love.

You may also like one of these nature activities:

Family Bird Watching Club

Explore Nature: Leaf Collections

Fun Ways to Explore Nature in Spring

Investigating Spider Webs at Rainy Day Mum

Sight Word Pick and Spell

September 12, 2014 By Terri Thompson

If you have kids learning to read, you know how important sights words are to the learning process. I’m always looking for ways to make learning sight words fun. We’ve play Sight Word Islands on the driveway and now we’re playing a fun Pick & Spell game, which is similar to Bingo. It’s an easy game to play and a fun way to learn your sight words.

Disclosure: There are Amazon Affiliate and other affiliate links in this article which means, at no additional cost to you, we could receive compensation for our recommendations. You can read our full disclosure policy on our Disclosure Page for more details.

Supplies Needed:

Sight word game sheets (click the link to download and print)
Scrap paper
Bag
Manipulatives to cover your letters (glass beads, rocks, pennies, bottle caps, etc.)
A couple of willing players

To prep the game you will need to write each letter of the alphabet on separate pieces of paper. I had some leftovers paper circles from another project, so that is what I used. Put all of your alphabet pieces in a bag.

You’ll also want to print out the sight word game sheets. I used the Dolch sight word list to create the game. You’ll find all the pre-primer words, except for a and I, on the game sheets. (I will be creating game sheets to go with the Primer, Grade One, and Grade Two lists in the coming weeks, so stay tuned!) I chose the Dolch lists because that is the list my girls’ school uses.

How to Play:

The game play is similar to Bingo. Give each child one of the sight word game sheets and a pile of manipulatives. Have one person reach into the bag and pull out a letter. When we played, I was in charge of pulling out the letters, but the kids can also take turns doing this part. After a letter is selected, each child will cover every occurrence of letter on their board. Continue on by pulling out another letter. Keep going until someone has covered every letter on their board. Yay, you’ve got a winner!

This is a fun way to help your child become familiar with these very important sight words. The more fun and playful ways you can employ to teach sight words, the easier it will be to learn them. So the next time you want to review sight words, play a little Pick & Spell!

Crayon Transfer Library Totes

September 9, 2014 By Terri Thompson

I don’t know about you, but I can’t go to the library without a bag to hold all my books. It’s crucial, especially when you like to check out piles of books!

We some fun personalized bags inspired by a new favorite children’s book. Read along to find out how we made our crayon transfer library totes.

*This post is written in partnership with Penguin Kids in celebration of the book The Day the Crayons Quit. They provided us with copies of the books for inspiration. This post contains Amazon Affiliate and other affiliate links. Please see my disclosure for more details.

Draw on sandpaper and transfer your design to a fun bag when you make these Crayon Transfer Library Totes inspired by The Day The Crayons Quit.

Have you ever read The Day the Crayons Quit by Drew Daywalt and illustrated by Oliver Jeffers?

It’s a delightful book that consists of letters from all of Duncan’s crayons who are ready to do something different. We love it!

Penguin Kids invited us to join them in their month-long celebration of this book. The crayons have gone on strike! And, we’ve given them reason to come back and have fun with our crayon transfer library totes.

Draw on sandpaper and transfer your design to a fun bag when you make these Crayon Transfer Library Totes inspired by The Day The Crayons Quit.

Supplies Needed for Your Crayon Transfer Library Totes

Fine sandpaper
Tote bag
Crayons (use your broken pieces for this project)
Newspaper
Iron

Draw on sandpaper and transfer your design to a fun bag when you make these Crayon Transfer Library Totes inspired by The Day The Crayons Quit.

Create Your Drawings

Before beginning the process, decide what you wanted to draw.

We made drawings inspired by all the things the crayons wanted to draw in the book, such as black rainbows and pink dinosaurs and horses.

Use your crayons to draw your picture on your sandpaper. I tested a couple of different types of sandpaper and found that the fine grit worked the best for this project. The coarse grit did not transfer our designs onto the tote bag well at all, so pick up the finest grit you can find.

Draw on sandpaper and transfer your design to a fun bag when you make these Crayon Transfer Library Totes inspired by The Day The Crayons Quit.

Color your pictures as heavy as possible.

This is a great project to use up some of your broken pieces of crayon. The sandpaper will eat away at the crayons, so you won’t want to use your brand new box.

Also, note that because of the iron-on transfer process, if you want to write any words, you will need to write everything backwards!

Draw on sandpaper and transfer your design to a fun bag when you make these Crayon Transfer Library Totes inspired by The Day The Crayons Quit.

Transfer Your Design

Once you’re finished with your drawing, slide a piece of cardboard inside of your tote bag.

Then turn your sandpaper upside down and center it onto your tote bag.

Draw on sandpaper and transfer your design to a fun bag when you make these Crayon Transfer Library Totes inspired by The Day The Crayons Quit.

Place a sheet of newspaper over top. We had scattered bits of crayon on the back of our sandpaper and I did not want that on my iron. The newspaper will protect your iron.

Heat your iron to it’s highest setting and start ironing over the newspaper. Move back and forth over your newspaper to transfer your drawing. You’ll need to iron for a good five minutes.

If you lift up your newspaper, you’ll see wax coming through to the back. This is a good way to see if you’re close.  Avoid lifting the sandpaper until your design is transferred.

Beware, the sand paper is very hot after ironing and will need to cool a bit before you can safely lift it. My girls helped with this process, but it does require close adult supervision.

After your design is transferred, throw your crayon transfer tote bag in the dryer for about 20 minutes to set your design.

Draw on sandpaper and transfer your design to a fun bag when you make these Crayon Transfer Library Totes inspired by The Day The Crayons Quit.

I hope our crayon transfer library bags convince the crayons to come back to work!

Do you want to join in the fun? There are two things you can do.

First, Penguin Kids is sponsoring a Pinterest sweepstakes where you can win a $100 AmEx gift card. You can find the details here at this link. The sweepstakes runs through Sept. 30, 2014. You can also click on the blue crayon below to go to the official Pinterest board for the contest.

Not only that, but I’ve got some extra copies of this book to give away. Yay!! Thank you Penguin Kids for helping me spread the love for The Day the Crayons Quit.
Would you like your own copy? It’s so easy to enter. Just comment below with your favorite Crayon color. I’ll randomly choose 3 of you to receive a hardcover copy of the book. Please make sure to leave me an email address so I can get a hold of you if you win! Sweepstakes ends Sept. 16, 2014.
Giveaway now closed.
Winners are: Virginia, Emily, and Anonymous (krrk80)
Congratulations!

You may also enjoy one of these fun projects:

School Spirit Washer Necklaces

Hole-Punched Bookmark Craft for Kids

Cardboard Tube Yeti Craft for Kids

Simple Ribbon Bookmarks at My Joy-Filled Life

  • « Go to Previous Page
  • Page 1
  • Interim pages omitted …
  • Page 94
  • Page 95
  • Page 96
  • Page 97
  • Page 98
  • Interim pages omitted …
  • Page 190
  • Go to Next Page »

Primary Sidebar

Footer

Categories

Archives

Copyright © 2026 · Designed by The Blog Surgery

Creative Family Fun uses cookies to improve your experience. These cookies provide feedback to our analytics and advertisers. We use the information to track views of the site, where you go and to know if you are a regular visitor or brand new as well as provide a personalized experience where possible. We'll assume you're ok with this, but you can opt-out if you wish.Accept Reject Read More
Privacy & Cookies Policy

Privacy Overview

This website uses cookies to improve your experience while you navigate through the website. Out of these, the cookies that are categorized as necessary are stored on your browser as they are essential for the working of basic functionalities of the website. We also use third-party cookies that help us analyze and understand how you use this website. These cookies will be stored in your browser only with your consent. You also have the option to opt-out of these cookies. But opting out of some of these cookies may affect your browsing experience.
Necessary
Always Enabled
Necessary cookies are absolutely essential for the website to function properly. This category only includes cookies that ensures basic functionalities and security features of the website. These cookies do not store any personal information.
Non-necessary
Any cookies that may not be particularly necessary for the website to function and is used specifically to collect user personal data via analytics, ads, other embedded contents are termed as non-necessary cookies. It is mandatory to procure user consent prior to running these cookies on your website.
SAVE & ACCEPT