• Skip to secondary menu
  • Skip to main content
  • Skip to primary sidebar
  • Skip to footer
  • Home
  • About
    • Email Me
    • Disclosure & Copyright
  • Start Here
  • Subscribe
  • Privacy Policy
  • Books for Moms

Creative Family Fun

Your one-stop shop for kids activities and family fun

  • Facebook
  • Instagram
  • Pinterest
  • Twitter
  • Spelling Activities
  • Family Fun
  • STEM
  • Movie Night
  • Toddler Activities

Preschool Activities

Ready for Kindergarten Book Study: Name Recognition

August 7, 2013 By Terri Thompson

*Disclosure: I was sent a free copy of the book in order the participate in this book study. All opinions are my own. There are Amazon Affiliate and other affiliate links in this article which means, at no additional cost to you, we could receive compensation for our recommendations. You can read our full disclosure policy on our Disclosure Page for more details.

(Image via Deborah Stewart, Teach Preschool)

One of the many benefits from writing this blog has been the amazing people I’ve met.

One such person is Deborah Stewart from Teach Preschool. Deborah is an amazing preschool teacher, knowledgeable in all things early childhood, and is always willing to share her knowledge with you and I.

Now, she’s sharing her knowledge in a brand-new book Ready for Kindergarten!: From Recognizing Colors to Making Friends, Your Essential Guide to Kindergarten Prep. To kick off the book launch, I and several other kid bloggers are participating in a blog book study of the book.

I’ve got a 4-year-old who is only one year away from Kindergarten. Even though I’ve walked this path before (my oldest will be in 1st grader this coming year), I still don’t feel all that prepared to send her to school.

Deborah’s book will be a big help for us throughout the year. The ideas are play-based and easy to incorporate into everyday life.

Even if you only have 10 minutes a day, you can help your child get ready for Kindergarten.

For my part in this book study, I decided to focus on Chapter 12, “It’s All in a Name.”

It’s important for your child to be able to recognize their name by the time they go to Kindergarten. They’ll need this skill to find their supplies, their seat at a table, or even where to hang their coat.

Name recognition is different from writing their name. As Deborah says: “name recognition is being familiar enough with the combination of letter as a whole to recognize them as being her name.”

Here are a few of the ways we’ve helped our girls learn to recognize their name at home:


1. Name puzzles: I made simple name puzzles to help my girls learn their name. My youngest has always loved puzzles, so I thought she would love the challenge of putting together her name. These are very easy to put together. I typed her name in a big, fun font, and then cut into pieces. I cut each letter separately, but you could also cut in syllable chunks. For an even easier version, write your child’s name on an index card and cut between the letters.

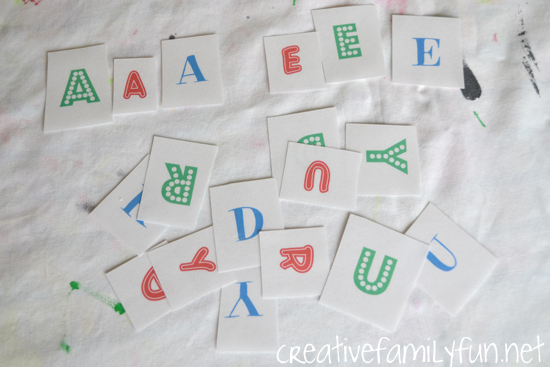
2. Letter Tiles: I typed up several versions of my daughter’s name and cut each letter individually. She can sort them or try to spell her name with them. If you don’t want to make your own letter tiles, use Scrabble tiles or magnetic letters and isolate just the letters needed to spell their name. For a super-simple version of letter tiles, write each letter on an index card.

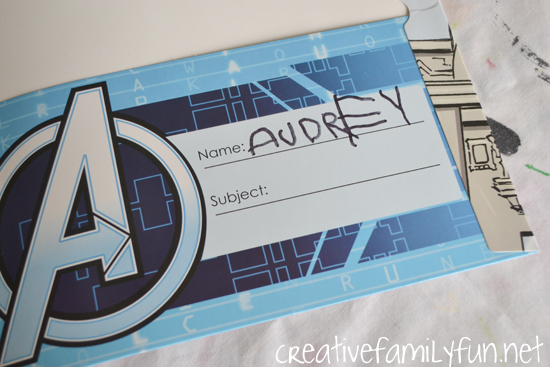
3. Display it! This is probably the simplest and most important way to help your child recognize their name. Label things. My daughter helps us write her name in folders, notebooks, letters, or cards. Label your child’s coat or shoes. Hang name art in their room. Write their name on the back of their artwork. Keep exposing your child to her name in simple, everyday ways and she will be able to recognize her name well before she walks into that Kindergarten classroom for the first time!

Thank you Deborah for the opportunity to review your book and participate in this blog book study!

If you have a preschool-aged child, this book is a perfect reference. Believe me, you won’t feel overwhelmed with buckets of things you need to teach your child. Instead you’ll feel empowered. Deborah offers easy, achievable ideas that don’t involve worksheets or workbooks. Yes, you can get your child Ready for Kindergarten!

Colored Ice Fun

June 6, 2013 By Terri Thompson

I can’t imagine anything more fun and refreshing on a hot summer’s day than playing with ice. So, grab some fun ice cube trays and create some colored ice cubes (or sticks) for some creative fun.

Disclosure: There are Amazon Affiliate and other affiliate links in this article which means, at no additional cost to you, we could receive compensation for our recommendations. You can read our full disclosure policy on our Disclosure Page for more details.

Today I’m happy to welcome Ana from Babble Dabble Do to this space with a fun ice play activity perfect for summer. While you guys are reading this, I’m going to head out to the store to buy some of these fun ice cube trays! Take it away Ana…

Make some simple colored ice to use for creative activities, sensory play, STEM experiments, art projects and more. Colored ice is such a fun tool to use!
Disclosure: This post contains Amazon Affiliate links. Please see my Disclosure Page for more details. 

Hi there, I’m Ana from Babble Dabble Do and I’m excited to be guest posting on Creative Family Fun today!

With summer finally here I’ve been itching to play with ice as a “cool” outdoor activity for the kids. If you’ve been to my blog you know I’m obsessed with color, and food coloring is something I use on a regular basis in our projects.  This week I thought it would be fun to experiment with colored ice and see what interesting activities we could come up with!

Make some simple colored ice to use for creative activities, sensory play, STEM experiments, art projects and more. Colored ice is such a fun tool to use!

Materials:

Water
Food Coloring
Cups/Bowls
Ice cube trays and/or different molds- I used trays that make ice sticks for water bottles. The pieces of ice were like logs, perfect to build and draw with!
Salt and salt shaker
Shaved ice (optional)– use a snow cone maker to make it
Small plates
Spoons or eye droppers
Paper

Make some simple colored ice to use for creative activities, sensory play, STEM experiments, art projects and more. Colored ice is such a fun tool to use!

You’ll need to factor in a little prep time for these activities because you have to freeze things in advance BUT a few minutes of freezing the day before is all you need. Using food coloring, tint several glasses of water with different colors and pour into ice
cube tray molds. Freeze overnight or for several hours.

Building:

Stack your ice cubes on top of one another to try and make a structure. Using drops of water and shaved ice, “glue” the pieces of ice together. “Gluing” only worked for us about half the time. When finished, carefully move the sculpture back into the freezer to fuse it together! If you plan on refreezing, use a sturdy tray underneath the sculpture as too much movement will cause it to break apart.

Make some simple colored ice to use for creative activities, sensory play, STEM experiments, art projects and more. Colored ice is such a fun tool to use!

Salt and Ice Experiment:

I don’t think the interaction of salt and ice ever gets old to watch. Give your child a salt shaker and let them sprinkle salt on the
ice to make holes and give it texture.

Color Mixing:

Using red, blue, and yellow ice sticks and three different bowls, encourage your child to experiment with color mixing. Let them melt two colored ice sticks in the same bowl to make a magical new color appear!

Water Table:

They might not last long in the blazing heat, but colored ice would make a fun addition to a water table.

Drawing with Ice:

You’ll need to use a strong concentration of color for this one to work well; use the ice sticks like crayons to color on paper.

Melting Artwork:

Place several ice sticks on a piece of white paper and let them melt to make a free form painting.

Open-ended Play:

I had originally planned to make only ice sculptures but when I gave my kids the ice sticks they had ideas of their own! They stacked and sorted them and just loved the sensory experience of playing with a cold material.

Make some simple colored ice to use for creative activities, sensory play, STEM experiments, art projects and more. Colored ice is such a fun tool to use!
Ana Luisa Dziengel is an architect, award winning furniture designer, and creatively inspired mom making magic with her three kids in sunny Los Angeles!
Web: http://babbledabbledo.com/
FB: https://www.facebook.com/pages/Babble-Dabble-Do/206167262806000
Twitter: https://twitter.com/BabbleDabbleDo
Pinterest: http://pinterest.com/babbledabbledo/

You may also like one of these activities:

Ice Play

Color Mixing Lab

Indoor Color Scavenger Hunt

Strong or Weak: A Nutrition Game

May 23, 2013 By Terri Thompson

Life has been very busy here at the Creative Family household, so I’ve been very pleased to have been able to provide you with some fabulous guest posts. Today, I’d like to welcome Malia from Playdough to Plato. Take it away Malia!

Disclosure: There are Amazon Affiliate and other affiliate links in this article which means, at no additional cost to you, we could receive compensation for our recommendations. You can read our full disclosure policy on our Disclosure Page for more details.


Strong or Weak: A Nutrition Game for Kids {Playdough to Plato}

Several years ago, my oldest son was at the beginning of his first picky eater phase. Hoping to make dinner time more enjoyable, I asked a parent educator to share her favorite survival tips. One of the simplest suggestions she mentioned was the one that helped my son the most: she taught children to call healthy food “strong” and junk food “weak”. By using words that explained how the foods would make them feel when they were finished eating, kids were motivated to eat healthier.

I immediately decided to make the vocabulary switch in our home too. That night, I placed my son’s plate in front of him and pointed out all of the strong foods he’d be eating. We had a nice, two-year-old conversation about the difference between “strong” and “weak foods” and then, to my surprise, he picked up his spoon and started eating. No complaints. No food on the floor.

We have been using those same words ever sense and I’m convinced that they have saved us from countless picky eater tantrums. I thought it would be fun to share the trick with all of you by creating a simple, kid-friendly game to help make the learning curve move quickly.

To play Strong-Weak, I first gathered a few supplies:

  • The Very Hungry Caterpillar book (optional)
  • A pile of strong foods and weak foods
  • A long piece of tape
  • Two signs: One that says “strong” and one that says “weak”

My now 3.5 year old son and I cozied up to read The Very Hungry Caterpillar together. It was the perfect introduction to our game because the caterpillar feels so sick after eating the cupcake, lollipop and other weak treats.

Strong or Weak: A Nutrition Game for Kids {Playdough to Plato}

Then, I invited him over to our play space. The pile of food was spread out on a tray. Directly in front of it was a piece of tape sandwiched between the signs “strong” and “weak” like this:

Strong or Weak: A Nutrition Game for Kids {Playdough to Plato}

It was time for my son to get to work sorting. He raced from the food pile to the labels, laying each item in the right spot. Most foods landed either on the right or left side, but he decided to place a few (including this box of macaroni and cheese) smack dab in the middle since it was a little of both.

Strong-Weak was a perfect combination of fun and nutritional learning. I hope your family will enjoy this picky eater trick too!

Meet Malia

Malia is a former kindergarten teacher turned stay at home mom who shares hands-on reading, writing and math games at Playdough to Plato. Stop by to download a free set of alphabet tracing cards and follow the blog by email.
 

All About Monkeys: A Learning Basket

May 15, 2013 By Terri Thompson

Recently my girls decided they wanted to learn everything they could about monkeys. And not just monkeys, all primates.

We went to the library and checked out books about monkeys, chimpanzees, and gorillas. We got both fiction and nonfiction.

Then we settled in for a day all about monkeys.

Disclosure: There are Amazon Affiliate and other affiliate links in this article which means, at no additional cost to you, we could receive compensation for our recommendations. You can read our full disclosure policy on our Disclosure Page for more details.

I filled a basket with all the supplies we would need for our projects and wrote down all the projects we were going to try.

We started by reading. We read as many books as we could handle, then we moved on to our projects. (See Amazon carousel below for book recommendations.)

Next, we made little books to remember what we learned.

We drew pictures of what monkeys ate, where they lived, and even traced our hands since monkeys have similar hands to ours.

The booklets were simple. I cut pieces of brown construction paper in half, and then folded each of those halves in half. I sandwiched two together and then stapled them along the folds.

We also did a fun hand print craft that I found on Red Ted Art. They turned out so cute!

Next we made monkey masks. I was inspired by this paper plate craft on Learn Create Love. Here’s what we did.

Supplies Needed:

Paper plate
Brown paint
Brown construction paper
Glue
Scissors
Large craft stick

We painted our paper plate brown.

While they were drying, we cut our mouth and ears out of brown construction paper.

We traced a sour cream lid for the mouth circle and the lid to one of my spice bottles for the ears.

After the paint was dry, I helped the girls by cutting out the eye holes.

The girls glued their mouth and ears onto their paper plates and used a black marker to add the details.

They also glued a craft stick onto the bottom of their masks so that they could hold it up to their face. Then it was time to run around and act like monkeys – OohOohAahAah!

Playful Ways to Learn Shapes

May 10, 2013 By Terri Thompson

Shapes are fun to learn and there are a multitude of hands-on ways to learn them.

Here are some of the playful ways we’ve learned about shapes.

Disclosure: There are Amazon Affiliate and other affiliate links in this article which means, at no additional cost to you, we could receive compensation for our recommendations. You can read our full disclosure policy on our Disclosure Page for more details.

Go outside and play shape hospscotch

Play hide & seek with circles while going on this fun circle hunt

Shapes are all around us. See how many you can find with this outdoor shape hunt

Have fun sewing while you sew up these simple sewing circles

Get crafty and make these fun square monsters

Go on a square hunt and find out how many squares are around your house

Get out the sidewalk chalk and make a driveway shape maze

Paint Square Cat!

Go on a shape hunt and round up all the shapes you can find in your house

Create beautiful watercolor resist circles

Make pretty shape collages

Have fun with giant circles on your driveway

What are some other fun ways to learn about shapes?

  • « Go to Previous Page
  • Page 1
  • Interim pages omitted …
  • Page 4
  • Page 5
  • Page 6
  • Page 7
  • Page 8
  • Interim pages omitted …
  • Page 12
  • Go to Next Page »

Primary Sidebar

Footer

Categories

Archives

Copyright © 2025 · Designed by The Blog Surgery

Creative Family Fun uses cookies to improve your experience. These cookies provide feedback to our analytics and advertisers. We use the information to track views of the site, where you go and to know if you are a regular visitor or brand new as well as provide a personalized experience where possible. We'll assume you're ok with this, but you can opt-out if you wish.Accept Reject Read More
Privacy & Cookies Policy

Privacy Overview

This website uses cookies to improve your experience while you navigate through the website. Out of these, the cookies that are categorized as necessary are stored on your browser as they are essential for the working of basic functionalities of the website. We also use third-party cookies that help us analyze and understand how you use this website. These cookies will be stored in your browser only with your consent. You also have the option to opt-out of these cookies. But opting out of some of these cookies may affect your browsing experience.
Necessary
Always Enabled
Necessary cookies are absolutely essential for the website to function properly. This category only includes cookies that ensures basic functionalities and security features of the website. These cookies do not store any personal information.
Non-necessary
Any cookies that may not be particularly necessary for the website to function and is used specifically to collect user personal data via analytics, ads, other embedded contents are termed as non-necessary cookies. It is mandatory to procure user consent prior to running these cookies on your website.
SAVE & ACCEPT