• Skip to secondary menu
  • Skip to main content
  • Skip to primary sidebar
  • Skip to footer
  • Home
  • About
    • Email Me
    • Disclosure & Copyright
  • Start Here
  • Subscribe
  • Privacy Policy
  • Books for Moms

Creative Family Fun

Your one-stop shop for kids activities and family fun

  • Facebook
  • Instagram
  • Pinterest
  • Twitter
  • Spelling Activities
  • Family Fun
  • STEM
  • Movie Night
  • Toddler Activities

Learning Activities for Kids

Hot Chocolate Science Experiment

October 17, 2018 By Terri Thompson

I love my girls’ natural curiosity when it comes to science. So, when my daughter asked me “Can we do a hot chocolate science experiment?” I knew it was time to get creative.

Working together, we came up with an amazing STEM activity.

When we make instant hot chocolate, we dissolve the contents of the packet into hot water. We decided to find out if temperature affected the speed that it dissolves.

This hot chocolate science experiment is a fun way to learn about how temperature affects the rate at which hot chocolate dissolves. It's a great STEM activity that uses items you probably already have in your kitchen.

Let’s get started!

Disclosure: There are Amazon Affiliate and other affiliate links in this article which means, at no additional cost to you, we could receive compensation for our recommendations. You can read our full disclosure policy on our Disclosure Page for more details.

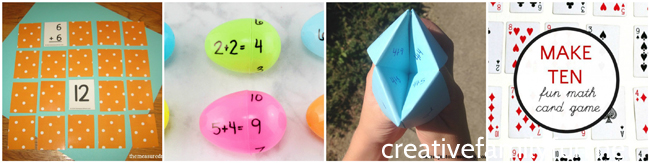
Supplies Needed for Your Hot Chocolate Science Project

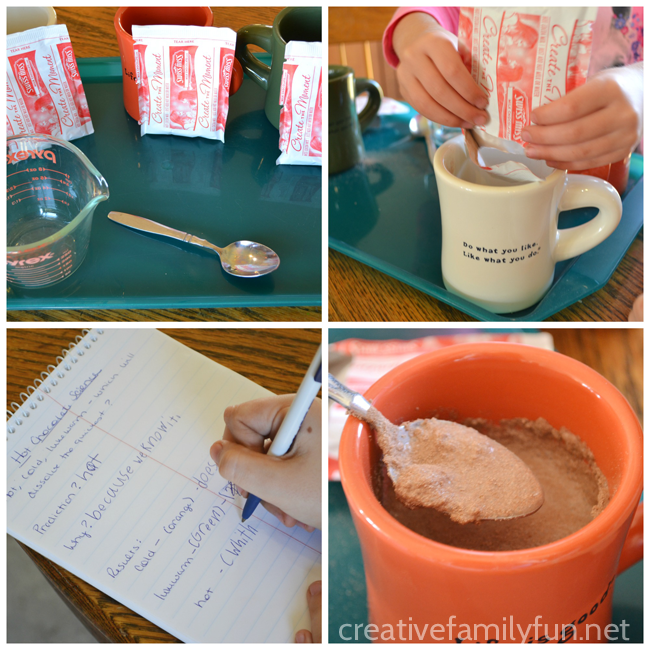
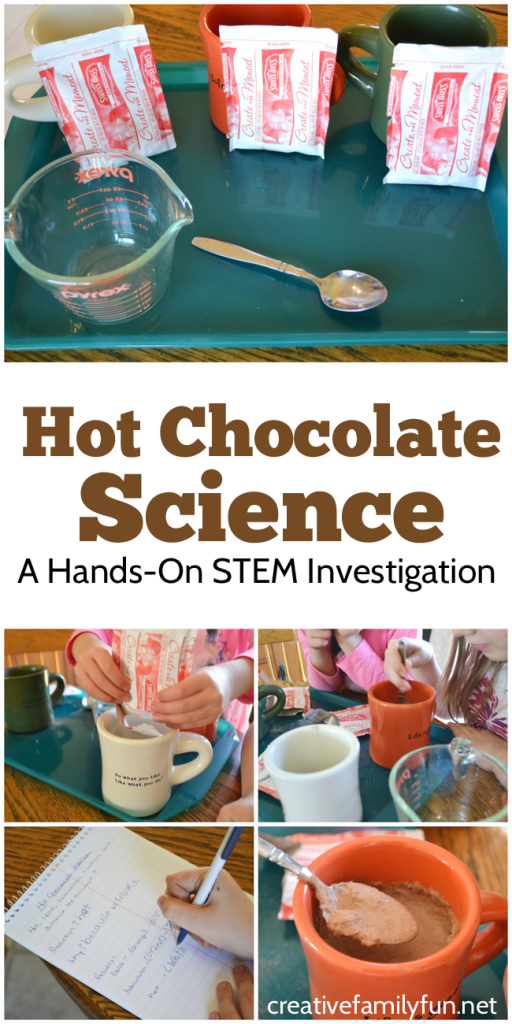
First we needed to gather our supplies. Luckily most of the items were already in our kitchen.

Here’s what you’ll need:

Three heat-proof mugs
Three packets of instant hot chocolate
Measuring cup
Water
Spoons
Stopwatch or timer
Notebook for recording your results.

Fun cocoa science project

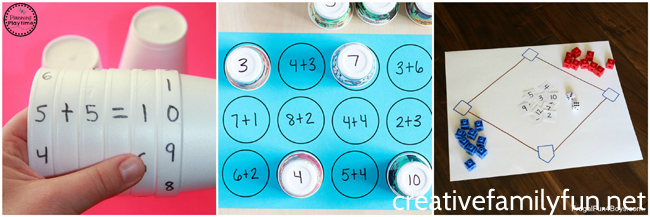
How to Do Your Hot Chocolate Science Experiment

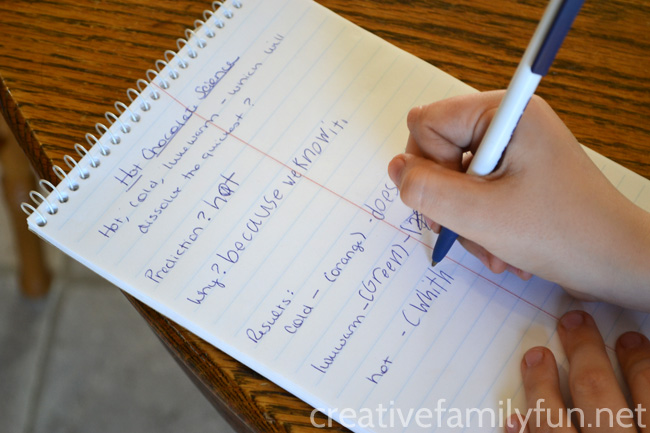
We started our experiment by making a prediction. Which temperature of water would dissolve the hot chocolate the quickest?

The girls made their prediction (they chose hot) and then it was time to experiment.

We started by emptying our hot chocolate packets into our mugs, one packet per mug. Then we moved on to testing the different temperatures of water.

We tested each temperature, one at a time. We were very vague with our temperatures, using ice cold water, room temperature water, and hot water. You can always add a kitchen thermometer to measure the temperature of the water to add an extra measurement element to your experiment.

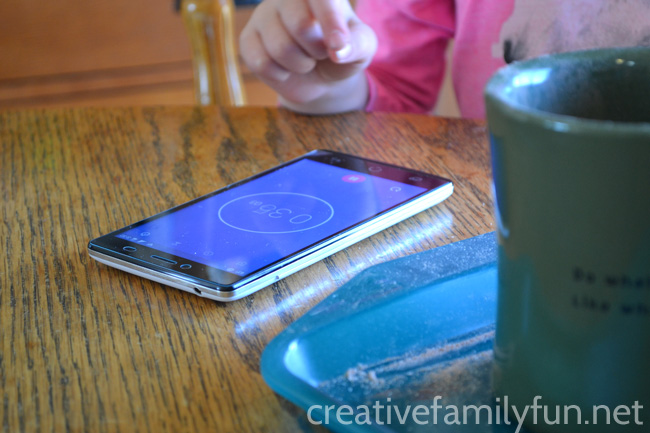
My girls took turns measuring the water, stirring, and operating the stopwatch. We used the digital stopwatch on my phone to time how long the hot chocolate took to dissolve.

STEM Hot Chocolate Activity

For each cup, we measured 6 oz. of water. We used cold water from our refrigerator over ice, lukewarm water from the tap, and I did my grown-up duty and heated water in the microwave for the last mug.

Once the water was added to a mug, one girl started the stopwatch and the other started stirring. We stopped the stopwatch as soon as we saw the hot chocolate had dissolved.

Does Hot Chocolate Dissolve Faster in Hot Water or Cold Water?

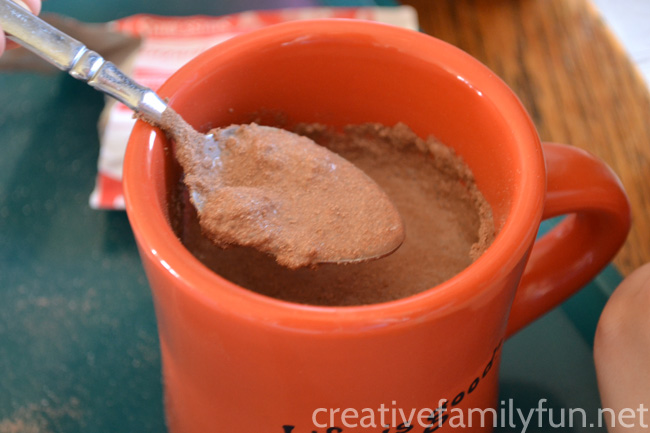
We started with the ice cold water. My oldest daughter was in charge of the stirring. She stirred and stirred and stirred some more. It wouldn’t dissolve. Eventually, we made the decision to stop after three minutes. You can see the results above. Disgusting!

We moved on to the room temperature water, which clocked in at 1 minute 38 seconds. And, then the hot water, which only took 28 seconds.

The results:  hot water takes the least amount of time. We predicted that because the instructions said to use hot water when we made hot chocolate. (And, it’s called hot chocolate after all…) But, now we know why we need to use hot water.

Why Does Hot Chocolate Powder Dissolve Faster in Hot Water?

Hot water has more energy than cold water. With more energy, the molecules in the water move faster breaking down the hot chocolate mix quicker.

Once we finished writing our results, we unceremoniously dumped the cold water hot chocolate sludge down the kitchen sink. Ick.

What happened to the other two mugs? They were topped with a dollop of whipped cream and enjoyed!

Yield: 1 experiment

Hot Chocolate Science Experiment

This hot chocolate science experiment is a fun way to learn about how temperature affects the rate at which hot chocolate dissolves.

Learn about how temperature affects the rate at which hot chocolate mix dissolves with this fun science experiment.

Prep Time 5 minutes
Active Time 25 minutes
Total Time 30 minutes
Difficulty Easy
Estimated Cost under $5

Materials

  • 3 heat-proof mugs
  • 3 packets of instant hot chocolate
  • Water
  • Stopwatch or timer
  • Notebook for recording your results

Tools

  • Measuring cup
  • Spoons

Instructions

  1. Make a prediction. Which temperature of water will dissolve the hot water the fastest: cold, room temperature, or hot? Write it in your notebook.
  2. Empty your hot chocolate packets into your mugs. You need three total mugs with one packet per mug.
  3. Get your stopwatch or timer reader to start measuring your time.
  4. Choose the first mug and add 1 cup (8 oz.) of cold water to your mix.
  5. Start the timer and start stirring. Record how long it takes for your hot chocolate mix to dissolve.
  6. Grab your next mug and add 1 cup of room temperature water to your hot chocolate mix.
  7. Start the timer and start stirring. How long did this one take?
  8. Next, grab your last mug. Have a grown up add 1 cup of hot water to your mug.
  9. Start the timer and start stirring. Record the time it takes to dissolve.
  10. Compare your results to your prediction. Were you right?

Notes

Use a kitchen thermometer to measure the temperature of your water if you would like. This is a great way to practice reading a thermometer and adds more data to your experiment.

Recommended Products

As an Amazon Associate and member of other affiliate programs, I earn from qualifying purchases.

  • Vremi 12 oz Coffee Mugs Set of 6 - White Ceramic Porcelain Mugs for Women and Men - Hot Tea Mug Set with Cool Decorative Red Orange Yellow Green Blue Purple Color Trim - Microwave and Dishwasher Safe
    Vremi 12 oz Coffee Mugs Set of 6 - White Ceramic Porcelain Mugs for Women and Men - Hot Tea Mug Set with Cool Decorative Red Orange Yellow Green Blue Purple Color Trim - Microwave and Dishwasher Safe
  • Nestle Hot Chocolate Mix, Hot Cocoa, Rich Chocolate Flavor, Made with Real Cocoa, 0.71 oz Packets (Pack of 50)
    Nestle Hot Chocolate Mix, Hot Cocoa, Rich Chocolate Flavor, Made with Real Cocoa, 0.71 oz Packets (Pack of 50)
  • Pyrex Prepware 1-Cup Glass Measuring Cup
    Pyrex Prepware 1-Cup Glass Measuring Cup
© Terri Thompson
Project Type: Kitchen Science Experiment / Category: Science
This hot chocolate science experiment is a fun way to learn about how temperature affects the rate at which hot chocolate dissolves.

Our hot chocolate science experiment and turned out great!

More STEAM Activities to Try

Hockey Science

Christmas Science: Grow the Grinch’s Heart

Edible STEM Projects for Kids

Marshmallow Engineering STEAM Building Challenge

28 Awesome STEM Challenges for the Elementary Classroom at Teach Junkie

STEM Activities for Kids in the Kitchen at iGame Mom

Do more science at home:

We love Green Kid Crafts boxes because they provide easy, ready-to-do STEM activities we can try at home. You’ll receive easy-to-follow instructions plus the supplies that you need for up to 6 activities. You can get a monthly subscription or buy a single themed box. If you enjoyed our hot chocolate science experiment, you may enjoy the Kitchen Science or the monthly Discovery Box subscription.

Click here for the Kitchen Science box.

Click here for the monthly Discovery Box subscription.

Are you looking for more activities?

Join our fun Facebook community, Creative Family Fun for Busy Families, for daily activities that are great for kids and families. We’ll chat, share, and have fun. It’s a safe and private place to share idea for family and kids activities. I’d love for you to join me! Just click the link below, request to join, and answer the questions (they’re easy, I promise). Come join the fun! Join the Creative Family Fun for Busy Families community here.

Halloween Shape Poems Writing Activity

October 2, 2018 By Terri Thompson

Most of the projects we’ve done for Halloween have been crafts.

We do love crafts, especially holiday crafts. But, I did want to sneak in a little learning with some Halloween Shape Poems.

My 2nd grader can get overwhelmed quite easily when it comes to writing, but she’s always responded well to poetry.

She gets excited about writing poetry, so many of our at-home writing projects are about poetry.

When considering after school projects, it’s important to keep your kids interests in mind. I don’t want to contribute to burn out!

Disclosure: There are Amazon Affiliate and other affiliate links in this article which means, at no additional cost to you, we could receive compensation for our recommendations. You can read our full disclosure policy on our Disclosure Page for more details.

Create the poetry invitation

I kept the set-up for this project easy by going with simple Halloween-inspired shapes.

I don’t have any printables for you this time because I drew the shapes on construction paper.

We used a ghost and a pumpkin. A witch’s hat and candy corn are a couple of other simple shapes you could consider.

Don’t worry about perfection. My pumpkin is a bit wonky, but I think I’m the only one that noticed!

Draw your shape, outline it in black, and cut it out.

Then, take a ruler and draw straight lines approximately 1-1/2 inches apart. My girls still write big, so I wanted to give them plenty of room. Plus, I didn’t want to overwhelm them with too many lines.

Write your Halloween Shape Poems

The fun thing about these Halloween shape poems is that you already know your subject. Your subject is the shape of your paper.

Sometimes choosing a topic can be the biggest hurdle to jump when it comes to creative writing.

The only rules about shape poems are that the poem should be about the shape and it should fit inside the shape. Other than that, anything goes!

Get a little creative when you write these fun Halloween shape poems. It's a fun Halloween writing activity for elementary kids.

Each girl wrote at their own level. My 2nd grader decided to write a rhyming poem and had fun with some silly rhymes.

My kindergartner just wrote a few lines about pumpkins. She came up with the lines and I wrote them for her. This is not a project I would have done with her alone at this point, but because she always wants to participate, I gave her extra help to keep it skill appropriate.

I love the poems the girls came up with and they are quite pleased with it themselves.

They’ve already added music to the ghost poem. If they keep that up, I may have to start calling them aspiring song writers.

Note: This post was originally published on October 21, 2014. Updated and republished October 2, 2018.

You may also like one of these fun Halloween activities:

Halloween Neighborhood Scavenger Hunt

No-Sew Ghost Pencil Toppers

Jack-O-Lantern Pencil Holder

Halloween Sensory Writing Tray at Growing Book by Book

Printable Halloween Story Telling Prompts for Kids at Kitchen Counter Chronicles

Get inspired to write with some Halloween poetry

Here are some great Halloween poetry books to share with your kids that will provide inspiration for this writing activity.

Do more fun activities with your family

Join our fun Facebook community, Creative Family Fun for Busy Families, for daily activities that are great for kids and families. We’ll chat, share, and have fun. It’s a safe and private place to share ideas for family and kids activities.

I’d love for you to join me! Just click the link below, request to join, and answer the questions (they’re easy, I promise). Come join the fun! Join the Creative Family Fun for Busy Families community here.

Fun Addition Fact Games for Kids

September 28, 2018 By Terri Thompson

Practice makes perfect. Right?

So, when you kids are working on addition, you’re going to find yourself practicing math facts with your kids at home.

If you’re anything like me, you’re going to want to make it fun. Luckily, I’ve got your back. I found some fun addition fact games for kids that will make them eager to learn and they’ll have fun while they’re at it!

Get your kids excited about learning with one of these fun and easy-to-prep DIY Addition Fact Games for kids. Learning can be so much fun.

You’ll find both printable games and easy DIY games.

You’ll be able to pull any of these together in minutes, so you’ll be able to get right to learning.

Disclosure: There are Amazon Affiliate and other affiliate links in this article which means, at no additional cost to you, we could receive compensation for our recommendations. You can read our full disclosure policy on our Disclosure Page for more details.

Get your kids excited about learning with one of these fun and easy-to-prep DIY Addition Fact Games for kids. Learning can be so much fun.

Fun Addition Fact Games for Kids

Practice your doubles facts with this fun printable Domino Doubles Game.

Math Fact Sticks are a fun and simple way to practice any set of addition facts.

Or play a similar game with this Halloween-Themed Addition Fact Pick and Find Sticks activity.

Get out your toy cars for this fun Making 10 game. 

Get your kids excited about learning with one of these fun and easy-to-prep DIY Addition Fact Games for kids. Learning can be so much fun.

Practice making ten with fun game inspired by Green Eggs and Ham.

It’s fun to practice your addition facts with this Fine Motor Addition Bead Threading.

Practice your Plus 1 Addition Facts with this printable Acorn Memory Game from Live Over C’s.

You can also practice your doubles plus 1 facts with this fun train-themed game from Royal Baloo.

Get your kids excited about learning with one of these fun and easy-to-prep DIY Addition Fact Games for kids. Learning can be so much fun.

Or practice your doubles facts with this printable memory game from The Measured Mom.

Make use of plastic Easter eggs for this fun way to practice addition facts from Homeschool Preschool.

Use a cootie catcher to practice math facts with this fun activity from There’s Just One Mommy.

Get out the playing cards to practice making 10 with this addition card game from What Do We Do All Day.

Get your kids excited about learning with one of these fun and easy-to-prep DIY Addition Fact Games for kids. Learning can be so much fun.

Use Styrofoam cups to make this fun math facts activity from Planning Playtime.

This math facts activity with paper cups from Fun Learning for Kids is another fun addition game with cups.

Your little baseball fans will love this Math Facts Baseball game from Frugal Fun for Boys and Girls.

Which of these addition fact games for kids are you going to try?

Get your kids excited about learning with one of these fun and easy-to-prep DIY Addition Fact Games for kids. Learning can be so much fun.

You may also like one of these fun math activities:

Number Line Secret Code Math Activity

Counting On Card Game

Fill-in-the-Blank Hundred Chart Puzzles

Fun LEGO Math Games

Chalkboard Spelling Word Erase

September 26, 2018 By Terri Thompson

I love having a chalkboard at home.

We practice math and sight words on it. We draw pictures and create elaborate scenes for our toys. And, we sometimes leave sweet notes for each other.

Now, we’re going to use it to practice our spelling words with this Chalkboard Spelling Word Erase activity.

Practice spelling words with this simple idea, Chalkboard Spelling Word Erase. It's so easy to set up and a fun way to learn.

Disclosure: There are Amazon Affiliate and other affiliate links in this article which means, at no additional cost to you, we could receive compensation for our recommendations. You can read our full disclosure policy on our Disclosure Page for more details.

How to set-up

You’ll need a chalkboard, chalk, paint brush, and a cup of water.

This is another one of those activities that is super-easy to set up. It won’t take any longer than it takes to fill up the cup of water.

Practice spelling words with this simple idea, Chalkboard Spelling Word Erase. It's so easy to set up and a fun way to learn.

Practice spelling with Chalkboard Spelling Word Erase

Have your child write out their spelling words with chalk, then use the paintbrush and water to erase all the words. That’s it. Simple, isn’t it?

Your child will be writing their words twice – a perfect amount for spelling practice at home.

We’ve also found that this is a fun way to take a practice spelling test.  Then we’ll write any words that we missed correctly and erase them in water.

Note: You may want to keep a rag available to wipe off the excess water. My daughter has a tendency to use A LOT of water when erasing her words. I can’t imagine she’s the only kids like this!

Practice spelling words with this simple idea, Chalkboard Spelling Word Erase. It's so easy to set up and a fun way to learn.

About the chalkboard

Having a chalkboard at home is really handy, but I know not everyone has one or even has room to keep one.

We’ve got two different chalkboards. The first (and the one used most often) is the top of a table. I simply painted the top of an old table that we keep in the playroom with chalkboard paint. Voila! Instant chalkboard. Plus, it serves a dual purpose as a table.

The other chalkboard we have was the upcycled top of an old, cheap bedside table. I removed the top, painted it with the chalkboard paint, and now we have a small chalkboard we can carry all over the house. Both were easy and cheap.

The next time you want to practice spelling words, grab a chalkboard instead of paper for Chalkboard Spelling Word Erase.

Practice spelling words with this simple idea, Chalkboard Spelling Word Erase. It's so easy to set up and a fun way to learn.

Buy the 31 Ways to Practice Spelling Words Ebook for more spelling ideas

You can purchase a printable form of this book for $7.50 with all 31 spelling ideas included. The book is designed to print and turn into a half-page size booklet. It’s perfect to keep at your homework station. Your kids can flip through and find a fun way to practice their spelling words.

The ideas will be convenient and ready to use. No need to turn on the computer every day for ideas.

Most activities require little to no prep time. And, if you make sure you have all the supplies on the Master Supply List (included in the book) on hand, you’ll be able to do any of these fun spelling word ideas any time.

Click here for my sales page or on the image below to purchase for $7.50.

Leaf Shape Collage for Toddlers and Preschoolers

September 19, 2018 By Trisha

Is it feeling like fall where you are?

Fall is a great time to explore leaves. Add this leaf shape collage for toddlers and preschoolers to your autumn leaf theme.

It’s perfect for working on fine motor skills and learning shapes.

Disclosure: There are Amazon Affiliate and other affiliate links in this article which means, at no additional cost to you, we could receive compensation for our recommendations. You can read our full disclosure policy on our Disclosure Page for more details.

Leaf Shape Collage for Toddlers and Preschoolers

This leaf activity can easily be modified to different ages and abilities.

For toddlers, you’ll want to prep everything ahead of time. They’ll be simply adding shapes to their contact paper leaves.

You can allow preschoolers to complete more of the steps on their own. Let them trace the leaves or cut out the paper shapes.

Materials Needed for the Leaf Shape Collage

Contact paper (find this near the shelf liners in the kitchen department)

Leaves (can use real, artificial, or printed on paper)

White paper (for tracing leaves)

Writing utensil (for tracing leaves)

Colored paper (can be printer paper, construction paper, scrapbook paper, recycled paper, etc.)

Scissors

Masking tape or painter’s tape

How to Make a Leaf Shape Collage

Start by tracing your leaves onto white paper.

Cut out the leaves and trace them onto contact paper.

I chose to trace them onto paper first because the paper is easier to work with than the leaves.

If you are tracing multiples of the same leaf onto contact paper, it will make it easier to use a paper template.

Cut the leaf shape out of your contact paper. Remove the backing and lay the sticky side up.

Use masking tape or painter’s tape to keep the contact paper leaf from moving around.

Next, cut small shapes from your colored paper.

You can use small paper punches or hole punches. Under supervision, this is a job for an older preschooler. Teach them how to use the punch safely and correctly.

Talk to your children about the paper shapes they see. Can they name the shapes? Now is a great time to introduce any shape names they are not familiar with.

What shape does he want to use first?

My toddler is currently in love with the color yellow, so he wanted a lot of yellow shapes on his sticky leaf.

He enjoyed placing each shape onto the contact paper.

Picking up those tiny shapes is awesome fine motor practice.

Once the leaves are finished, add another layer of contact paper sticky side down.

Then, cut out your leaf shapes.

While my toddler was busy adding more and more circles to his leaf shape collage, my 4 year old worked on punching stars and created two leaves. The bottom two leaves in the picture above were created by her.

My toddler was super proud of what he created, too.

If you had fun with this activity, you can find more fun and simple crafts for toddlers here. Have fun together!

More Leaf Themed Activities for Toddlers and Preschoolers

Leaf Name Sticky Wall – work on name recognition with a contact paper sticky wall

Go Leaf Collecting – make a bag to collect your nature finds

Learn your ABCs with this fun Leaf Hunt Alphabet Game.

Make some Leaf Man Art – take your leaf collection and create some art

Make pretty autumn leaves and learn shapes with this fun fine motor craft for toddlers and preschoolers, a simple Leaf Shape Collage.
  • « Go to Previous Page
  • Page 1
  • Interim pages omitted …
  • Page 16
  • Page 17
  • Page 18
  • Page 19
  • Page 20
  • Interim pages omitted …
  • Page 61
  • Go to Next Page »

Primary Sidebar

Footer

Categories

Archives

Copyright © 2026 · Designed by The Blog Surgery

Creative Family Fun uses cookies to improve your experience. These cookies provide feedback to our analytics and advertisers. We use the information to track views of the site, where you go and to know if you are a regular visitor or brand new as well as provide a personalized experience where possible. We'll assume you're ok with this, but you can opt-out if you wish.Accept Reject Read More
Privacy & Cookies Policy

Privacy Overview

This website uses cookies to improve your experience while you navigate through the website. Out of these, the cookies that are categorized as necessary are stored on your browser as they are essential for the working of basic functionalities of the website. We also use third-party cookies that help us analyze and understand how you use this website. These cookies will be stored in your browser only with your consent. You also have the option to opt-out of these cookies. But opting out of some of these cookies may affect your browsing experience.
Necessary
Always Enabled
Necessary cookies are absolutely essential for the website to function properly. This category only includes cookies that ensures basic functionalities and security features of the website. These cookies do not store any personal information.
Non-necessary
Any cookies that may not be particularly necessary for the website to function and is used specifically to collect user personal data via analytics, ads, other embedded contents are termed as non-necessary cookies. It is mandatory to procure user consent prior to running these cookies on your website.
SAVE & ACCEPT