• Skip to secondary menu
  • Skip to main content
  • Skip to primary sidebar
  • Skip to footer
  • Home
  • About
    • Email Me
    • Disclosure & Copyright
  • Start Here
  • Subscribe
  • Privacy Policy
  • Books for Moms

Creative Family Fun

Your one-stop shop for kids activities and family fun

  • Facebook
  • Instagram
  • Pinterest
  • Twitter
  • Spelling Activities
  • Family Fun
  • STEM
  • Movie Night
  • Toddler Activities

Terri Thompson

Watercolor and Salt: Exploring Antigua and Barbuda Through Art

April 6, 2015 By Terri Thompson

Stop six in Project: Around the World took us to the sandy beaches of Antigua and Barbuda. The islands, located in the West Indies, became an independent nation in 1981. You can see Antigua and Barbuda on a map here. Many of the citizens today are descendants of African slaves brought by the British to work on sugar plantations. The sugar trade was once the main source of income for Antigua and Barbuda, but has since been replaced by tourism. Its pleasant climate, beautiful beaches, and world-class sailing draws tourists all year round.
Disclaimer: This post contains Amazon Affiliate links. Please see my disclosure for more details.


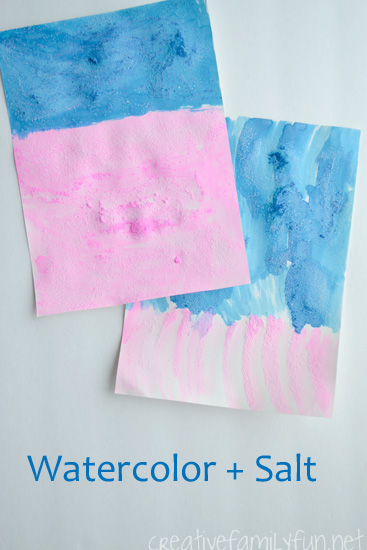
We took our inspiration for our art projects from the beautiful beaches of Antigua and Barbuda, specifically the pink sand beaches. (You can see plenty of beach images here at the Visit Antigua and Barbuda website.) I thought it would be the perfect project to experiment with watercolor and salt.
Supplies Needed:
Watercolor paper
Liquid watercolor
Salt
The project was very, very simple. The girls used pencil to draw a very light dividing line between the sand and the ocean on their watercolor paper. Then they started painting. They would paint a bit at a time and stop and sprinkle salt over the wet watercolor. They went bit by bit until they had covered their entire page. Once the paintings were completely dry, I shook both of them over a trash can to get rid of all the excess salt. Since I knew our paper would get rather wet during the process, I had the girls use watercolor paper which is thicker and better able to handle all the wet paint.
The painting itself was very simple, just two colors. We used the salt to create texture and add interest to the sand. The girls decided they liked the salt so much (of course) that they also added it their water. After all, the ocean is full of salt water! I love how the paintings ended up looking like an abstract beach scene using texture and blocks of color instead of detail.
It was so much fun talking a virtual tour of the beautiful beaches of Antigua and Barbuda. I’m so glad you came along!
If you would like to see the rest of our stops during Project: Around the World, please click here or on the image below.
Note: Facts about Antigua and Barbuda all came from this book, Antigua and Barbuda (Cultures of the World) by Sara Louise Kras, which we used for reference throughout this project.
 

Clay African Baskets: Exploring Angola Through Art

March 26, 2015 By Terri Thompson

Our fifth stop in our journey around the world through art was Angola. Angola is located in south-western Africa. (You can see it on a map here.) The Portuguese began exploring and settling in Angola in the 1400’s. Angola was a Portuguese colony until it gained independence in 1975 following almost 15 years of warfare. Angola still faces extreme poverty and social problems today.
Despite a lack of books about Angola, we were able to find many resources on the web. We found a culture that was rich in art. We found beautiful wood carvings, like this intricately carved chair. We also found amazing baskets. (See some examples here.) All of these examples show how an everyday object can be made beautiful. We took our inspiration from those baskets to create our Angola art project.
Disclaimer: This post contains Amazon Affiliate links. Please see my disclosure for more details.
How can you make your own version of these baskets? That question had me thinking for awhile. We couldn’t actually make our own baskets, so I had to come up with an alternative. Finally, I settled on the idea of clay pots painted in the style of the baskets. My friend Cerys at Rainy Day Mum has a baker’s clay recipe that I’ve been wanting to try, so I made up a batch. Please click here to get the recipe. I followed her recipe exactly and had enough clay for both of our pots.


The girls found the clay very easy to work with. They made simple pinch pots to create their basket shapes. They tried several versions before they settled on their preferred shape. Plus, they just really enjoyed the feel of the soft dough and wanted to play with it for awhile. After they were satisfied, I put the pots on a foil-lined baking sheet and dried them in the oven. Do check on it frequently. Our pots dried quicker than I had anticipated. (We typically use salt dough which can take a very long time to dry. I loved that this dried so much quicker.)


Even after the oven drying, we let our pots sit out over night to cool before painting. You don’t need to wait as long as we did. We were just busy and didn’t have a chance to paint until the next day. We used regular craft paint for our decorations. (This was the brand we used. Any similar paint would also work.) The clay was very easy to paint and we only needed one coat for full coverage. The girls used three different shades of brown for their designs.


No, they’re not carbon copies of the Angola baskets we saw. But, I think the girls really captured the feel of the baskets. They enjoyed the process and made it all their own. Plus, we had a lot of conversation about how talented the basket-makers are.
I hope you’re enjoying our virtual trip around the world through art. If you would like to see details of this project, please see my introductory post. You can find all the previous projects we did here or by clicking on the graphic below.
 

Watercolor Easter Eggs Garland

March 24, 2015 By Terri Thompson

I only have a few Easter decorations and, unfortunately, I have no idea where they are.

Luckily, I’ve got two girls that are always willing to make new decorations for me.

I set up a simple art invitation for the girls one day and now I have two beautiful Watercolor Easter Eggs garlands.

Get out your watercolors and make a pretty Easter banner. This simple Watercolor Easter Eggs Garland is simple to make, is a fun art project for kids, and make a pretty homemade Easter decoration.

Disclosure: CraftProjectIdeas.com provided us with the awesome watercolors for this project. All ideas are my own. There are Amazon Affiliate and other affiliate links in this article which means, at no additional cost to you, we could receive compensation for our recommendations. You can read our full disclosure policy on our Disclosure Page for more details.

Get out your watercolors and make a pretty Easter banner. This simple Watercolor Easter Eggs Garland is simple to make, is a fun art project for kids, and make a pretty homemade Easter decoration.

Set up your art invitation

I love surprising the girls with a fun project after school. This time, I set up a simple art invitation.

I cut Easter egg shapes from plain white paper and set them out along with watercolors and black permanent markers.

The challenge was to decorate the eggs for Easter.

Get out your watercolors and make a pretty Easter banner. This simple Watercolor Easter Eggs Garland is simple to make, is a fun art project for kids, and make a pretty homemade Easter decoration.

Make your watercolor Easter eggs

They got to work. The girls decided to draw their designs using the permanent marker.

You will want to make sure you use a permanent marker for this project. If you use washable markers, the watercolors will smear the marker lines.

Once they had their designs drawn, the girls used our watercolors to paint their eggs. We had striped eggs, polka dots, flowers, a ladybug, geometric designs, and more.

Each one was different!

Get out your watercolors and make a pretty Easter banner. This simple Watercolor Easter Eggs Garland is simple to make, is a fun art project for kids, and make a pretty homemade Easter decoration.

When the eggs were dry, I used clear tape to attach them to a string and make the garland.

We’ve got them hanging over a window.

Yay! We’ve got Easter decorations now!

Get out your watercolors and make a pretty Easter banner. This simple Watercolor Easter Eggs Garland is simple to make, is a fun art project for kids, and make a pretty homemade Easter decoration.

This was such an easy art invitation to set up for the girls. They loved creating and spent a long afternoon at the table. I even had to cut out more Easter egg shapes because we ran out before they were done creating.

If you’re looking for a fun Easter project, look no further than this simple idea for a Watercolor Easter Eggs Garland.

Get out your watercolors and make a pretty Easter banner. This simple Watercolor Easter Eggs Garland is simple to make, is a fun art project for kids, and make a pretty homemade Easter decoration.

You may also enjoy one of these fun Easter activities for kids:

Easter Egg Dye Pour Painting

Egg Carton Easter Basket

Shake Art Easter Eggs

Easter Egg Potato Stamping at How Wee Learn

Math Homework 101: How to Use a Number Line

March 19, 2015 By Terri Thompson

Okay parents, it’s time to chat. I’ve heard from so many people both online and in real life and they are all frustrated with their kids’ math homework. How are we supposed to help them if we have no idea how to help?

I know you’ve got tons of questions because I did too. Things like how to use a number line or what is a hundred chart?

Like it or not, our kids are learning math differently from the way we did. Contrary to a lot of Facebook memes and viral posts, it’s not an inferior way. It’s not. You’re just going to have to trust me on this for awhile.

In fact, I’ll be honest with you, I believe the way I was taught is inferior. My kids will have the advantage when it comes to math.

More than likely you've seen a number line come home in your child's homework, but do you know how to use a number line and how to help your child?

Disclosure: This post contains Amazon Affiliate and other affiliate links. Please see my Disclosure Page for more details.

I’ve taken the time to figure out these new methods of math, and I’m here to help.

I’ve read all the worksheets, asked questions, and did my own homework. And while I was at it, I’ve learned to really like this stuff!

I hear your frustrations, though, and I want to help. You want to be able to help your child with their homework and I’m going to help you do that. We’ll be starting with how to use a number line.

Disclaimer: If you’re a long time reader, you already know this. But, if you’re new here, I want to make sure you know that I’m not a teacher. But, I have done my homework (pardon the pun). I’m talking to you as parent to parent. I want to help you help your kids!

More than likely you've seen a number line come home in your child's homework, but do you know how to use a number line and how to help your child?

What’s the big deal with the number line?

Let’s start with the number line. I know you’ve seen this, especially in the early years of elementary school.

You may also be shaking your head right now and saying: I know what a number line is. I know you do.

But, we’re chatting about it because I’ve seen the worry. “My child will never learn how to do math in their head if they become dependent on a number line!” “You can’t do algebra (or any kind of higher math) if you have to use a number line!” That’s just not true.

Think of the number line the same way you think of training wheels on a bicycle. Your child will eventually learn to ride on just two wheels and never put those training wheels on again.

Just because your child learns to add and subtract using a number line does not mean they will always use one. I promise.

More than likely you've seen a number line come home in your child's homework, but do you know how to use a number line and how to help your child?

How to use a number line

The number line is a visual tool. It helps kids see the relationship between the numbers. They can see the operation they are doing. Addition moves forward on the number line and subtraction moves backwards. In preschool, it’s a simple tool to show number order.

If your kid is just learning addition or if they are struggling with the facts, don’t be afraid to let them use a number line.

If you’re adding 5 plus 3, start at the number 5. Take 3 hops and you’re at your answer.

Very simple, I know. But remember, these simple things didn’t become simple until we’ve learned them well. By using a number line, your child is going to see how addition changes a number. The number will always get bigger because they are going forward on the number line.

You can also illustrate the basics of subtraction on the number line. For the problem, 10 minus 6, start at 10. Count 6 hops back and you’ve got your answer. Your child can now see that subtraction is moving backward on a number line. They see that their number will always get smaller.

More than likely you've seen a number line come home in your child's homework, but do you know how to use a number line and how to help your child?

Keep a number line at home

Now that you know how to use a number line, I’m sure you want to have one to keep at home.

Your child’s teacher may have already provided you with number line. But, if not, I’ve created one for you.

Click the link below to download and print. There are two number lines per sheet.

If you want to reuse it, laminate it. Your child can then use a dry erase marker with the number line. You can also put it between 2 sheets of clear contact paper and still use a dry erase marker. If you don’t have a laminator (and how many of us actually do), use a small item like a coin or a LEGO minifig to bounce around on the number line instead of drawing on it.

Download the number line here.

For more number line practice, check out these posts:

Number Line Secret Codes

Play and Learn with Number Lines

And stay tuned for more Math Homework 101 posts. We’re going to tackle all those things that frustrate you about your kid’s homework! Find all the Math Homework 101 Posts you’ve missed here.

Puff Paint Ski Mountains: Exploring Andorra Through Art

March 12, 2015 By Terri Thompson

Disclosure: This post contains Amazon Affiliate links. Please see my disclosure for more details.
Quick geography pop quiz: who can tell me, without looking at a map, where Andorra is located? I’ve got a passion for geography, so I knew a bit about where it was located. But, once I started researching, I could find very little information about Andorra beyond a map. No books, no other projects, only information from travel sites. And that, my friends, is one reason why we are doing this project. We want to learn about all corners of the world and not just the most popular countries. I’ll admit that I struggled with the planning for Andorra for awhile. I didn’t have a book to read to the kids and I had a very hard time coming up iwth an idea for an art project?

Andorra is a tiny European country located in the Pyrenees Mountains between France and Spain. See Andorra on a map here. It’s size is only 181 squares miles and completely mountainous. Most citizens live in the few valley areas. Tourism is the biggest industry in Andorra, especially mountain sports. (Source: Oxford Atlas of the World) Since winter sports are so important to Andorra’s economy, we decided to focus on that for our art project. We made our own puff paint to create a simple ski mountain.

Supplies Needed:
Microwave puff paint (see recipe below)
Blue paper
2 craft sticks
2 toothpicks
Paint
Glue
Special note on this project: This project is more focused on the process and the experience and doesn’t necessarily produce a piece of art that you can keep. I’ll be creating a digital scrapbook of our journey with Project: Around the World, because I know I won’t have room to keep every project. So, it’s not important to me to be able to preserve each project. I will give you tips to help you preserve this project if you desire. But, despite this, the project is fun and it helped us learn about the country of Andorra.


Before we started using our puff paint, we painted our skis and poles. The girls used regular craft paint in some of their favorite colors. You only need to paint one side of each since you will be gluing them down. We found that painting these first gave them plenty of time to dry before it was time to glue to our snowy mountains.
Next, it was time to make the puff paint. It’s a simple recipe to follow and the girls loved being able to make their own paint. Our recipe made enough for both projects with just a little bit left over.
Microwave Puff Paint:
1/3 c flour
1 tsp baking powder
1 tsp salt
1/3 cup of water
Mix all of the dry ingredients in a bowl. Add water slowly, stirring after every couple of tablespoons, until your paint is the consistency of paste (thick, but spreadable). We used just shy of the 1/3 cup of water.
You need to use the paint soon after you make it, so don’t try to make it too far ahead of time!


We used our paint to make the side of a snowy mountain. We found that a small sponge brush works better than a regular paintbrush with this paint. If you don’t have a sponge brush, cut up a regular sponge into smaller pieces or you can even use your fingers.
Once we were satisfied with our mountains, it was time to pop it into the microwave to dry. I microwaved each in 10 second increments until the paint started getting hard. Our pieces were not fully dry when I felt the paper getting hot (after about 30 seconds). This did give us enough to work with because the paint was hard on the surface. It will continue to dry in the air. Once we microwaved our pictures, we glued our skis and ski poles to the mountain.


I’ll admit that I’ve never found this puff paint to keep well. Nonetheless, we love using it! The paper will curl up on the sides once it’s fully dry and it will crack and flake after awhile. There are a couple of options if you would like to keep these projects. First, you can make the pictures on thick cardboard, like the side of a packing box. Paint the sky blue after microwaving. This will prevent the curling of the edges, but not the cracking and flaking. You can also recreate this project with regular white paint. You won’t have the puffy effect, but you will be able to keep the project if that is what is important to you.


Even though we’ve just barely started our artistic journey around the world, we’ve already found such great value in it. We’re learning about countries that aren’t often introduced to kids until they’re much older and we’re doing it in a way that will help us remember a bit about them. This approach is also helping us find the beauty and the positive aspects of each location. I want to teach my girls to see the value in each and every corner of the world. I can’t wait to do more projects!
If you’d like to follow along with Project: Around the World, you can find the introduction post here. Or click here or on the image below to see all the projects we’ve done so far.


  • « Go to Previous Page
  • Page 1
  • Interim pages omitted …
  • Page 88
  • Page 89
  • Page 90
  • Page 91
  • Page 92
  • Interim pages omitted …
  • Page 190
  • Go to Next Page »

Primary Sidebar

Footer

Categories

Archives

Copyright © 2026 · Designed by The Blog Surgery

Creative Family Fun uses cookies to improve your experience. These cookies provide feedback to our analytics and advertisers. We use the information to track views of the site, where you go and to know if you are a regular visitor or brand new as well as provide a personalized experience where possible. We'll assume you're ok with this, but you can opt-out if you wish.Accept Reject Read More
Privacy & Cookies Policy

Privacy Overview

This website uses cookies to improve your experience while you navigate through the website. Out of these, the cookies that are categorized as necessary are stored on your browser as they are essential for the working of basic functionalities of the website. We also use third-party cookies that help us analyze and understand how you use this website. These cookies will be stored in your browser only with your consent. You also have the option to opt-out of these cookies. But opting out of some of these cookies may affect your browsing experience.
Necessary
Always Enabled
Necessary cookies are absolutely essential for the website to function properly. This category only includes cookies that ensures basic functionalities and security features of the website. These cookies do not store any personal information.
Non-necessary
Any cookies that may not be particularly necessary for the website to function and is used specifically to collect user personal data via analytics, ads, other embedded contents are termed as non-necessary cookies. It is mandatory to procure user consent prior to running these cookies on your website.
SAVE & ACCEPT