• Skip to secondary menu
  • Skip to main content
  • Skip to primary sidebar
  • Skip to footer
  • Home
  • About
    • Email Me
    • Disclosure & Copyright
  • Start Here
  • Subscribe
  • Privacy Policy
  • Books for Moms

Creative Family Fun

Your one-stop shop for kids activities and family fun

  • Facebook
  • Instagram
  • Pinterest
  • Twitter
  • Spelling Activities
  • Family Fun
  • STEM
  • Movie Night
  • Toddler Activities

Terri Thompson

DIY Trail Mix Bar

July 26, 2013 By Terri Thompson

Our daily snacks are usually quite simple: fruit, apple sauce, cheese sticks, or crackers.

I had been trying to come up with a few more interesting choices when the thought occurred to me that I could let the girls make their own snacks with a DIY Trail Mix Bar.

Trail mix can be quite yummy and is a perfect snack choice. It’s healthy, fun to make, and fun to eat.

But this time, instead of making it myself, I let each girl control the ingredients in her trail mix.

Disclosure: There are Amazon Affiliate and other affiliate links in this article which means, at no additional cost to you, we could receive compensation for our recommendations. You can read our full disclosure policy on our Disclosure Page for more details.

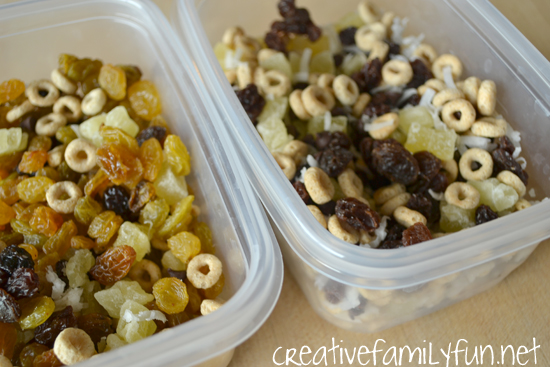
I purchased dried fruit and cereal that I knew the girls would love.

We used golden raisins, raisins, dried pineapple, mini chocolate chips, coconut, and Cheerios.

You can add whatever your kids would enjoy.

Trail Mix Ingredients

Raisins
Golden Raisins
Dried Pineapple
Dried Cranberries
Dried Papaya
Banana Chips
Coconut
Sunflower Seeds
Pumpkin Seeds
Nuts
Cheerios
Any dried cereal
Mini chocolate chips
Mini M&M’s
Granola
Pretzels

Select 5 to 6 ingredients that you know your child enjoys.

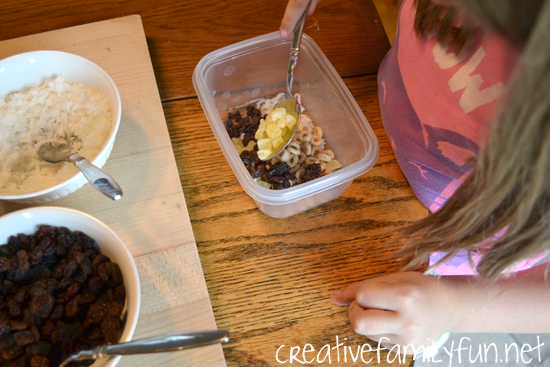
Place each in a separate bowl with a spoon.

Give each child a separate storage container and let them mix up their own custom trail mix.

My girls love having control of their own snack and they mixed up enough to enjoy for several days.

I know this is not going to be a one-time only activity for us.

It was easy to put together and their girls had fun.

Plus, they’re not going to complain at snack time when they’re presented with their own kid-made snack!

Do you have any other ideas for trail mix ingredients? Let me know and I’ll add them to the list!

Raspberry White Chocolate Ice Pops

July 24, 2013 By Terri Thompson

We’ve been a bit addicted to ice pops this summer.

We’ve tried recipes from magazines, cook books, and Pinterest.

We discovered what we liked and what we didn’t like.

Then we started making our own concoctions.

These Raspberry White Chocolate Ice Pops are one of our recent creations. They are easy to make, drip free, and are very yummy.

This is the perfect recipe for your kids to try. My girls are able to make them from start to finish with just a little bit of instruction from me.

Disclosure: There are Amazon Affiliate and other affiliate links in this article which means, at no additional cost to you, we could receive compensation for our recommendations. You can read our full disclosure policy on our Disclosure Page for more details.

Ingredients:

1 package White Chocolate Instant Pudding
2 cups milk
1 (6 oz). container of raspberry yogurt
6 ice pop molds (or 6 paper cups with wooden sticks)

1. Combine your pudding mix and milk in a bowl. Whisk together until smooth and thick.

2. Fill your molds 1/3 full of your pudding mix. Add about 2 Tablespoons yogurt to the mold, then top off with your pudding mix again.

3. Run a table knife up and down in each mold to swirl and mix the flavors. Add the sticks. Freeze overnight or until completely frozen.

4. Remove from molds and enjoy!

*Special note on our ice pop molds: I’ve tried many different ice pop molds over the years and these Tovolo Groovy Ice Pop Molds are my favorites. They’re BPA free, the stick stays put, and the shape is awesome. Ours were purchased through Amazon.

You can mix up the pudding and yogurt flavors to come up with fun combinations of your own. Try chocolate pudding and vanilla yogurt, vanilla pudding and strawberry yogurt, or white chocolate pudding and blueberry yogurt. All would be delicious!

What is your favorite ice pop combination?

10 Ways to Play this Weekend: Week 48

July 20, 2013 By Terri Thompson

  1. Do some water squirter math with Kitchen Counter Chronicles
  2. Read a story from around the world with Kid World Citizen
  3. Interview your grandparents using these free printable interview questions from The House of Hendrix
  4. Draw on the floor with Hands On: How We Grow!
  5. Make your own soap crayons to play with in the bath with Childhood 101
  6. Work a 3-D word search with No Time for Flash Cards
  7. Set up a simple lab to explore rock and minerals with An Everyday Story
  8. Make frozen s’mores for a special treat with Reading Confetti
  9. Draw a life-size whale with KC Edventures
  10. Make a simple and cute firefly craft with There’s Just One Mommy

How are you going to play this weekend?

Classic Crafts ~ Painted Rock Turtles

July 16, 2013 By Terri Thompson

Did you ever paint rocks when you were a kid?

It’s always so much fun to see what you can create on a smooth rock surface.

We’ve painted rocks in the past, that time using abstract designs.

But, this time we wanted to turn them into animals.

Keep reading and I’ll show you how to turn a rock into a cute turtle.

Disclosure: There are Amazon Affiliate and other affiliate links in this article which means, at no additional cost to you, we could receive compensation for our recommendations. You can read our full disclosure policy on our Disclosure Page for more details.

Supplies Needed:

Craft paint in varying colors of green
Paint brushes
Rocks (Look for rocks that are rounded with a smooth surface)

*Note: I used acrylic craft paint for a darker, even coat. Try to avoid washable paint as it will not cover the rock’s surface as well.

Step 1: Paint the top and sides of your rock in the medium green color.

Step 2: Use your darkest green color to paint circles in increasing size from the middle to the end of your medium green paint.

Step 3: Still using your dark green, paint straight lines from the center to the outer edges. It will look like a spider web.

Step 4: Use all three of your colors to create spaces of differing colors; use a pattern or just randomly paint in the different sections.

At this point, you can also use your darkest green color to paint a head, tail, and feet on your turtle.

There you have it, a cute little round turtle.

But, don’t limit yourself to turtles. Create a whole menagerie of animals! Try a ladybug, snail, mouse, or frogs.

You are only limited by your imagination.

10 Ways to Play this Weekend: Week 47

July 13, 2013 By Terri Thompson

  1. Play in a pretty rose petal sensory tub with NurtureStore
  2. Draw with homemade glow-in-the-dark sidewalk chalk with Coffee Cups and Crayons
  3. Play backyard Bananagrams with Constantly Lovestruck
  4. Make fun superhero sock puppets with Seven Thirty Three
  5. Play a dump truck counting game with Inspiration Laboratories
  6. Pretend to be Michelangelo and create a masterpiece with Classic Play
  7. Make fruit kabobs to share with Kids Activities Blog
  8. Make a homemade skee ball game from a cardboard box with Frugal Fun for Boys
  9. Learn left and right with a little fancy footwork with Childhood 101
  10. Make your own paper plate tambourines with Creative Family Fun
How are you going to play this weekend?
  • « Go to Previous Page
  • Page 1
  • Interim pages omitted …
  • Page 113
  • Page 114
  • Page 115
  • Page 116
  • Page 117
  • Interim pages omitted …
  • Page 190
  • Go to Next Page »

Primary Sidebar

Footer

Categories

Archives

Copyright © 2026 ยท Designed by The Blog Surgery

Creative Family Fun uses cookies to improve your experience. These cookies provide feedback to our analytics and advertisers. We use the information to track views of the site, where you go and to know if you are a regular visitor or brand new as well as provide a personalized experience where possible. We'll assume you're ok with this, but you can opt-out if you wish.Accept Reject Read More
Privacy & Cookies Policy

Privacy Overview

This website uses cookies to improve your experience while you navigate through the website. Out of these, the cookies that are categorized as necessary are stored on your browser as they are essential for the working of basic functionalities of the website. We also use third-party cookies that help us analyze and understand how you use this website. These cookies will be stored in your browser only with your consent. You also have the option to opt-out of these cookies. But opting out of some of these cookies may affect your browsing experience.
Necessary
Always Enabled
Necessary cookies are absolutely essential for the website to function properly. This category only includes cookies that ensures basic functionalities and security features of the website. These cookies do not store any personal information.
Non-necessary
Any cookies that may not be particularly necessary for the website to function and is used specifically to collect user personal data via analytics, ads, other embedded contents are termed as non-necessary cookies. It is mandatory to procure user consent prior to running these cookies on your website.
SAVE & ACCEPT