• Skip to secondary menu
  • Skip to main content
  • Skip to primary sidebar
  • Skip to footer
  • Home
  • About
    • Email Me
    • Disclosure & Copyright
  • Start Here
  • Subscribe
  • Privacy Policy
  • Books for Moms

Creative Family Fun

Your one-stop shop for kids activities and family fun

  • Facebook
  • Instagram
  • Pinterest
  • Twitter
  • Spelling Activities
  • Family Fun
  • STEM
  • Movie Night
  • Toddler Activities

Toddler Activities

Cardboard Roll Stamping

September 8, 2011 By Terri Thompson

I’ve been hoarding empty toilet paper rolls lately (yes, an embarrassing admission). So to avoid ending up on an episode of Hoarders and also to make my husband happy, I decided it was time to use up some of them.I had recently ran across the idea of toilet paper roll stamping on Tot School and decided to give it a go. I squished the rolls into shapes at one end and set out a few colors of tempura paint (I loosened the paint up a bit with water because it seemed a bit too thick for this project).

Disclosure: There are Amazon Affiliate and other affiliate links in this article which means, at no additional cost to you, we could receive compensation for our recommendations. You can read our full disclosure policy on our Disclosure Page for more details.

The girls were eager to get started, as you can probably tell by the hand hovering over the paint! My requests of “let Mommy take a quick picture” were just not heeded. Oh well, I let them go at it.

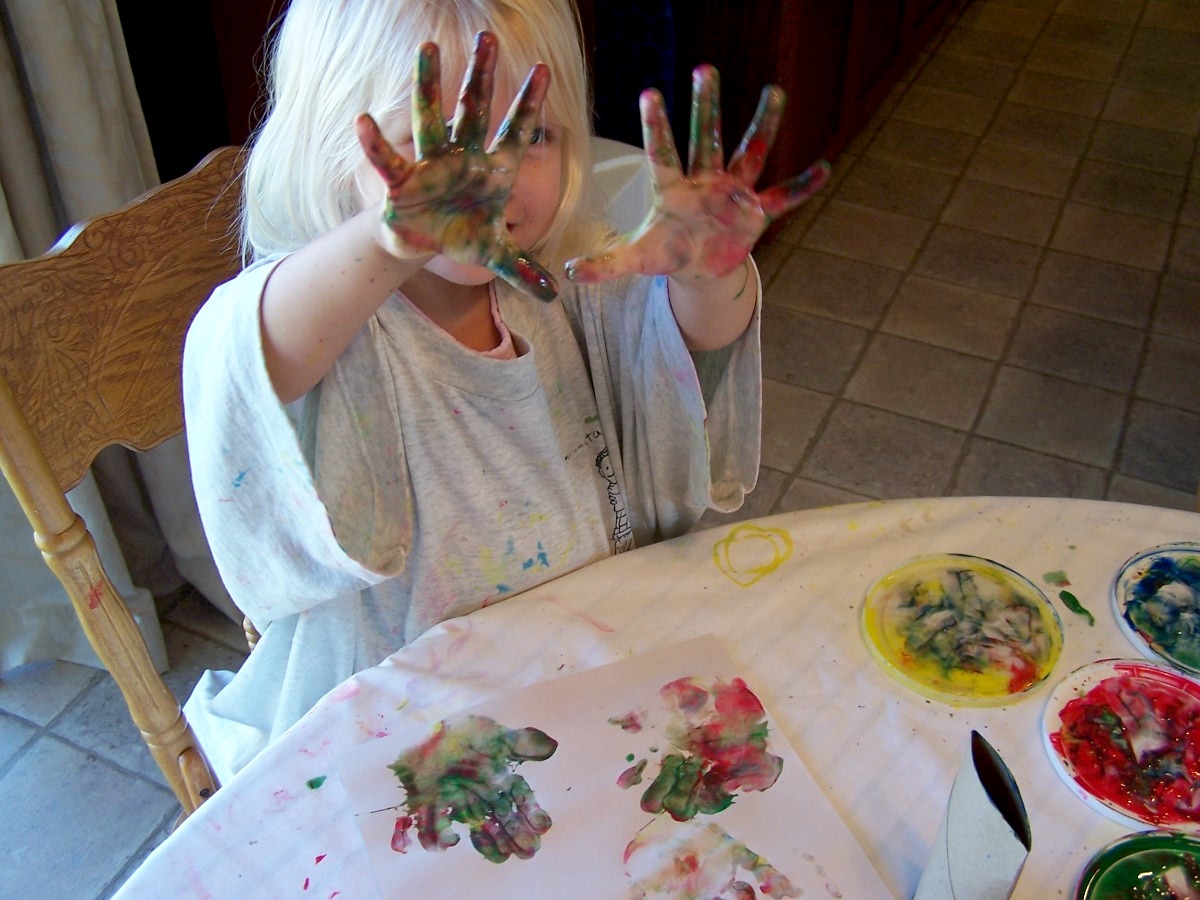
They started stamping and enjoyed the process immensely. Then AJ discovered that you could mix colors by dipping your roll in multiple colors of paint. Then Lizzie decided to get her fingers involved. Suddenly…

Yes, indeed, cardboard roll stamping evolved into handprint art! Look at those hands!

The girls used up many pieces of paper and all the paint I had set out. They had tons of fun and I’m proud of myself for just sitting back and letting them create (which is sometimes quite hard for me). Take a look at all of the finished products!

What have you been creating lately?

Window Art

September 7, 2011 By Terri Thompson

Art doesn’t have to always be confined to paper or even clay. After bookmarking this wonderful post by You’ll Thank Me One Day and arming myself with the revolutionary idea that wet craft foam sticks to windows, I set the girls to work.They each had a bowl of water, a paint brush and a bowl of craft foam shapes. The original concept was to paint the back of the shapes, then stick them on the window.

Well, evidently that wasn’t a satisfactory way to do this. The girls immediately started painting the water directly on the window then sticking the pieces on. Well, that works too!

Disclosure: There are Amazon Affiliate and other affiliate links in this article which means, at no additional cost to you, we could receive compensation for our recommendations. You can read our full disclosure policy on our Disclosure Page for more details.

They stuck and stuck and stuck. They experimented a bit and learned that you can dip your shapes in water and they’ll stick to the window as well. That was a revolutionary idea for these two!

All in all, they loved this project.I know they’ll be asking to do it again and again and I’ll pull out the bowl of foam shapes again and again.

After all, what’s not to love. It’s relatively mess free (other than wiping up water from the floor) and it kept little feet from getting underneath me while cooking dinner (loved that bonus feature).

The next time you need to spark a little bit of creativity, remember, wet foam sticks to glass!

Making Masks

September 6, 2011 By Terri Thompson

Lizzie loves to find a project waiting for her when she wakes up in the morning.This morning, to go along with our art week, I put out several elements the girls could use to make masks.

I cut out simple mask shapes from paper plates, added crayons, a small basket of star stickers, glue sticks and the paper plate scraps I had cut off the masks.

It didn’t take her long this morning to get to work. AJ soon joined the fun.

Disclosure: There are Amazon Affiliate and other affiliate links in this article which means, at no additional cost to you, we could receive compensation for our recommendations. You can read our full disclosure policy on our Disclosure Page for more details.

They glued, stuck stickers and largely ignored the crayons (oh well).Lizzie opted for a more formal arrangement of the stickers, while AJ was all about the glue sticks. She added quite a few of the paper plate scraps.

I left them free to do as they pleased and only helped when asked. I love to see what they come up with on their own. Here are the finished products:

What are you and your kids up to this week?

Suncatchers

August 24, 2011 By Terri Thompson

It’s a sunny day, the kids are freshly bathed after a mud pie baking session, and you need to cook dinner.So what do you do?

Grab a bucket of tissue paper scraps, a roll of contact paper, and some painter’s tape. It’s time to make suncatchers!

Disclosure: There are Amazon Affiliate and other affiliate links in this article which means, at no additional cost to you, we could receive compensation for our recommendations. You can read our full disclosure policy on our Disclosure Page for more details.


The process was easy.I taped up a couple of squares of contact paper to our patio window and told the girls to cover all the sticky bits with the tissue paper.

After that, they started working.

They were quite deliberate at times and others times they just started randomly sticking tissue paper. This was one of those projects that needed very little supervision, so I got to sit back and enjoy watching the process. (Oh, and cook dinner too!)

Once they were finished, I covered their handiwork with another square of contact paper. and we hung them back up on the window.

The results were quite colorful and very pretty! And now we still have a bucket full of tissue paper… I need to think of some more craft projects!

P.S. You can find another fun version of this at Mamma May I Blog… tissue paper fish!

Butterfly Color Match

August 16, 2011 By Terri Thompson

After we packed away all the contents of our space basket, I started working on filling it with butterfly-related games and books.One activity I decided to make myself was a butterfly color match game.

My first stop was our local home improvement store for paint swatches. I picked some of the brightest colors I could find and made sure I had two each of the ten colors.

You could have as many or as few different colors as you want, as long as you have two of each color.

Disclosure: There are Amazon Affiliate and other affiliate links in this article which means, at no additional cost to you, we could receive compensation for our recommendations. You can read our full disclosure policy on our Disclosure Page for more details.

I kept one swatch of each color whole and used the other to cut a butterfly shape.Then, I showed the girls the cards and how they match. But, other than that, I have no actual rules to this game.I tend to let them use the cards as they want.

There are times when they make up a game that I never would have even thought of. Usually, though, they do play a match game with this set.

I had my 2-year-old in mind when I made this game. I knew this would be something she would be able to do and it would allow her to participate and play with the butterfly basket.It’s so easy to find activities at my 4-year-old’s level and much, much harder to find easier, toddler-friendly activities.

I added several other activities, games and books in the basket, all with the butterfly theme. Don’t worry! I’ll share them all here soon!

  • « Go to Previous Page
  • Page 1
  • Interim pages omitted …
  • Page 11
  • Page 12
  • Page 13
  • Page 14
  • Go to Next Page »

Primary Sidebar

Footer

Categories

Archives

Copyright © 2025 ยท Designed by The Blog Surgery

Creative Family Fun uses cookies to improve your experience. These cookies provide feedback to our analytics and advertisers. We use the information to track views of the site, where you go and to know if you are a regular visitor or brand new as well as provide a personalized experience where possible. We'll assume you're ok with this, but you can opt-out if you wish.Accept Reject Read More
Privacy & Cookies Policy

Privacy Overview

This website uses cookies to improve your experience while you navigate through the website. Out of these, the cookies that are categorized as necessary are stored on your browser as they are essential for the working of basic functionalities of the website. We also use third-party cookies that help us analyze and understand how you use this website. These cookies will be stored in your browser only with your consent. You also have the option to opt-out of these cookies. But opting out of some of these cookies may affect your browsing experience.
Necessary
Always Enabled
Necessary cookies are absolutely essential for the website to function properly. This category only includes cookies that ensures basic functionalities and security features of the website. These cookies do not store any personal information.
Non-necessary
Any cookies that may not be particularly necessary for the website to function and is used specifically to collect user personal data via analytics, ads, other embedded contents are termed as non-necessary cookies. It is mandatory to procure user consent prior to running these cookies on your website.
SAVE & ACCEPT