• Skip to secondary menu
  • Skip to main content
  • Skip to primary sidebar
  • Skip to footer
  • Home
  • About
    • Email Me
    • Disclosure & Copyright
  • Start Here
  • Subscribe
  • Privacy Policy
  • Books for Moms

Creative Family Fun

Your one-stop shop for kids activities and family fun

  • Facebook
  • Instagram
  • Pinterest
  • Twitter
  • Spelling Activities
  • Family Fun
  • STEM
  • Movie Night
  • Toddler Activities

Terri Thompson

Poetry Basket for Creative Writing Fun

April 23, 2013 By Terri Thompson

We love poetry. We own a few kid’s poetry books and frequent the poetry section at the library.

We’ve experimented with writing our own poems and illustrating poetry.

Recently, I wanted to delve a bit deeper and see how we could be inspired by one poem. I was inspired by Montessori poetry baskets, but wanted to add in more elements to inspire my Kindergartner to do a little creative writing.

Disclosure: There are Amazon Affiliate and other affiliate links in this article which means, at no additional cost to you, we could receive compensation for our recommendations. You can read our full disclosure policy on our Disclosure Page for more details.

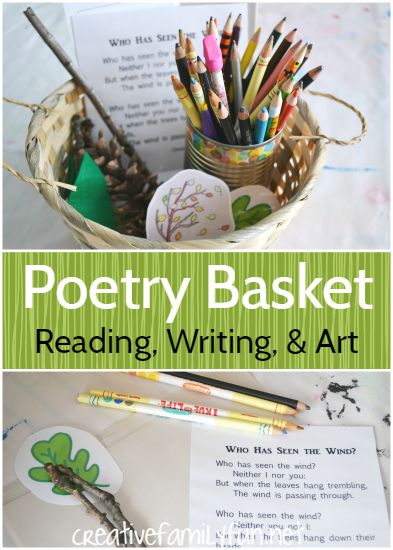
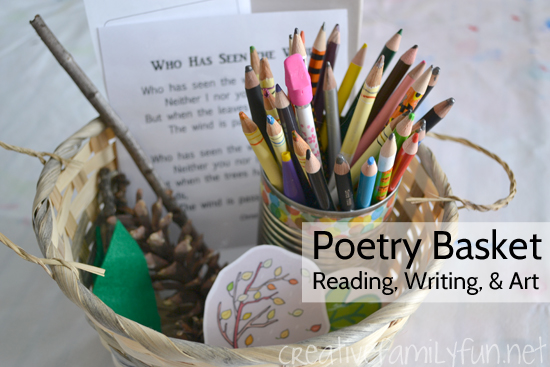
I started with the poem Who Has Seen the Wind? by Christina Rossetti. It’s a simple poem with beautiful imagery. I also knew the girls would easily identify with the poem. After all, we’ve experience many a windy day.

I printed out the poem and laminated it for durability.

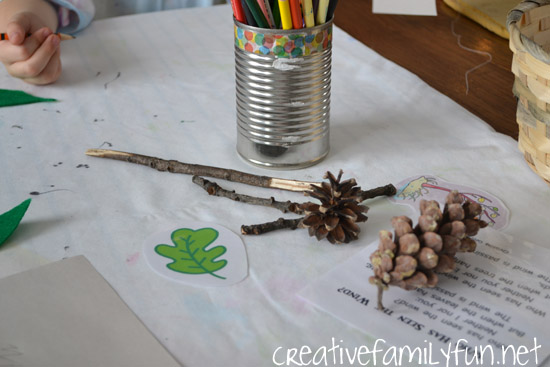
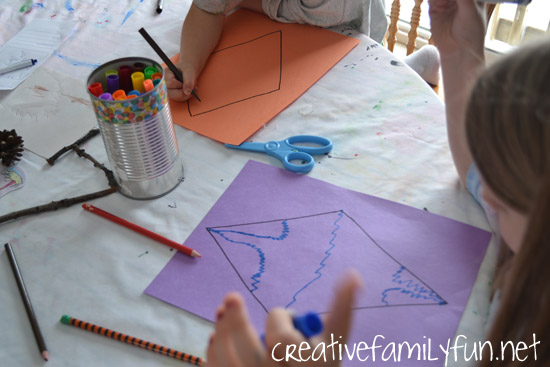
I also printed out a few pieces of clip art of trees and leaves. I included felt leaves, small sticks, pine cones, and acorns.

I added some drawing paper, writing paper, and colored pencils to round out the basket.

You can do this with any poem. Just add items mentioned in or inspired by your poem of choice.

We read the poem aloud a few times.

We talked about the wind. We talked about ways in which we would see the wind.

Then we pulled out the drawing paper.

Drawing Prompts:

*If the wind were a person, what would it look like?

*Draw a tree with its leaves blowing in the wind.

*What are some other ways that we can “see” wind? Draw them.

After drawing for awhile, it was time to start writing.

I provided some writing paper that had a square at the top for a picture and 5 short lines for writing.

My daughter is just starting to get comfortable writing and I didn’t want to overwhelm her with too much space for writing.

Writing Prompts:

*Write an acrostic poem using the word WIND.

*Write a pretend conversation between you and your imagined wind person. What would you ask him/her? How would he/she answer?

*How many words can you come up with that rhyme with wind?

*Write a poem about your favorite part of nature. Will you write about the sun, the moon, trees, flowers?

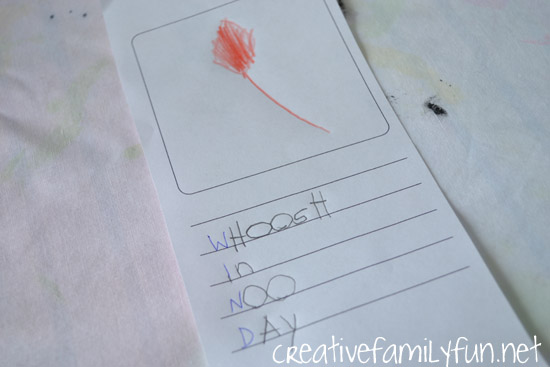
We chose to write the acrostic poem. My daughter enjoyed this style of poetry when we first learned about it and she wanted to try it again.

The above poem is all hers… spelling mistakes and all. I think I’ll keep it forever!

We definitely got our creative juices flowing, because by the time we were done writing our poems, the girls wanted to make kites. We found some construction paper, markers, and yarn and made a couple of simple kites.

The girls loved the poetry basket so much that they’ve requested more poems. What poem should we choose next?

10 Ways To Play This Weekend: Week 36

April 20, 2013 By Terri Thompson


  1. Make a hovercraft with Inspiration Laboratories
  2. Create scrubbing sponge flowers with Mess for Less
  3. Celebrate Earth Day with Creative Family Fun
  4. Play with recycled chalkboard toys with B-Inspired Mama
  5. Dissect a bean with Buggy and Buddy
  6. Go on a nature scavenger hunt with Sun Scholars
  7. Play in a dirt and worms sensory tub with Creative Playhouse
  8. Make giant bubbles with Frugal Fun for Boys
  9. Create fruit animals with Wildlife Fun 4 Kids
  10. Take care of the birds with homemade bird nesters with Childhood Beckons
How are you going to play this weekend?


Go Outside! Cards

April 18, 2013 By Terri Thompson

Back in the early days of this blog, my Go Outside Cards post was one of my most popular posts. It still has people stopping by daily.It was a simple idea to add a surprise element to your day.

The premise was simple. Write several outdoor activities on index cards, put them in an envelope, and have your kids choose one to kick-start their outdoor play.

Disclosure: There are Amazon Affiliate and other affiliate links in this article which means, at no additional cost to you, we could receive compensation for our recommendations. You can read our full disclosure policy on our Disclosure Page for more details.

The ideas on the cards weren’t complicated and most did not require any prep time or special supplies.

I’ve been wanting to update that post for a long time and now that spring is here, it seems like the perfect time.

I came up with 25 fun outdoor activities and created a free printable for you. I’ve even included 5 blank cards so you can add your own fun ideas.All you need to do is print them out, cut, hide in an envelope, and go have fun! Include all 25 or just pick the ones that work for your family.

I’ve got simple ideas such as play hopscotch, go on a nature walk, jump rope, search for bugs, and roll down a hill.I’ve included active play, nature play, and pretend play.

It’s a fun boredom buster and a great excuse to just get outside and play.


Click below to download and print your Go Outside! Cards. It is a pdf and designed to print on regular letter size paper. Print on card stock or laminate to make them more durable.

Click here for your Go Outside! Cards

As always, if you have difficulty downloading or printing, please let me know and I’ll get it fixed as soon as possible.

Have fun and go outside and play!

Make this a family adventure
Cost: Free
Planning Time: 15 minutes to print and prep your Go Outside! Cards. Prep time for activities varies. Most require minimal prep time.
Ages: All
Time Needed: Varies. You should be able to find an activity to fit the time limit that you have.
Notes: Keep your Go Outside! packet handy for last-minute family time. You’ll have a wealth of family activities at your fingertips.

10 Ways to Celebrate Earth Day

April 16, 2013 By Terri Thompson

Earth Day is coming up on April 22. It’s a day to celebrate the Earth and what it provides us.

We can also learn how we can help protect the Earth for ourselves, our children, and many generations to come.

So what can you do? Any little act can go a long way and once these little acts become habit, they become bigger acts.

Here are 10 ideas to celebrate Earth day.

Disclosure: There are Amazon Affiliate and other affiliate links in this article which means, at no additional cost to you, we could receive compensation for our recommendations. You can read our full disclosure policy on our Disclosure Page for more details.

1. Plant a tree. Plant a new tree in your yard, or if you don’t have a spot for a tree, you can have the National Arbor Day foundation plant one in a forest on your behalf.

2. Go on a hike and celebrate the beauty that the Earth provides you everyday. Here are some tips for hiking with children to help you enjoy the process.

3. Learn about composting and set up a compost bin. KidWorldCitizen has some great information to get you started, plus fun information to help teach your kids all about composting. You can also check out HowToCompost.org or the EPA’s information about composting at home. It will help reduce waste in our landfills and if you decide to do #7, you’ll have some fantastic free fertilizer to help those plants grow.

4. Brainstorm ways that your family can do more in helping the Earth. Do you need to turn off the lights more often? Can you recycle more? Can you replace paper items with cloth, such as napkins?

5. Observe wildlife. Learn about what animals need from us to live and remain in their environment. Can we do more to help them? You are never to old or too young to enjoy observing wildlife. It can be something as simple as watching a backyard bird feeder out your window. Here are a few tips to help you teach your young children how to observe nature.

6. Save up your pocket change or donate some of your allowance and send a donation to an organization that helps protect the Earth and the creatures that call it home. The World Wildlife Fund, the National Arbor Day Foundation, and The National Audobon Society are some possible organizations.

7. Plant a garden. Try to grow your own vegetables this year. Not only will you be eating healthier, but you’ll be reducing your carbon footprint. If you don’t have room for a garden, grow some potted herbs on your windowsill. And if you really don’t have a green thumb, vow to shop at your local farmer’s market more this year. There really is nothing better than garden-fresh vegetables.

8. Clean up your neighborhood, or a park. Take a walk through the neighborhood and pick up trash. Or, clean up a local park. Believe me, your neighbors will appreciate it, and who knows, maybe you’ll inspire someone else to do their part.

9. Go on a microsafari in your own yard. You will be amazed to discover everything that is growing in your yard. Grab your magnifying glass and get up close and personal with your yard.

10. Remake, reimagine, recycle. Is there something heading to the trash that you can remake into something else? Turn old jeans into fun aprons like these from Happy Hooligans. Or, you can turn old tank tops into reusable market bags, like these from Making Lemonade. What else can you remake?

The best part about these ideas is that they’re not just for Earth Day. You can do them any day of year. So why not make Earth Day everyday?

What are some ideas you would add to the list?

Around the World in 12 Dishes: France

April 15, 2013 By Terri Thompson

This month, Around the World in 12 Dishes landed in France.

Ah France! It’s the country at the very tip top of my dream travel list, so I was excited to do this month’s projects.

The girls and I haven’t explored much about France, so I decided to start with one of the most recognizable landmarks in the country, the Eiffel Tower. We looked at pictures, learned a few things about the Eiffel Tower, then created some beautiful artwork.

Disclosure: There are Amazon Affiliate and other affiliate links in this article which means, at no additional cost to you, we could receive compensation for our recommendations. You can read our full disclosure policy on our Disclosure Page for more details.

Supplies Needed:

Black paper
Chalk
Scissors
Glue
White pape
Paint

For the first step in this project, we drew the Eiffel Tower.

Wait, I take that back, I drew the Eiffel Tower.

My original plan was to give the girls a pencil outline of the tower, then let them trace it with chalk and fill in the details. They didn’t want to. They wanted to paint. Oh well, we trudged along and I drew their towers.

In case you’re wondering, yes, the chalk will smudge. If you don’t want it to, spray a light coat of hairspray over the drawing (a trick I learned in high school art class).

If you’re like us, and don’t own any hairspray, just be careful not to touch the chalk or redraw any smudged parts. Once you’ve drawn the Tower, cut it out.

While I was drawing, the girls were painting their backgrounds. They painted the sky, a pond, a garden with flowers, and a bright yellow sun. They really got into it and enjoyed spending the time painting.

Once they were finished with their paintings and the paint had dried a bit, we glued their Eiffel Towers to their paintings.

The completed paintings were wonderful! I would have loved to have seen their version of the Eiffel Tower, but you can’t win them all. I don’t want to pressure them when it comes to art because I don’t want to do anything to take away their joy of creating.

Would you like to join in this month? You can download a printable passport page here and a placemat here.

  • « Go to Previous Page
  • Page 1
  • Interim pages omitted …
  • Page 120
  • Page 121
  • Page 122
  • Page 123
  • Page 124
  • Interim pages omitted …
  • Page 190
  • Go to Next Page »

Primary Sidebar

Footer

Categories

Archives

Copyright © 2026 · Designed by The Blog Surgery

Creative Family Fun uses cookies to improve your experience. These cookies provide feedback to our analytics and advertisers. We use the information to track views of the site, where you go and to know if you are a regular visitor or brand new as well as provide a personalized experience where possible. We'll assume you're ok with this, but you can opt-out if you wish.Accept Reject Read More
Privacy & Cookies Policy

Privacy Overview

This website uses cookies to improve your experience while you navigate through the website. Out of these, the cookies that are categorized as necessary are stored on your browser as they are essential for the working of basic functionalities of the website. We also use third-party cookies that help us analyze and understand how you use this website. These cookies will be stored in your browser only with your consent. You also have the option to opt-out of these cookies. But opting out of some of these cookies may affect your browsing experience.
Necessary
Always Enabled
Necessary cookies are absolutely essential for the website to function properly. This category only includes cookies that ensures basic functionalities and security features of the website. These cookies do not store any personal information.
Non-necessary
Any cookies that may not be particularly necessary for the website to function and is used specifically to collect user personal data via analytics, ads, other embedded contents are termed as non-necessary cookies. It is mandatory to procure user consent prior to running these cookies on your website.
SAVE & ACCEPT